authentication
Muximux supports four authentication methods, configured via auth.method in config.yaml:
| Method | Description |
|---|---|
none |
No authentication (default) |
builtin |
Username/password login managed by Muximux |
forward_auth |
Delegates to an external auth proxy (Authelia, Authentik, etc.) |
oidc |
OpenID Connect with an identity provider (Keycloak, Auth0, Okta, etc.) |
The default is none.
auth:
  method: none
Anyone who can reach Muximux can use it. This is suitable for trusted networks or when authentication is already handled externally (e.g., VPN-only access).
Username/password login with bcrypt-hashed passwords and cookie-based sessions.
auth:
  method: builtin
  session_max_age: 24h        # How long sessions last (default: 24h)
  secure_cookies: true         # Set true if serving over HTTPS
  api_key_hash: "$2a$12$..."    # Optional: bcrypt hash of API key (see below)
  users:
    - username: admin
      password_hash: "$2a$12$..."  # bcrypt hash
      role: admin
      email: admin@example.com     # Optional
      display_name: "Admin User"   # Optional
    - username: viewer
      password_hash: "$2a$12$..."
role: userUse the built-in hash subcommand:
muximux hashThis prompts for a password (input is hidden) and outputs a bcrypt hash to paste into config.yaml.
You can also pass the value as an argument (useful for scripting):
muximux hash 'my-secret-password'Alternatively, use any bcrypt tool:
# Using htpasswd (from apache2-utils)
htpasswd -nbBC 12 "" 'my-secret-password' | cut -d: -f2

# Using Python
python3 -c "import bcrypt; print(bcrypt.hashpw(b'my-secret-password', bcrypt.gensalt()).decode())"-
admin-- Full access. Can modify settings, manage apps, groups, themes, icons, and users. -
power-user-- Extended dashboard access. Can view and interact with apps with elevated permissions but cannot manage users or change security settings. -
user-- Dashboard access. Can view and interact with apps but cannot change configuration.
- Cookie-based (cookie name:
muximux_session) - Automatically refreshed on activity
- Can be invalidated by changing the user's password (all other sessions for that user are invalidated)
-
session_max_ageaccepts duration strings like1h,24h,7d
For use behind a reverse proxy that handles authentication. Muximux reads user identity from HTTP headers set by the auth proxy.
auth:
  method: forward_auth
  trusted_proxies:
    - 192.168.0.0/16
    - 172.16.0.0/12
    - 10.0.0.0/8
  headers:
    user: Remote-User        # Header containing username (default: Remote-User)
    email: Remote-Email      # Header containing email (default: Remote-Email)
    groups: Remote-Groups    # Header containing groups (default: Remote-Groups)
    name: Remote-Name        # Header containing display name (default: Remote-Name)
  logout_url: https://auth.example.com/logout  # Optional: redirect here on sign-out
IMPORTANT:
trusted_proxiesis required. Muximux will reject all forward auth requests if no trusted proxies are configured. This prevents users from spoofing auth headers by connecting directly.
Only the direct TCP connection IP (from RemoteAddr) is checked against trusted proxies -- forwarded headers like X-Forwarded-For are not trusted for this check.
When logout_url is set, clicking "Logout" in Muximux clears the local session and redirects the browser to the auth provider's logout endpoint. Without this, the user's external session remains valid and they are silently re-authenticated on the next page load.
Authelia:
logout_url: https://auth.example.com/logoutAuthentik:
# For proxy outpost (forward auth mode):
logout_url: https://app.example.com/outpost.goauthentik.io/sign_out

# For domain-level outpost:
logout_url: https://auth.example.com/outpost.goauthentik.io/sign_out
Caddy Security (caddy-security plugin):
logout_url: https://auth.example.com/logoutTraefik Forward Auth (thomseddon/traefik-forward-auth):
logout_url: https://auth.example.com/_oauth/logoutOrganizr:
logout_url: https://organizr.example.com/api/v2/logoutIf your provider is not listed, check its documentation for the logout or sign-out endpoint URL.
Users whose groups contain "admin", "admins", or "administrators" (case-insensitive match) are automatically assigned the admin role.
To use a different group name, set forward_auth_admin_groups on the auth block. When set, it replaces the default list; group matching stays case-insensitive.
auth:
  method: forward_auth
  forward_auth_admin_groups:
- dashboard-adminsWhen forward auth is enabled, Muximux will not show a login form. Instead, users who reach Muximux without being authenticated (e.g., by accessing the internal IP directly instead of through the reverse proxy) see an informational message explaining that authentication is handled by an external provider.
This prevents confusion from showing a username/password form that cannot be used -- since forward auth delegates all authentication to the reverse proxy, there are no local credentials to enter.
Your reverse proxy (Nginx, Traefik, Caddy) authenticates users via Authelia, then forwards the request to Muximux with identity headers. Muximux reads these headers and creates a session.
Direct integration with identity providers like Authentik, Keycloak, Auth0, Okta, and others.
auth:
  method: oidc
  oidc:
    enabled: true
    issuer_url: https://auth.example.com     # OIDC discovery endpoint base
    client_id: muximux
    client_secret: ${OIDC_CLIENT_SECRET}      # Supports env var expansion
    redirect_url: https://muximux.example.com/api/auth/oidc/callback
    scopes:                                   # Default: [openid, profile, email]
      - openid
      - profile
      - email
    username_claim: preferred_username         # Default: preferred_username
    email_claim: email                        # Default: email
    groups_claim: groups                       # Default: groups
    display_name_claim: name                  # Default: name
    admin_groups:                             # Groups that grant admin role
      - admins
- muximux-admins- User clicks "Login with SSO" on the login page.
- The browser redirects to the OIDC provider's login page.
- After authentication, the provider redirects back to Muximux's callback URL.
- Muximux exchanges the authorization code for tokens.
- User info is fetched from the provider's userinfo endpoint.
- A local session is created.
- Create a new application/client in your provider.
- Set the redirect/callback URL to:
https://your-muximux-domain/api/auth/oidc/callback - Note the client ID and client secret.
- The issuer URL is usually the base URL of your provider (e.g.,
https://auth.example.com/application/o/muximux/for Authentik).
For step-by-step instructions tailored to a specific provider, including how to surface group memberships so admin_groups matches:
- Microsoft Entra ID (formerly Azure AD)
- Keycloak
- Authentik
- Pocket ID -- minimal self-hosted IdP with passkey sign-in
- Zitadel -- self-hosted IdP with project roles as groups
- Google (consumer + Workspace; no group support)
- Authelia (forward auth or OIDC)
- Cloudflare Access -- Cloudflare Zero Trust as forward auth
Use ${VAR_NAME} syntax in config.yaml to reference environment variables. This is useful for secrets:
client_secret: ${OIDC_CLIENT_SECRET}min_role gates an app on the user's role tier (admin > power-user > user). For finer slicing, you can also restrict an app to specific groups the user belongs to.
apps:
  - name: Internal Wiki
    url: http://wiki.internal:8080
    proxy: true
    allowed_groups: [staff, contractors]   # only users in one of these groups see the app

  - name: Production Console
    url: http://prod.internal
    proxy: true
    min_role: admin                         # role gate
    allowed_groups: [sre, on-call]          # AND group gate

  - name: Status Page
    url: http://status.internal
    proxy: true
    # No allowed_groups -> visible to anyone who clears min_role (default behavior)
Rules:
-
allowed_groupsempty or missing -> no group gate. Existing configs keep working. -
allowed_groupsset -> the user needs to be in at least one of those groups to see and reach the app. -
min_roleandallowed_groupsare additive. If both are set, both must match. - Group names are matched case-insensitive, so
Developersanddevelopersboth work. -
Admins always see every app, regardless of
allowed_groups. This mirrors howmin_roleis bypassed by the role hierarchy.
| Auth method | Source of group memberships |
|---|---|
| Built-in (password) | The optional groups: [...] field on each user in auth.users[], editable via Settings -> Security -> Users. |
| OIDC | The configured groups_claim (default groups) on each sign-in. Group membership is owned by your IdP. |
| Forward auth | The Remote-Groups header (configurable via auth.headers.groups). Group membership is owned by your auth proxy. |
For OIDC and forward-auth users, group membership refreshes when they log in again. Mid-session changes on the IdP side don't propagate until the user re-authenticates.
In config.yaml:
auth:
  method: builtin
  users:
    - username: alice
      password_hash: "$2a$12$..."
      role: user
      groups:
        - developers
        - on-call
    - username: bob
      password_hash: "$2a$12$..."
      role: user
      # No groups -> only sees apps with no allowed_groups gate
Or in the UI: Settings -> Security -> Users, type a comma-separated list in the Groups field next to the user's role. The change saves on blur.
OIDC users inherit groups from their IdP claim, so the work happens on the IdP side. See the per-provider guides for the exact configuration needed:
-
Microsoft Entra ID -- emit Security Group display names in the
groupsclaim - Keycloak -- add a Group Membership mapper, full path off
-
Authentik -- enable the
groupsscope and property mapping - Pocket ID -- assign users to groups in the admin UI
-
Zitadel -- create project roles, point
groups_claimaturn:zitadel:iam:org:project:roles -
Authelia -- groups arrive via
Remote-Groups(forward auth) or thegroupsclaim (OIDC)
A user with no groups passes the role gate but fails any non-empty allowed_groups gate. So apps without allowed_groups stay visible; apps with allowed_groups become invisible. This is intentional: it means a misconfigured IdP claim defaults to "no access" rather than "access to everything", which is the safer side to land on.
Muximux supports an instance-wide API key that non-browser integrations (scripts, webhooks, other services) can present in the X-Api-Key header instead of a session cookie. The key is what lets a tool like Seerr or a cron job reach Muximux without having to maintain a logged-in session.
Important scope note: the API key is not a universal bypass. It only authenticates requests whose path has been allowlisted with require_api_key: true. Everything else still requires a session cookie. This keeps a leaked key's blast radius bounded to exactly the endpoints the operator has opted in.
Out of the box, these paths accept X-Api-Key:
| Path | What it's for |
|---|---|
GET /api/appearance |
Embedded / external apps fetching Muximux's current language and theme (see Apps > Appearance API). |
Additionally, operators can allowlist per-app proxy paths via auth_bypass on each proxied app. This is the common integration pattern: expose a backend app's own API (e.g. Sonarr's /api/v3/*) through the Muximux reverse proxy, gated by the Muximux API key at the front door. See Apps > Per-App Auth Bypass for the full setup.
apps:
  - name: Sonarr
    url: http://sonarr:8989
    proxy: true
    # Muximux -> Sonarr: Sonarr's own auth (so the user doesn't see it)
    proxy_headers:
      X-Api-Key: "${SONARR_API_KEY}"
    # Caller -> Muximux: require the Muximux API key on /api/*
    auth_bypass:
      - path: /api/*
        methods: [GET, POST]
        require_api_key: true
Seerr calls:
curl -H "X-Api-Key: $MUXIMUX_API_KEY" \
  https://muximux.example.com/proxy/sonarr/api/v3/series
Muximux validates the Muximux key at the front door, then forwards the request to Sonarr with Sonarr's own API key injected as a header. Two different keys, two different jobs, in the same request.
Say you run a self-hosted CI tool behind Muximux at /proxy/ci/ and want GitHub to POST to its webhook receiver. GitHub does not have a Muximux session cookie and never will, so without an auth_bypass rule the request gets a 401.
Configure the proxied app to accept the Muximux API key on the exact webhook path:
apps:
  - name: CI
    url: http://ci.internal:8080
    proxy: true
    # Caller -> Muximux: only the webhook path, only POST, only with the API key.
    auth_bypass:
      - path: /proxy/ci/hooks/github
        methods: [POST]
        require_api_key: true
In GitHub, configure the webhook with:
-
Payload URL:
https://muximux.example.com/proxy/ci/hooks/github -
Content type:
application/json -
Secret: GitHub's HMAC secret if you use one. This is independent of the Muximux key and rides through the proxy as the standard
X-Hub-Signature-256header. -
Custom header:
X-Api-Key: <your Muximux API key>. (GitHub's webhook UI does not let you add arbitrary headers, so you typically run the webhook through a small relay that adds the header. Other services like Linear, Sentry, Tailscale, or n8n let you set custom headers directly.)
Then the request flow is:
- External service POSTs to
https://muximux.example.com/proxy/ci/hooks/githubwithX-Api-Key. - Muximux's
auth_bypassmatches/proxy/ci/hooks/github+POST+require_api_key: true, verifies the bcrypt hash, and lets the request through without a session cookie. - Muximux's reverse proxy forwards the request to
http://ci.internal:8080/hooks/github. The original payload,X-Hub-Signature-256, and other app-specific headers ride through unchanged. - The CI tool processes the webhook normally.
Scope is tight by design: this rule allows only POST /proxy/ci/hooks/github. The same key cannot hit GET /proxy/ci/admin or any other /api/* endpoint that has not been allowlisted.
Header note: Muximux does not strip the inbound
X-Api-Keyheader before forwarding to the backend. If the proxied app readsX-Api-Keyfor its own auth (Sonarr, Radarr, Prowlarr, Lidarr, Bazarr all do), setproxy_headers.X-Api-Key: "<backend-key>"on the app so Muximux overwrites the inbound key with the backend's own key before forwarding. If the backend ignoresX-Api-Key, no action is needed: the Muximux key just rides through and gets dropped on the backend's floor.
The following endpoints always require a session cookie (logged-in user). Sending X-Api-Key against them has no effect -- the request still gets a 401:
-
GET /api/config,PUT /api/config(dashboard configuration) -
GET/POST /api/apps,GET/POST /api/groups(app and group CRUD) -
GET/POST /api/themes(theme CRUD) -
GET/POST/DELETE /api/auth/users(user management) -
POST /api/auth/password(password change) - Every other
/api/*path not explicitly listed above
This is deliberate. A session cookie is attributable to a specific user in audit logs, is HttpOnly so JavaScript can't read it, and expires on its own. A bearer token like an API key doesn't have any of those properties, so it doesn't get to drive state-changing administrative endpoints.
The API key is stored as a bcrypt hash in config.yaml -- not as plaintext. When a request arrives with X-Api-Key, Muximux verifies it against the stored hash using bcrypt.CompareHashAndPassword. This means:
- The original API key cannot be recovered from the config file
- If
config.yamlis compromised, the attacker cannot extract the key - Verification is constant-time, preventing timing attacks
Recommended: in the UI. Open Settings → Security → API Key as an admin and click Generate API key. Muximux uses 32 bytes of crypto/rand, prefixes the result with muximux_ so a leaked key is recognisable, and stores only the bcrypt hash on disk. The plaintext is shown exactly once so you can copy it into your integration. If you lose it, click Rotate to generate a new one. Delete clears the configured key, after which every allowlisted path immediately stops accepting X-Api-Key.
Alternative: command line. If you want to set a key you generated yourself, hash it first and write the hash into config.yaml:
# Using the built-in hash subcommand
muximux hash 'my-api-key'

# Using htpasswd
htpasswd -nbBC 12 "" 'my-api-key' | cut -d: -f2auth:
method: builtin
api_key_hash: "$2a$12$..."Restart Muximux and the key is live. The UI then reports the key as configured and offers Rotate / Delete from there on.
-
Keep the key out of browser code.
X-Api-Keyis a bearer token; anyone who sees it can authenticate as that key. Put it on server-side integrations, not in JavaScript loaded by untrusted users. -
Rotating the key invalidates every integration at once -- there's only one
api_key_hashper instance. Coordinate the swap. -
Disable the key by removing
api_key_hashfrom config (or clearing it in the UI). Every allowlisted path immediately stops acceptingX-Api-Key. -
Audit logs for API-key requests show a sentinel user (not a human username). If you need per-integration attribution, use separate proxied apps with their own
auth_bypassrules.
Muximux authentication controls access to the Muximux dashboard and its API. It does not automatically protect the apps you add to it. Three configurations to be aware of:
-
With
proxy: true, noauth_bypass-- Requests to the app go through Muximux's built-in reverse proxy, where a Muximux login session is required. Users must be logged in to reach the app. This is the secure option for interactive use. -
With
proxy: trueandauth_bypassrules -- Specific paths on the proxied app can be opened to non-browser integrations that present the Muximux API key (see Per-App Auth Bypass and the Sonarr / Seerr example in API Key Authentication). Muximux still sits in the request path, so: the Muximux API key gates the front door, andproxy_headersinjects the backend's own credentials on the way through -- the external caller never sees the backend's key. This is how you expose a backend API to another service without giving that service a Muximux login. -
Without
proxy: true-- The browser loads the app directly from its own URL (in an iframe, new tab, etc.). Muximux is not in the request path and has no ability to block or authenticate those requests. Anyone who knows the app's URL can access it directly.
Bottom line: If you expose Muximux to the internet and want it to gate access to your apps, enable the reverse proxy for those apps. If other services need to call a backend app's API through Muximux, add an auth_bypass rule with require_api_key: true for the specific paths those services need. Otherwise, secure your apps with their own authentication, a separate reverse proxy, or a VPN.
See Apps & Groups > Open Modes for more details on the three-way choice and Per-App Auth Bypass for the integration pattern.
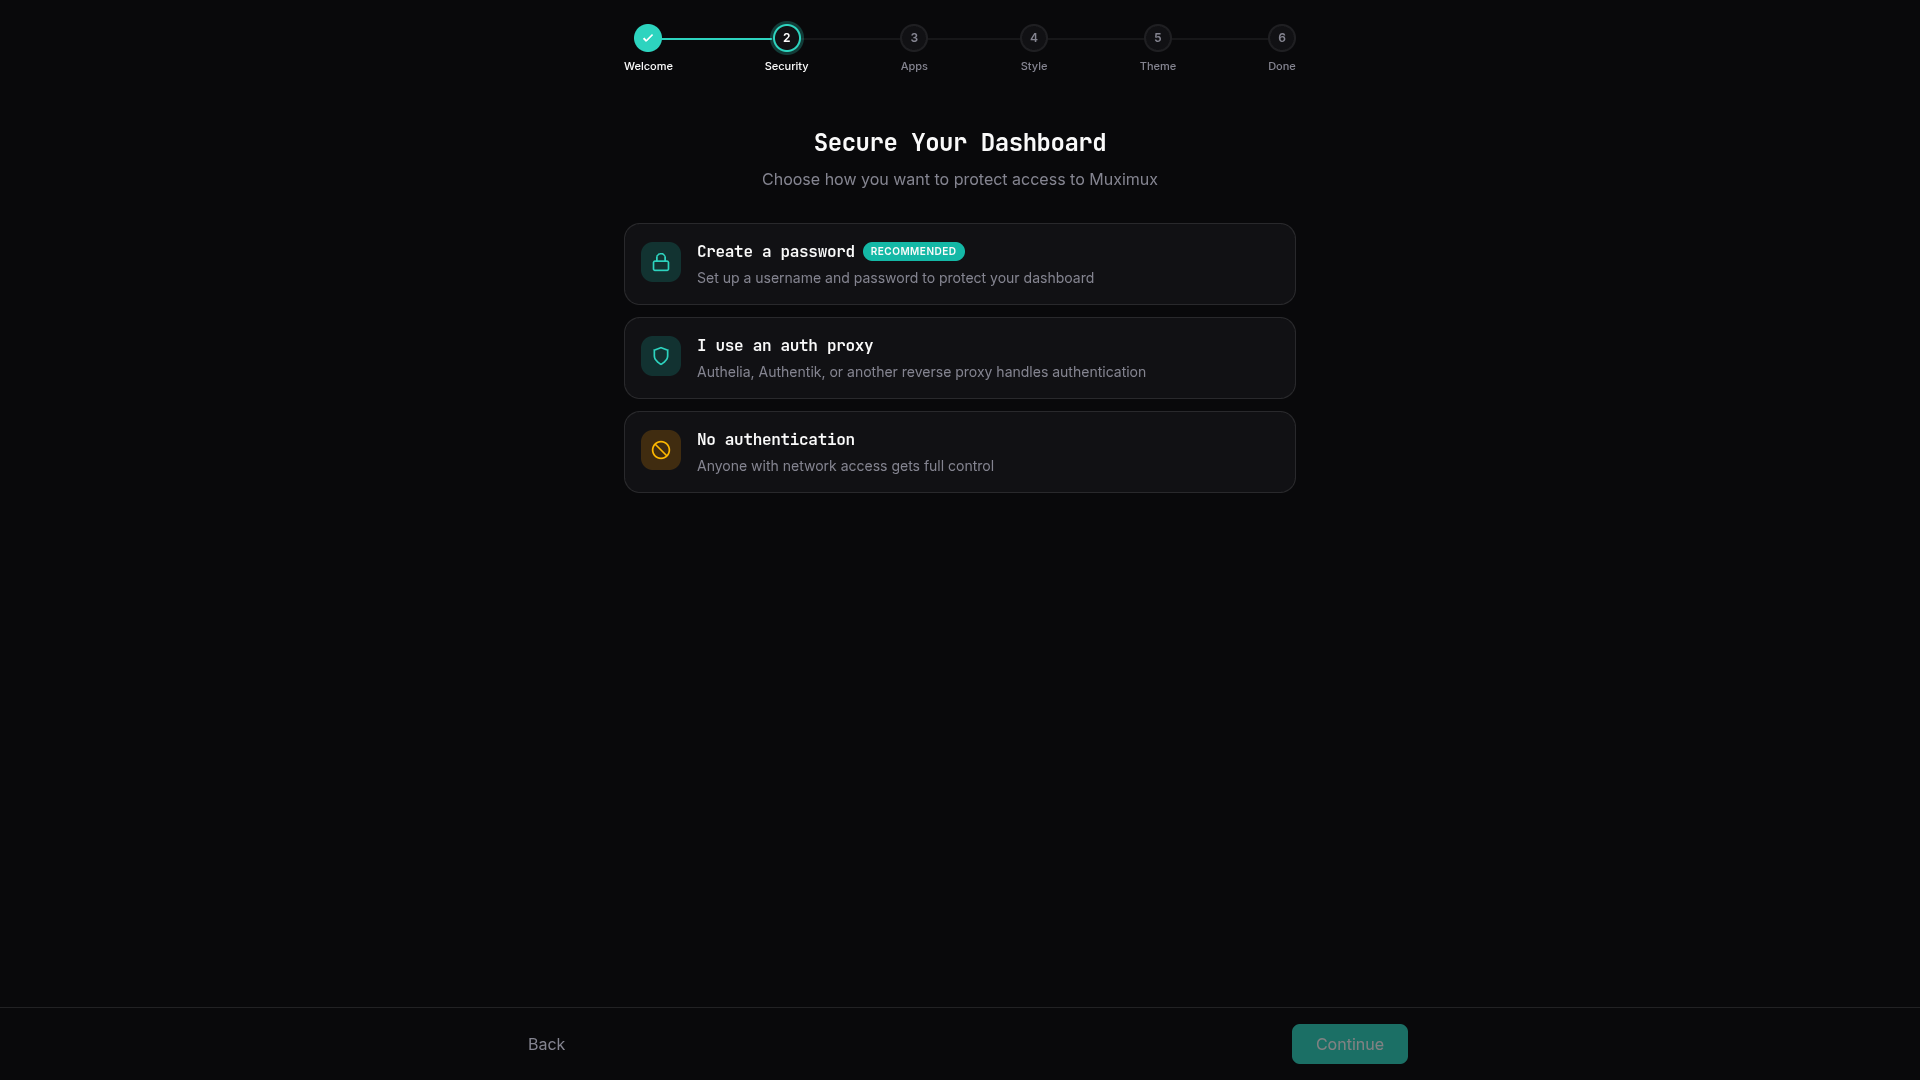
When Muximux starts with no configuration, the onboarding wizard includes a Security step that lets you configure authentication before anything else. You can choose between password authentication, forward auth, or no authentication. This ensures the dashboard is secured from the first launch.
If authentication is already configured (or you're running behind an auth proxy), the security step is skipped and the wizard proceeds directly to app setup.
To stop an attacker on the same network from racing the legitimate operator through the onboarding wizard, Muximux generates a one-time setup token on first boot. The wizard (and the restore-from-backup flow) refuse to proceed without it. The token is only required during initial setup; once setup completes it is destroyed.
Find the token one of two ways:
-
Server log / stdout. At first boot, Muximux prints a log line tagged with the token, for example via
docker logs muximuxor the systemd journal. Look forGenerated new setup tokenorReusing existing setup token(the latter appears on restarts that happen before setup is complete). -
Filesystem. The token is also written to
<dataDir>/.setup-tokenwith mode0600. On a default Docker deployment that's/app/data/.setup-tokeninside the container.
Paste the token into the Setup token field on the onboarding wizard's welcome screen. The wizard sends it as an X-Setup-Token HTTP header on the underlying setup and restore requests. Once setup is complete the token file is removed and the header is no longer accepted -- the setup endpoints reject every request after that point.
Admin users can manage accounts from Settings > Security > User Management:
- Add users -- Set a username, password (minimum 8 characters), and role
- Change roles -- Promote or demote users via the role dropdown
- Delete users -- Remove accounts (you cannot delete yourself or the last admin)
These changes take effect immediately and are persisted to config.yaml. Users can also be managed via the User Management API.
Admin users can switch the authentication method from Settings > Security without restarting Muximux. The available options are:
- Password -- Built-in username/password authentication
- Auth Proxy -- Forward auth via Authelia, Authentik, etc. (requires trusted proxy IPs)
- None -- No authentication
When switching to a different method, existing user accounts are preserved in the configuration but only authenticate when the method matches. For example, switching from builtin to forward_auth means password logins stop working, but the user records remain in config.yaml and will work again if you switch back.
Auth method changes can also be made via the API.
Users can change their own password via Settings > Security or the POST /api/auth/password endpoint. Changing a password invalidates all other sessions for that user (except the current one).
Password requirements: minimum 8 characters.