Example app showing Flutter flavors configuration for Android and iOS. I am going to build a sample app with three flavors: develop, staging, production. Flutter flavors support is not very well documented in the official docs (yet) - they point to the following three articles as of writing
- Config Variables for your Flutter apps with flutter_config
- Flutter Launcher Icons
- Build flavors in Flutter(Android and iOS) with different Firease project per flavor
Running your app: This project has the following flavors:
- production:
flutter run --flavor production - staging:
flutter run --flavor staging - develop:
flutter run --flavor develop
| Android | iOS |
|---|---|
 |
 |
Flavors are typically to build your app for different environments such as develop and production.
- develop version of the app might want to point to an API host at
dev.api.myapp.com - production version of the app might want to point to
api.myapp.com
Instead of hardcoding these values into variables and building an app for every environment manually, the right approach is to use flavors, and supply these values as build time configurations.
dependencies:
    flutter_config: 2.0.0
    flutter_launcher_icons: 0.9.2

    ///Demo different Firease project per flavor
    firebase_core: 1.6.0
    firebase_messaging: 10.0.6
Step 1: Build flavors and config variables for your Flutter apps with flutter_config
Save config for different environments in different files: .env, .env.staging, .env.dev
- Create a new file
.envin the root of your Flutter app:ENVIRONMENT=PRODUCTION - Load all environment variables in
main.dartimport 'package:flutter_config/flutter_config.dart'; void main() async { WidgetsFlutterBinding.ensureInitialized(); // Required by FlutterConfig await FlutterConfig.loadEnvVariables(); runApp(MyApp()); }
-
Manually apply a plugin to your app, from
android/app/build.gradle: Belowapply from: "$flutterRoot/packages/flutter_tools/gradle/flutter.gradle", add the following lines:project.ext.envConfigFiles = [ developdebug: ".env.dev", developrelease: ".env.dev", stagingdebug: ".env.staging", stagingrelease: ".env.staging", productiondebug: ".env", productionrelease: ".env", ] apply from: project(':flutter_config').projectDir.getPath() + "/dotenv.gradle"Add productFlavors look like:
android {
    ...
    flavorDimensions "flavors"

    productFlavors {
        develop {
            dimension "flavors"
            applicationIdSuffix ".dev"
            manifestPlaceholders = [appName: "[DEV] example_with_flavors"]
        }
        staging {
            dimension "flavors"
            applicationIdSuffix ".stg"
            manifestPlaceholders = [appName: "[STG] example_with_flavors"]
        }
        production {
            dimension "flavors"
            applicationIdSuffix ""
            manifestPlaceholders = [appName: "example_with_flavors"]
        }
    }
}
To support different build variants.
defaultConfig {
    ...
    resValue "string", "build_config_package", "YOUR_PACKAGE_NAME_IN_ANDROIDMANIFEST.XML"
}
NOTE : Where
YOUR_PACKAGE_NAME_IN_ANDROIDMANIFEST.XMLshould be replaced with your app's package name. -
Also make sure
${appName}value is assigned forandroid:labelattribute in the manifest (android/app/src/main/AndroidManifest.xml)<application ... android:label="${appName}" ... -
Build a release version When building your apk for release, the R8 code shrinker obfuscates the
BuildConfigclass which holds all the env variables and thus causes all the env variables to be null. To prevent this, the following has to be done: -- Add fileandroid/app/proguard-rules.proto your app's project. -- Add the below line to the newly createdproguard-rules.profile:-keep class com.yourcompany.app.BuildConfig { *; }where
com.yourcompany.appshould be replaced with your app's package name.
- Under
Runner/Flutter. Add the following code to bothDebug.xcconfigandRelease.xcconfig#include? "tmp.xcconfig"It is also recommended to add this file to gitignore
**/ios/Flutter/tmp.xcconfig - In the Xcode menu, go to
Product>Scheme>Edit Scheme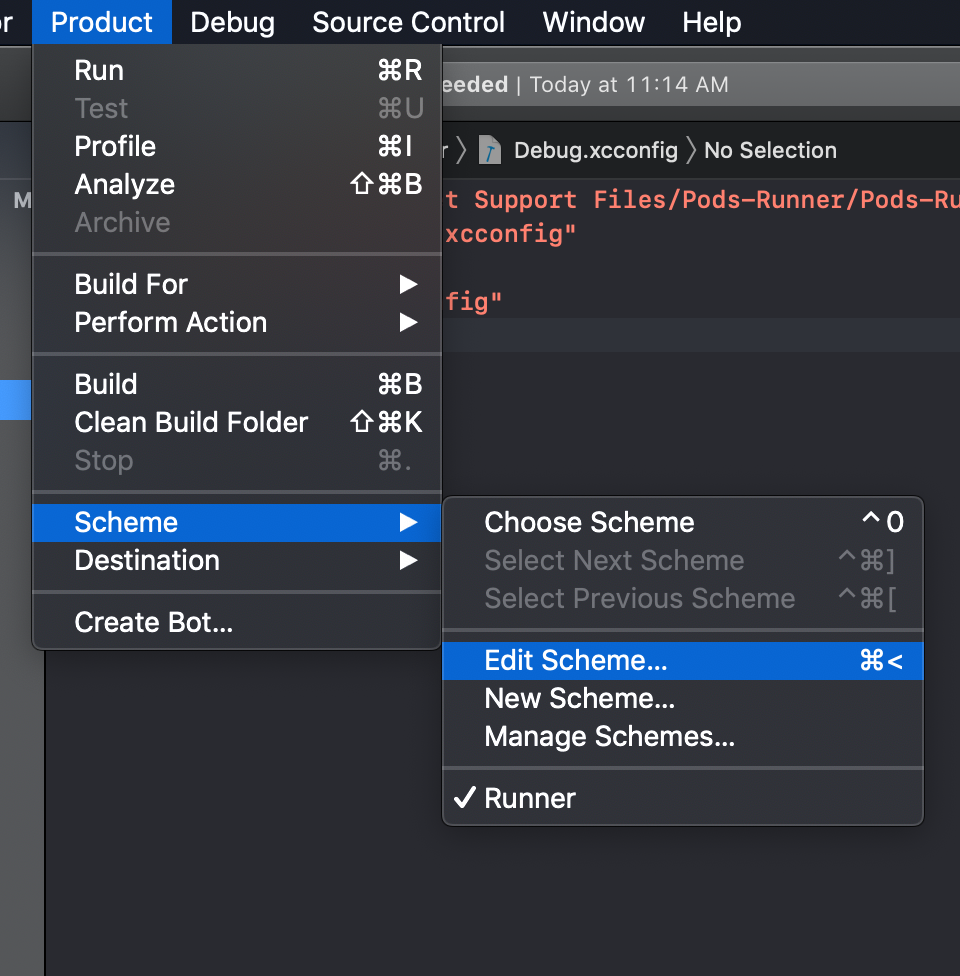
- Under
Build>Pre-actionsyou need to add 2 new run script actions with the following code:
echo ".env" > ${SRCROOT}/.envfile${SRCROOT}/.symlinks/plugins/flutter_config/ios/Classes/BuildXCConfig.rb ${SRCROOT}/ ${SRCROOT}/Flutter/tmp.xcconfig - Make sure you select
Runnerfrom theProvide build settings fromdropdown Your finished scripts should look like this:
- Creating new scheme for
developandstagingenvironments:- In the Xcode menu, go to
Product>Scheme>Edit Scheme - Click
Duplicate Schemeon the bottom - Give it a proper name (
develop,staging) on the top left. - In the Xcode menu, go to
Product>Scheme>Edit Schemes> select your scheme (develop,staging) > Follow steps3and4again for each scheme and replace you env filesecho ".env.staging" > ${SRCROOT}/.envfile # replace .env.staging for your fileecho ".env.dev" > ${SRCROOT}/.envfile # replace .env.dev for your file
- In the Xcode menu, go to
- Rename
Runnerscheme toproduction- In the Xcode menu, go to
Product>Scheme>Manage Schemes... - Select
Runnerand rename toproduction
- In the Xcode menu, go to
- Create build configurations...
- Target project >
PROJECTS>Runner>Info>Configurations - Create
developandstagingconfigurations- Click
+> Duplicate ["Debug","Release","Profile"] Configuration - Rename
Debug copy,Release copy,Profile copyto:Debug-develop,Release-develop,Profile-developDebug-staging,Release-staging,Profile-staging
- Click
- Then rename
Debug,Release,ProfiletoDebug-production,Release-production,Profile-production
- Target project >
- Change the app name to be different for all schemes:
- Target project >
TARGETS>Runner>Build Settings> Click+>Add User-Defined Setting> RenameNEW_SETTINGtoAPP_DISPLAY_NAME> Give proper name for all schemes... - Update
Info.plistto includeAPP_DISPLAY_NAMEproperty<dict> ... <key>CFBundleDisplayName</key> <string>$(APP_DISPLAY_NAME)</string> ... </dict>
- Target project >
- Change the app bundle identifier to be different for all schemes:
- Target project >
TARGETS>Runner>Build Settings>Packing>Product Bundle Identifier> Give proper bundle identifier for all schemes...
- Target project >


- Setting
Build Flavor, Android Studio > Clickmain.dartdropdown button >Edit Configurations> Set flavor namedevelop/staging/productionatBuild flavor>Apply>OK> ClickRunbutton. - Command
flutter run --flavor develop
flutter build apk --flavor staging
...

- Copy launcher icons into
assets/launcher_iconfolder. - Config file is called
flutter_launcher_icons-<flavor>.yamlby replacing by the name of your desired flavor.For instance: develop
flutter_icons: android: true ios: true image_path: "assets/launcher_icon/demo-icon-dev.png" - Run this command to create all launcher icons for all flavors:
flutter pub run flutter_launcher_icons:main -f flutter_launcher_icons-${flavor_name}.yaml - (OPTIONAL) Create adaptive icons for Android:
- Select
android>Flutter>Open Android module in Android Studio - Select your format project:
Project android>app>src> Select <flavor_folder> thenRight click>New>Image Asset> give image path atPath>Next.- Select flavor_name at
Res Directory> clickFinish - Final it should be look like:
- Select
- Make sure iOS project is configured properly.
Runner>Assets.xcassetslook like:- Select Project Target >
TARGETS>Runner>Build Settings>Asset Catalog Complier - Options>Asset Catalog App Icon Set Name> Correct flavor is mapping with App Icon.
- Now, run your flavor and view app icon.


Create the app for iOS and Android in Firebase console and download GoogleService-Info.plist and google-services.json respectively:

You can have multiple google-services.json files for different build variants by replacing google-services.json files in dedicated directories named for each variant under the app module root. Configuration could be organized like this:

- First, we will keep the
GoogleServices-Info.plistfiles for each flavor in a separate folder like follows... GoogleServices-Info.plistfile is copied into the correct location, i.e inside theRunnerdirectory. This can be accomplished by adding a new Run script Build Phase to the target...The script I used is below:
environment="develop"

# Regex to extract the scheme name from the Build Configuration
# We have named our Build Configurations as Debug-dev, Debug-prod etc.
# Here, dev and prod are the scheme names. This kind of naming is required by Flutter for flavors to work.
# We are using the $CONFIGURATION variable available in the XCode build environment to extract
# the environment (or flavor)
# For eg.
# If CONFIGURATION="Debug-prod", then environment will get set to "prod".
if [[ $CONFIGURATION =~ -([^-]*)$ ]]; then
environment=${BASH_REMATCH[1]}
fi

echo $environment

# Name and path of the resource we're copying
GOOGLESERVICE_INFO_PLIST=GoogleService-Info.plist
GOOGLESERVICE_INFO_FILE=${PROJECT_DIR}/config/${environment}/${GOOGLESERVICE_INFO_PLIST}

# Make sure GoogleService-Info.plist exists
echo "Looking for ${GOOGLESERVICE_INFO_PLIST} in ${GOOGLESERVICE_INFO_FILE}"
if [ ! -f $GOOGLESERVICE_INFO_FILE ]
then
echo "No GoogleService-Info.plist found. Please ensure it's in the proper directory."
exit 1
fi

# Get a reference to the destination location for the GoogleService-Info.plist
# This is the default location where Firebase init code expects to find GoogleServices-Info.plist file
PLIST_DESTINATION=${BUILT_PRODUCTS_DIR}/${PRODUCT_NAME}.app
echo "Will copy ${GOOGLESERVICE_INFO_PLIST} to final destination: ${PLIST_DESTINATION}"

# Copy over the prod GoogleService-Info.plist for Release builds
cp "${GOOGLESERVICE_INFO_FILE}" "${PLIST_DESTINATION}"


flutter run --flavor develop or flutter run --flavor staging
And the iOS/Android will install separate apps which connect to separate Firebase!