
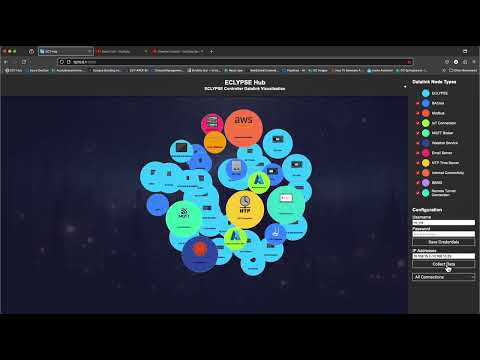
ECY Hub is a simple but powerful web application that visualizes the connectedness of one or more Distech Controls Eclypse 2 controllers using the Eclypse RESTful API. By connecting to your devices, ECY Hub extracts and processes data to display interactive visual representations of device communications. The application presents "Nodes" (representing endpoints) and "Links" (representing data exchanges) in an intuitive graph format.
Key features include:
- Interactive Nodes: Hover over nodes to view detailed metadata.
- Dynamic Visualization: Nodes resize based on the number of connections.
- Filtering Options: Easily filter specific node types to focus on relevant data.
- Detailed Link Information: Click on links to view comprehensive metadata.
- User-Friendly Navigation: Zoom and pan to explore the network graph seamlessly.
Leveraging Python, Flask, and D3.js, ECY Hub offers a real-time, centralized view of decentralized network information, enhancing your ability to monitor and manage complex networked environments effectively.
- Project Overview
- Features
- Technologies Used
- Installation
- Usage
- Configuration
- Project Structure
- Development
- Contributing
- License
- Contact
ECY Hub serves as a centralized dashboard to monitor connections between various devices and services using the ECLYPSE 2 API. It fetches data asynchronously, processes it, and visualizes the relationships and statuses in an intuitive graph format. This tool is particularly useful for managing complex networked environments, ensuring all connections are monitored for optimal performance and reliability.
- Real-Time Data Fetching: Asynchronously fetches data from multiple device IP addresses at regular intervals.
- Interactive Visualization: Utilizes D3.js to render an interactive graph of nodes and links representing devices and their connections.
- Dynamic Filtering: Allows users to filter connections based on node types such as BACnet, Modbus, IoT, MQTT, Weather Services, Email Servers, and more.
- Detailed Metadata Display: Clicking on links provides detailed metadata about the connection, including status, hostname, and other relevant information.
- User Authentication: Securely manage device credentials through a user-friendly interface.
- Responsive Design: Ensures the dashboard is accessible and visually consistent across various devices and screen sizes.
- Backend:
- Python 3.11
- Flask
- Aiohttp
- Asynchronous Programming with asyncio
- Frontend:
- D3.js (v7)
- HTML5 & CSS3
- Others:
- Docker (optional for containerization)
- Homebrew (for package management on Mac)
- NPM (for managing JavaScript dependencies)
- Python 3.11: Ensure Python is installed on your system.
- Node.js & NPM: Required for managing frontend dependencies.
- Homebrew (for macOS users): To install Node.js and other packages.
- Git: For version control.
-
Docker Hub Pull
docker pull fisha462/ecy_hub:x86
OR
docker pull fisha462/ecy_hub:arm
-
Run the Docker Container
docker run -d -p 5000:5000 --name ecy_hub_container fisha462/ecy_hub:tag
-
Verify the Container is Running
docker ps
You should see ecy2_hub_container listed as running.
-
Access the Application Open your web browser and navigate to http://localhost:5000 .
-
Clone the Repository
git clone https://github.com/sn3kyJ3di/ecy_hub.git cd ecy_hub -
Build the Docker Image
docker build -t ecy_hub . -
Run the Docker Container
docker run -d -p 5000:5000 --name ecy_hub_container ecy_hub
-
Verify the Container is Running
docker ps
You should see ecy2_hub_container listed as running.
-
Access the Application Open your web browser and navigate to http://localhost:5000 .
If you prefer to run the application without Docker, follow these steps:
-
Clone the Repository
git clone git@github.com:sn3kyJ3di/ecy_hub.git cd ecy_hub -
Create a Virtual Environment
python3 -m venv venv source venv/bin/activate -
Install Dependencies
pip install --upgrade pip
pip install -r requirements.txt
-
Run the Application
python async_app.py
-
Access the Application Open your web browser and navigate to http://localhost:5000 .
The application requires specific configurations to interact with your networked devices effectively. Follow these steps when configuring the web UI:
-
Authorization
- Username: Enter the username for device authentication.
- Password: Enter the password for device authentication.
-
IP Addresses Specify the IP addresses of the devices you wish to monitor. The application supports individual IPs and ranges:
- Single IP:
192.168.1.10 - Range:
192.168.1.1-192.168.1.10 - Multiple IPs/Ranges:
192.168.1.1,192.168.1.5-192.168.1.10
- Single IP:
Security Note: Ensure that your credentials are stored securely. Consider using environment variables or a secrets manager to protect sensitive information.
ecy_hub/
├── async_app.py          # Main Flask application handling API interactions and data processing.
├── Dockerfile            # Defines the Docker image for containerizing the application.
├── requirements.txt      # Lists Python dependencies.
├── .dockerignore         # Specifies files and directories to exclude from the Docker build context.
├── templates/
│   └── index.html        # HTML template for the main page.
├── static/
│   ├── images/           # Directory containing image files.
│   │   └── ...
│   └── favicon.ico       # Favicon for the web application.
└── README.md             # Project documentation.
- async_app.py: Main Flask application handling API interactions and data processing.
- Dockerfile: Defines the Docker image for containerizing the application.
- requirements.txt: Lists Python dependencies.
- .dockerignore: Specifies files and directories to exclude from the Docker build context.
- templates/: Contains HTML templates.
- static/: Houses static images.
Contributions are welcome! Please follow these steps to contribute:
-
Fork the Repository: Click the “Fork” button at the top-right corner of the repository page.
-
Create a New Branch:
git checkout -b feature/YourFeatureName -
Make Your Changes: Implement your feature or fix.
-
Commit Your Changes: git commit -m "Add Your Feature Description"
-
Push to the Branch: git push origin feature/YourFeatureName
-
Create a Pull Request: Navigate to the repository on GitHub and click “Compare & pull request.”
This project is licensed under the MIT License.
For questions, support, or collaboration, please reach out to:
- Aaron Fish
- Email: afish@distech-controls.com
- GitHub: @sn3kyJ3di
- LinkedIn: Aaron Fish