
PharaGlow is a python package for tracking and analyzing C. elegans motion and feeding behavior from videos. The package can be used to simply track labelled pharynxes (or whole animals from brightfield) as a simple center of mass tracker, but it also has a pipeline to extract pharyngeal pumping and features of the pharynx.
- Install Python
To use PharaGlow you first need to install the Python script language interpreter. We recommend to install Python using the Miniconda Distribution.
# Example: Downloading and Installing Anaconda for Linux (x86)
wget https://repo.anaconda.com/miniconda/Miniconda3-latest-Linux-x86_64.sh
bash Miniconda3-latest-Linux-x86_64.sh
The installer will ask you to accept the license and then proceed to download the necessary packages.
After, you will be prompted to allow conda to be added to your .bashrc profile.
- Create and activate a new
condaenvironment
Using the terminal (Linux) or Miniconda command prompt (Windows) run:
conda create --name pumping -c conda-forge python=3.8 jupyterlabYou can activate the created environment using conda:
conda activate pumping
- Next, install the
pharaglowpackage from PyPI usingpip:
python -m pip install pharaglow
Alternatively you can clone PharaGlow repository from GitHub
-
Copy the repository link from GitHub in https://github.com/scholz-lab/PharaGlow/
-
In the terminal (Linux) or Miniconda Command Prompt (Windows), navigate to the directory where you wish to download PharaGlow and enter the command:
git clone https://github.com/scholz-lab/PharaGlow.git pharaglow
Change to the pharaglow directory and run:
cd pharaglow
conda activate pumping
pip install -e .
in the main directory of the software, which has the file called pyproject.toml
- (Optional) Create a dedicated environment kernel
conda activate pumping
python -m ipykernel install --user --name pumping --display-name "pumping (python 3.8)"
And remove notebook output before committing
conda install -c conda-forge nbstripout
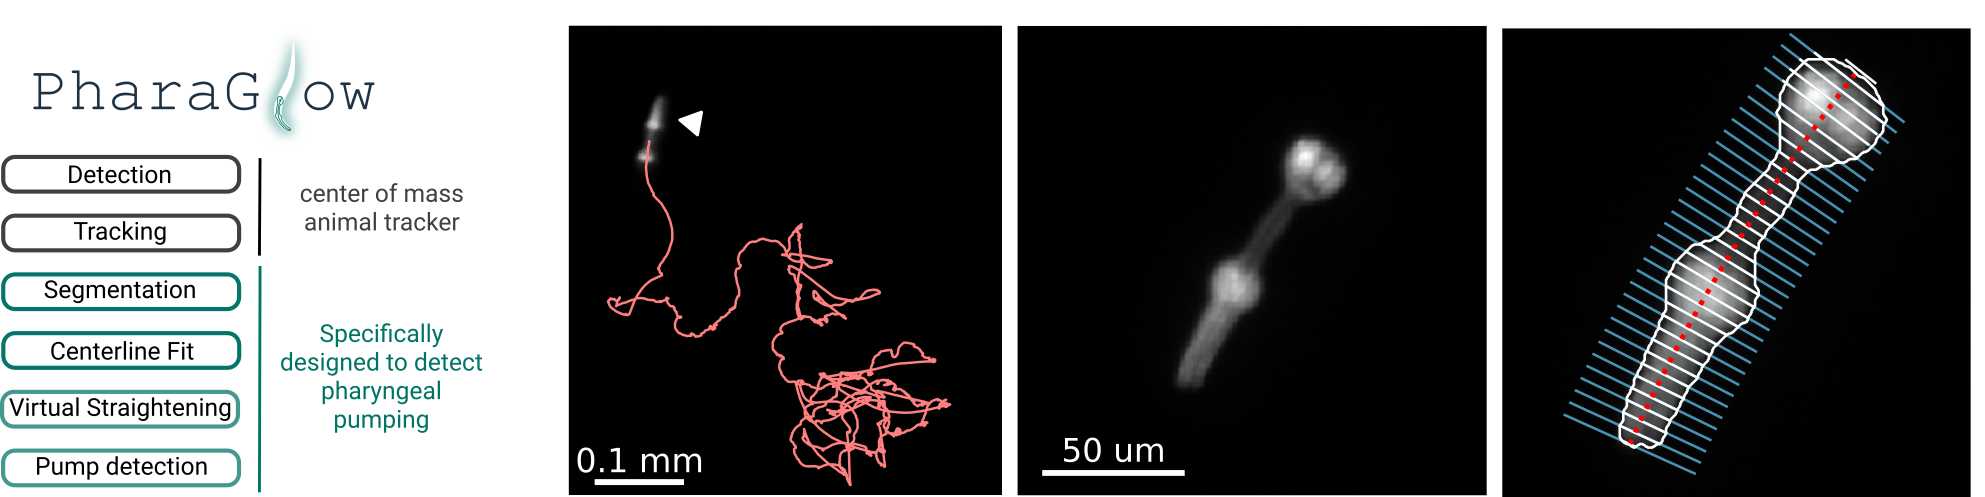
1. Step - Basic object detection This step creates a "_features.json" file which contains a table of objects (worms) detected in each frame. It creates also a stack of images that contain a cropped area around each worm.
2. Step - Linking objects into trajectories This step results in individual files "_trajectory.json" and _images.tiff for each tracked animal.
3. Step - Analyzing the details of object shapes This step is doing the heavy lifting: It extracts centerlines, widths, contours and other object descriptors from the objects. It results in individual files "_result.json" for each tracked animal.
All subsequent analyses steps add 'columns' to the dataframe, and thus features is a subset of trajectories is a subset of results.
-
We provide a demo data set with 1000 frames of 1x magnification (30 fps, 2.34 um per pixel) showing C. elegans expressing myo-2::mCherry. https://osf.io/4wgca/. You can also find the expected outputs in the data repository at OSF.
 conda activate pumping
 conda install -c conda-forge osfclient
 osf -p 4wgca list
 osf -p 4wgca fetch osfstorage/demo_data.zip
 unzip demo_data.zip
-
Before analyzing your data, we recommend to check your installation and familiarize yourself with the code by running the jupyter notebook "testing/PharaGlowMain_testdata.ipynb" on this dataset using the provided parameter file "AnalysisParameters_1x.json"
-
To run
pharaglowinside ajupyter notebookin soma HPC cluster please refer to the running_pharaglow_jupyterlab guide.
Raw data are tiff files typically obtained from simultaneously recording of up to 50 adults worms at 30 frames per second at 1x magnification. Typical use is by interacting through the notebook which contains the whole pipeline from raw movies to final data.
PharaGlow requires a json parameter file with the parameters that are editable by you. A default file comes with the repository, you can use it as a starting point (AnalysisParameters_1x.json). These parameters are:
| Field | Description |
|---|---|
| subtract | (0 or 1) Subtract the background from the movie for detection. Helps particularly with the higher resolution movies. |
| smooth | (integer, >= 0, in pixel) Should the image be smoothed. This helps to avoid breaking up the pharynx into two parts. |
| dilate | (integer, >=1) Binary dilation of the image. Can help to connect the worm if its broken up into two pieces. |
| tfactor | (float,[0-1]) Use rarely. If you have disparate sizes the automated threshold doesn't work well. This factor multiplies the threshold value for binarization. Eg. for an 8-bit image, if the threshold is 150 and tfactor is 0.5 the image would be thresholded at 150*0.5=75. |
| thresholdWindow | (in frames) To get a threshold for binarization, use every nth frame of the movie evenly spaced up to N=thresholdWindow. |
| bgWindow | (in frames) Calculate a static background on every nth evenly spaced movie image of the movie with a total N=bgWindow. If this is too short, you get a memory error. It can be as large as 500 frames for a full 18000 frame movie. |
| length | (in pixel) This sets the size of the extracted images around the center of the worm. It should be at least as large as the largest expected worm length. |
| watershed | (in pixel) When two or more worms touch, how large is an individual approximately. |
| minSize | (in pixel) Remove all objects smaller than this. |
| maxSize | (in pixel) Remove all objects larger than this (but a caveat here is when we have worm collisions where we allow the resulting segmentation to be a bit bigger). |
| searchrange | (in pixel) Describes how much we expect a worm to move frame-to-frame when we link particles together during tracking. This can be a bit bigger to allow for loosing the worm for a bit, but then you might get large perceived jumps in velocity. |
| memory | (in frames) When we loose a worm for a few frames, how long can gaps be until we call it a 'new' worm. |
| minimalDuration | (in frames) Filters out worm trajectories that are shorter than this. |
| widthStraight | (in pixel) How wide is a worm for the straightened image. |
| pad | (in pixel) crops a boundary around a worm for image analysis. this helps when the mask is a bit too small. |
| nPts | (integer) How many points along the centerline are we measuring. This should relate to the typical length of a worm. |
| linewidth | (integer) number of points to sample for a kymograph. 1 means only pixels directly on the centerline are taken. |
If you want to analyze one data set, run the notebook PharaGlowMain (PharaGlow > notebooks > PharaGlowMain.ipynb) as shown in the section above #Run PharaGlow on a demo dataset
- Open the notebook /notebooks/PharaGlowMain.ipynb
- Edit the section called 'Input parameters' to point to your data, to the location where outputs should be stored, and to the analysis parameter file.
- If you use a similar imaging setup as we describe in our preprint (1x magnification, pixel size ~ 2.35 um), you can use the AnalysisParameter file that comes with this repository.
- Execute the cells. You can see intermediate steps like the masking and the number of objects detected
- output files will be saved at your designated 'outPath' location
If you want to analyze multiple data sets, you need (in PharaGlow > notebooks) :
- pglow_batch_config.json
- runPGlow_HPC.py
- PharaGlowHPC.ipynb
The program generates 3 levels of outputs (see Overview). The final full analysis is present in the files called (movie_ID)_results.json
| Column | Type | Description |
|---|---|---|
| Centerline | object | centerline of the pharynx, ordered coordinates from anterior to posterior |
| Straightened | object | straightened image of the oharynx |
| frame | int64 | frame number from original recording |
| Imax | uint8 | maximal image intensity |
| Imean | float64 | mean image intensity |
| Imedian | float64 | median image intensity |
| Istd | float64 | standard deviaton image intensity |
| Area2 | int64 | area estimated from second thresholding in 3. analysis step (px) |
| image_index | int64 | index of images correpsonding to location in images_all.tiff stack. |
| has_image | int64 | boolean indicating missing images |
| y | float64 | y coordinate of pharynx relative to original full frame recording (px) |
| x | float64 | x coordinate of pharynx relative to original full frame recording (px) |
| slice_y0 | int64 | slice location used to crop pharynx from full frame image |
| slice_y1 | int64 | slice location used to crop pharynx from full frame image |
| slice_x0 | int64 | slice location used to crop pharynx from full frame image |
| slice_x1 | int64 | slice location used to crop pharynx from full frame image |
| area | int64 | area estimated from firsth thresholding in 1. analysis step - object detection (px) |
| yw | float64 | intensity-wighted center of mass location (px) |
| xw | float64 | intensity-wighted center of mass location (px) |
| shapeY | int64 | image shape Y for cropped image |
| shapeX | int64 | image shape X fro cropped image |
| im_idx | int64 | index of images correpsonding to location in images_all.tiff stack. |
| particle | int64 | particle id assigned during linking (step 2) |
| pumps | floa64 | pumping metric |
https://scholz-lab.github.io/PharaGlow/build/html/pharaglow.html
Tracking is based on the package trackPy (http://soft-matter.github.io/trackpy/v0.4.2/).
scholz-lab/PharaGlow is licensed under the GNU General Public License v3.0