Micro OLED Comparison
This is very in depth review and comparison between the MeganeX and Dream Air by the creator of the MeganeX driver. I will never be going back from micro-oled. The resolution, colors, and clarity are unmatched. My general consensus is that they are very similar headsets and the choice between them is very much a personal preference. There are slight strengths and weaknesses that may influence your decision. Generally if you have a decent experience on one of them, you will probably be disappointed with the lack of improvement with the other one.
If you have any questions. Message me and I can add them to this document.
For those who are not aware. There is a MeganeX MK1 and a MeganeX MK2. They share the same lenses and displays but the MK2 has a slightly better design for the rest of the headset. Although I only have an MK1, I wrote most things based on what you will get with the MK2.
The lenses of the MeganeX have an incredibly small eye box and the best experience requires being extremely close to the lenses. However when you get really close to the lenses, the image becomes sharp and clear. Learning how to position it best takes quite some time and tinkering. It took days in my case. There is always a slight ring of blur not quite at the edge of the display, but that is also minimized the closer you get to the lenses. The glare is fairly minimal and presents itself as a blurry smear on the display. There is also a very faint effect where objects that cover a large portion of the create slight streaks horizontally and vertically across the display. With the MeganeX MK1, the design of the headset can prevent some people from getting close enough to get a good image. Although the MK2 is better in that regard. Some people also do not like their eye lashes touching the lenses which is required to get the best image quality. For some people having their eye lashes touch, means they constantly have to clean the lens. The center of the lens does remain clear even if you can't get extremely close but edge to edge clarity suffers. Overall the chromatic aberration is minimal. There is slight chromatic aberration on the blue chanel, but it is not visible in most scenes. The color is fairly uniform across the lens and my driver has a setting to make it near perfect. The edge to edge clarity is overall good, but it requires exact positioning and being extremely close. When in the optimal position, text is readable across the whole display.
The lenses of the Dream Air have a much larger eye box which makes it much more forgiving to positioning and distance. It still requires somewhat exact positioning for the best experience. There is slightly less fringing along high contrast transitions. There is also a very faint effect where objects that cover a large portion of the create slight streaks across the display except it is diagonal which makes it less common. There is a very slight ring of blur. However compared to the MeganeX when extremely close, there is only a small improvement in edge to edge clarity. The glare is potentially slightly less, but unlike the MeganeX, the glare is far more sharp. It is sharp enough that it is possible to read text within the glare. There is some chromatic aberration near the edges of the display but it probably fixable. The blue channel has similar chromatic aberration to the MeganeX. There is a brown tinting on the outer edges of the lens. The edge to edge clarity is slightly better and is much easier to attain than the MeganeX.
The MeganeX has the larger FOV, but again the experience is very dependent on how close you are to the lenses. It also maintains 100% overlap while doing this. You will need to use my driver to get the full FOV. You can choose any FOV at the driver level. It can go up to 115x99.
The Dream Air has a smaller FOV and less overlap. However it is much easier to get the max FOV. Getting closer will allow you to get more FOV when looking around, but you do run into physical limitations that don't allow you to get super close. The FOV is currently 110x89 with 100x89 per eye in the default Pimax Play profile.
However one major problem is that it seems like there is potentially too much FOV in the distortion profile and it may need to be reduced to get rid of distortions and improve comfort. See the distortion section for more details.
Both of the headsets were calibrated against the camera that was used for the distortion pictures before measurement. All of these numbers are from the calibrated profiles I used with my driver. So these numbers will be slightly different than what you see elsewhere. But I believe these are some of the most accurate measurements done of either headset due to the distortion profile calibration step. At the very least the relative comparisons are extremely accurate. I also calibrated the eye rotation against the real world as well. These comparisons were done without the face gasket on either headset. The hidden area mesh was also disabled.
| Description | MeganeX MK1 | Dream Air |
|---|---|---|
| WIMFOV measurements taken when looking looking strait forward. This is how WIMFOV is meant to be used and gives you the maximum FOV. |  |
 |
| WIMFOV link for above | https://andreasaronsson.com/!apps/wimfov/?id=d120682d | https://andreasaronsson.com/!apps/wimfov/?id=c8c55967 |
| WIMFOV measurements taken when looking at the edge of the lens. This gives you a sense of what you can see when looking around with your eyes. |  |
 |
| WIMFOV link for above | https://andreasaronsson.com/!apps/wimfov/?id=7716960f | https://andreasaronsson.com/!apps/wimfov/?id=a0282c90 |
| Notes | The MeganeX MK1 hits both my brow and my large nose. With an MK2 the numbers here should be higher do to the slightly increased nose relief. | This larger result is likely because the Dream Air lenses are bigger so there is more lens to look at when moving your eyes. |
| Stats about the FOV and render resolution |
Maximum possible FOV : 112.7x96.5 100% Render resolution for SteamVR : 4278x3188 Render resolution for 1:1 sample per panel pixel : 7510x5596 ( 308.2% ) When decreased to the same per eye FOV as the Dream Air: Current rendered FOV : 96.0x85.9 100% Render resolution for SteamVR : 4033x3381 Render resolution for 1:1 sample per panel pixel : 5551x4653 ( 189.4% ) |
Maximum possible FOV per eye: 96.0x85.9 100% Render resolution for SteamVR : 4032x3382 Render resolution for 1:1 sample per panel pixel : 5779x4848 ( 205.5% ) |
| HMDQ outputs. The eyes are symetric so for these profiles so only one eye and the totals are show for brevity. |
Left eye raw FOV: horiz.: 112.70 deg vert.: 96.46 deg Total FOV: horizontal: 114.70 deg vertical: 96.45 deg diagonal: 125.43 deg overlap: 110.70 deg View geometry: left view rotation: -1.0 deg right view rotation: 1.0 deg reported IPD: 63.5 mm |
Left eye raw FOV: horiz.: 96.00 deg vert.: 85.94 deg Total FOV: horizontal: 100.00 deg vertical: 85.91 deg diagonal: 113.88 deg overlap: 92.00 deg View geometry: left view rotation: -2.0 deg right view rotation: 2.0 deg reported IPD: 63.0 mm |
The MeganeX generally has a good distortion profile in the latest version of my driver. However it is still not perfectly flat. The distortion changes when you are not in the eye box, so being a tiny bit off causes a noticeable distortion. The distortion profile is stored as user editable JSON files and community members have made many alternatives. Although as the person in charge of selecting the default, I think the default is best.
The Dream Air is still problematic at the edges. Just like the MeganeX, it will probably get better with time. I think it might require shrinking the total FOV, however it might just be that things need to be redistributed through the image to get rid of all of the extra FOV packed into the outer edges. The warping reminds me of forcing more FOV onto the MeganeX. I got only 96.0x85.9 per eye and 100x85.9 total after calibrating the distortion for my FOV measurements. There is a chance I have done something wrong so don't treat this as an absolute fact but I am somewhat confident as it looks correct in the headset. I intend to update this with any developments.
These diagrams show the FOV and distortion of the default profiles by using a calibrated camera to look through the lens. The thin lines that extend outside the camera are the ground truth overlaid over the photo while the thicker blurry lines are rendered on the display of the headset. The ground truth boxes have the FOV that they cover from edge to edge listed. Each line is 2.5 degrees apart from its neighbors. The solid gray portions on the edges are outside of what the camera can see.
| MeganeX Left Lens | Dream Air Left Lens |
|---|---|
 |
 |
| This is the default in my driver as of 1.1.0. Lines are mostly straight although it has some localized distortions likely from the camera not being in the optimal position. The lines on the display do fall short of the expected positions so the distortion profile potentially has 1-3 degrees of extra FOV than it should although it does not cause significant distortion. I got 112.7x96.5 after calibrating the distortion for my FOV measurements. The display covers the whole frame except far out in the corner. | This is the default in Pimax Play at version v1.43.7. The inner portion of the lens on the right looks better than the MeganeX and seems near perfect. However the outer portion of the lens on the left is pretty bad. The lines on the display are significantly closer to the center than they should be and have a decent amount of curvature to them. 2-4 degrees of FOV likely needs to be removed from the outside of the lens to get rid of the distortion. That means a total of 4-6 degrees when combining both eyes. I got only 96.0x85.9 per eye and 100x85.9 in total after calibrating the distortion for my FOV measurements. In this image you can also see the black edges of the display and how they are smaller than the MeganeX. Also you can calculate the per eye FOV to be around 96-97 degrees on the Dream Air based on where the edges are in the image. |
The main thing I want to get across is that 1:1 resolutions are a ceiling of clarity and have absolutely no bearing on sharpness or performance of resolutions below them. Only changes in 1:1 caused by per eye FOV differences change sharpness and performance. Distortion amount of the headset does not. I want to share this to clear up the common myth that headsets that require more distortion correction are harder to drive.
I actually had the wrong idea about what 1:1 resolutions meant for headsets and what headsets with higher distortion did to the sharpness and performance. Having to go through the whole driver making process showed me how it actually worked.
When rendering resolutions below the 1:1 the only headset specific thing that effects sharpness is the per eye FOV. Per eye FOV is the only factor that determines how hard to drive a headset is. If your cropped the per eye FOV on the BSB2 and the Crystal Super 57PPD(a headsets that requires significantly more distortion correction) to the same per eye FOV and then displayed the same resolution on them, the sharpness will look near identical as long as it has not hit either 1:1 ceiling. Extreme amounts of distortion correction can make the outsides of the lens have lower PPDs but they do not make the headset harder to drive. On the contrary, higher distortion correction actually just make it possible to get more sharpness out of the center with higher resolutions if desired. Of course there are other factors like subpixel sampling pushing the ceiling even higher or foveation making rendering easier, but per eye FOV is the only factor that changes how sharp the rendered image is at a given resolution. It only starts to diverge between headsets for a given per eye FOV when you hit limits of the headset such as the 1:1 ceiling or lens clarity issues.
Essentially how headset rendering works is that the game renders identically to how a flat screen that takes up the same FOV of your vision would. Then you look through the distorted screen door effect of the headset to view that flat screen. The distortion profile does the job of mapping the pixels on the warped screen of the headset onto the correct locations of the flat rendered screen. Hence, it is the resolution and FOV that the flat render that effect the sharpness the most. The fineness of the screen on the headset(the 1:1 at the center) provides an upper ceiling on how much sharpness you can view on the rendered flat screen. The image is always resampled even at exactly 1:1 because the pixel grids do not line up between the screen and the rendered flat image. Aspheric lenses just concentrate more of the headset pixels in the center making the center sharper at the expense of the edges.
Clarity is fairly similar between them as the panels are very similar. The PPD for the MeganeX at the center is 42. The MeganeX depends on getting close to the lenses to get the best clarity. These displays are already quite a bit sharper than what current GPUs can render. Due to the hexagonal subpixel arrangement with my custom shader you can light up individual subpixels to essentially 3x the resolution and reach retina sharpness. The subpixel format is optimal for VR in my opinion. Although without the shader code, it winds up making edged slightly jagged. If you take subpixels into account you can multiply the PPD by the square root of three to get 73 for the MeganeX PPD and 78 PPD for the Dream Air which makes them both pretty much retina and have a minimal difference in sharpness to the eye. The BOE panels in the MeganeX seem to have a problem with what I assume is calibration near the edge of the color space which causes banding. It is pretty rare that you run into circumstances where you see it. I have some shader code to improve it but I have not released it yet. The MeganeX supports 72, 75, and 90Hz refresh rates.
The Dream Air has a slight edge due to it's lower per eye FOV, but once I make overlap configurable on the MeganeX the same sharpness will be possible for a given resolution and FOV. The PPD in the center of the Dream Air is 45. There is a slight reduction in mura on the Dream Air, but it is not significant as the MeganeX already had next to no mura. I also potentially have a cherry picked Dream Air review unit so I will have to see if this is the same across all units. The Dream Air supports 72 and 90Hz refresh rates.
The following PPD stats were taken from the calibrated distortion profiles for both headsets.
| MeganeX PPD Stats | Dream Air PPD Stats |
|---|---|
|
PPD at 0°: 42.750278 PPD at 10°: 41.461792 PPD at 20°: 38.406311 PPD at 30°: 36.366726 PPD at 40°: 29.351044 PPD average 0° to 10°: 42.453503 PPD average 0° to 20°: 41.301769 |
PPD at 0°: 45.349155 PPD at 10°: 44.633224 PPD at 20°: 42.176746 PPD at 30°: 39.521122 PPD at 40°: 33.518692 PPD average 0° to 10°: 45.287998 PPD average 0° to 20°: 44.622002 |
I personally prefer the halo style strap on the MeganeX. It puts no pressure on your face and makes it possible to use it without the face gasket. Depending on what you do in VR, being able to look around the edges and see the real world is really nice. The headset alone weighs 181 grams. The flip up hinge is also nice if you commonly need to see outside the headset. As someone who developed a driver for it, I really enjoy the flip up mechanism. It also allows full position adjustment which makes getting into the small eye box possible. However It really needs a hard strap to be stable enough to maintain the position when moving around. There is a thriving modding community in the MeganeX discord in a thread. Alternatively there is now an official hard strap that is available for purchase. The 5m cable is admittedly a bit expensive, but it is a very good cable. It is a fiber optic cable and is thinner, lighter, and more flexible than most other headset tethers. The cable uses standard USB-C DisplayPort Alt mode which is a very common standard. Although long cables that support 4 streams of DisplayPort 1.4 are harder to find. The headset was designed with asian faces in mind and may impact your brow or nose and prevent getting close enough. The nose relief on the MK1 one is especially bad and has a razor sharp edge that digs into my nose. On the MK2 the nose relief was slightly increased and the edge is made of soft silicon.
The Dream Air is generally comfortable. The low weight makes most designs decent due to supporting next to no weight. The headset alone weighs 174 grams. It is more of a traditional headset with a face gasket. They plan on improving the face gasket in the future. I do miss the ability to see the world without a gasket. Taking it on and off is a bit more difficult as the current back strap does not stretch, but they plan to improve that too. It comes with a 5m cable by default, but it is considerably thicker and heavier than the MeganeX's fiber optic cable. The split cable is not really a plus in my opinion. It decreases the flexibility that you have with how you want to rout the cable off of the headset. You can always attach a normal cable to the back of the head strap to get a similar experience. The split also gets somewhat warm on my neck as it does produce heat, but I am not too bothered by it. The cable is completely proprietary despite using a standard USB-C connector, so it is not possible to use a different cable. The only real upside is that it allows the USB-C expansion port to be USB3. The fans in it do blow a small amount of air into the face gasket. That keeps the inside of the face gasket pleasant during long sessions. Although it can dry your eyes out. Currently the images are rotated to far out from each other. This means you have to slightly cross your eyes in the headset more than you would normally. It seemingly has 1 degree of extra rotation per eye. It is not a huge amount but it slightly screws with depth and comfort to get a few more degrees of FOV.
The lighthouse tracking is good. However due to the small size it is not as high quality as something like an index. You need good base station coverage as you can easily block the entire headset with your head. You may need 3 base stations depending on what you do. Due to the small size of the headset, base stations may position them selves sometimes as much as 10-20cm off of where they actually are. This causes slight problems for headset tracking but is disastrous for smaller trackers like tundras which will drift by similar amounts. The best way tp mitigate this I have found to slowly rotate the headsets between base stations at startup but it is still pretty random how well it does.
The Dream Air lighthouse tracking is also good. Do to the larger face plate, it is better than the MeganeX. You can pretty much turn around with a single base station which is impossible on the MeganeX. However is still has the same base station positioning problem as the MeganeX. I have not personally tried it but everyone says that the SLAM tracking from Pimax is bad.
The MeganeX MK1 has some significant startup issues for some people. However the MK2 is better and quicker. Using my driver helps with the startup issues. The new style of adapter on the MK2 is also better than the old L adapter that many of us had to replace. The included controller dongle is not great when paired with the weak radios of the Index controllers. Other controllers or other dongles are likely to work better. I use a Vive to pair my Index controllers to. As stated the tether uses a common standard which makes using 3rd party cables possible. Linux support is somewhat complete but an nvidia bug prevents it from displaying to both eyes. The hinge mechanism may also develop some play over time. The lens coating is very scratch prone, so make sure to get plain lens inserts even if you do not need to correct for vision.
The Dream Air also has given me troubles starting up with Pimax Play. It also refuses to connect while the MeganeX DisplayPort is connected. Somehow it hangs my entire system, host and all, if I boot up my windows VM with the Dream Air's DisplayPort connected. Having just the link box's USB cable plugged in is enough to cause the hang. The integrated controller radios are OK but not great. The original Vive's radios are significantly better. The cable is proprietary and not possible to replace without Pimax. The proprietary cable is also integrated into the headset strap, so it will need to be replaced as one. On Linux the USB devices are not properly detected which will hamper future support and may be related to the hanging. I am a little concerned about how the face gasket interacts with the USB-C expansion port. It puts pressure and potentially pulls on the center contacts of the port which sticks up slightly above the frame of the headset. I have already reinforced around it to avoid damaging it. The overall durability will have to be seen as it is brand new.
Because my driver runs the MeganeX as a native SteamVR headset, the experience is stable like any other native SteamVR headset. Generally the performance is great as Valve had optimized SteamVR back when the GTX 1060 was a popular GPU. My driver allows tons of configurations and improvements. It is also open source so anyone could modify or fix it in the future. Shiftall now ships a version of my driver with the official software and it runs by default with the MK2. However the included version does not have all of the configuration options that the one off github has.
I am not fond of how Pimax Play intercepts all lighthouse VR devices before sending them to SteamVR. As you might expect from someone who made an open source driver, I also detest hardware that requires creating an account and logging in which Pimax Play seems to require. I do not appreciate how it resets my SteamVR background and a few other settings every time I launch it. I have already stumbled across a bug on the first day where having 2 headset connected causes the frames to alternate between the two headset positions. It also constantly takes a few minutes to detect and start the headset on my PC. The eye tracking also failed to work at all for me some times. Despite my gripes it does have a decent amount of customization. The internal hub that the internal lighthouse dongles are connected to supports MTT so it will not cause bandwidth issues.
However, I have confirmed that Dream Air could run as a native SteamVR headset and just like the MeganeX it improves the startup reliability.
[Todo Performance Benchmarks]
The MeganeX does not have a return policy. Reselling it is your only option to recoup most of the cost. That is especially problematic if you can not get close enough to the lenses to get a good image. The microphone on the MeganeX is great. It has beam forming to block out noise and it compares with the Index and Beyond in terms of audio quality. The beam forming does degrade the audio slightly but it is still very good. The beam forming can't really be turned off on the MK1 due to the fan noise, but the MK2 should be quieter. There is no built in audio or 3.5mm jack so a USB-C adapter is needed to use headphones. The MeganeX has threaded mounting holes on the bottom of the headset which makes mounting face tracking or other accessories easy. Cad files for the headset are available and have helped the hardware modding community. The diopters on the MeganeX are a blessing and a curse. They do make it possible to change the focal plane or correct for minor vision issues. However they are not indexed so you have no idea what they are set to or if the eyes are the same. They also change the distortion so you ideally want to have them near zero and use prescription inserts instead. Although you technically could go through the painstaking process of developing your own distortion profile as they might help edge to edge clarity and decrease FOV as they go higher. The MeganeX only uses USB 2.0. Only Nvidia GPUs are supported.
The Dream Air has built in Tobii eye tracking. Personally I did not find the eye tracking particularly accurate in my limited testing. After viewing the feeds from my cameras I have determined that one of the eye tracking cameras or lenses is loose and can move around causing significant artifacts. When I position the bad camera in a way that minifies the artifacts, the eye tracking does seem decent. The audio built into the strap is alright. It is decent enough that I can enjoy music while using it, but a pair of headphones would be better. The microphone is decent. It is worse than the MeganeX with beam forming enabled but quite a bit better than most other Pimax headsets. The Dream Air seemingly has no CAD files available or easy ways to mount things to it other than the screw holes on the top for a future halo style mount. The USB-C expansion port is hidden under the serial number sticker and delivers a USB 3.0 signal.
This was the process I used for calibrating the Dream Air. The results look pretty good and allowed me to get accurate FOV measurements. I lined up a camera with the lens and then created a distortion profile that lined up the boxes in the headset to those on the camera. A similar method was used before taking FOV measurements on the MeganeX as well.
 |
 |
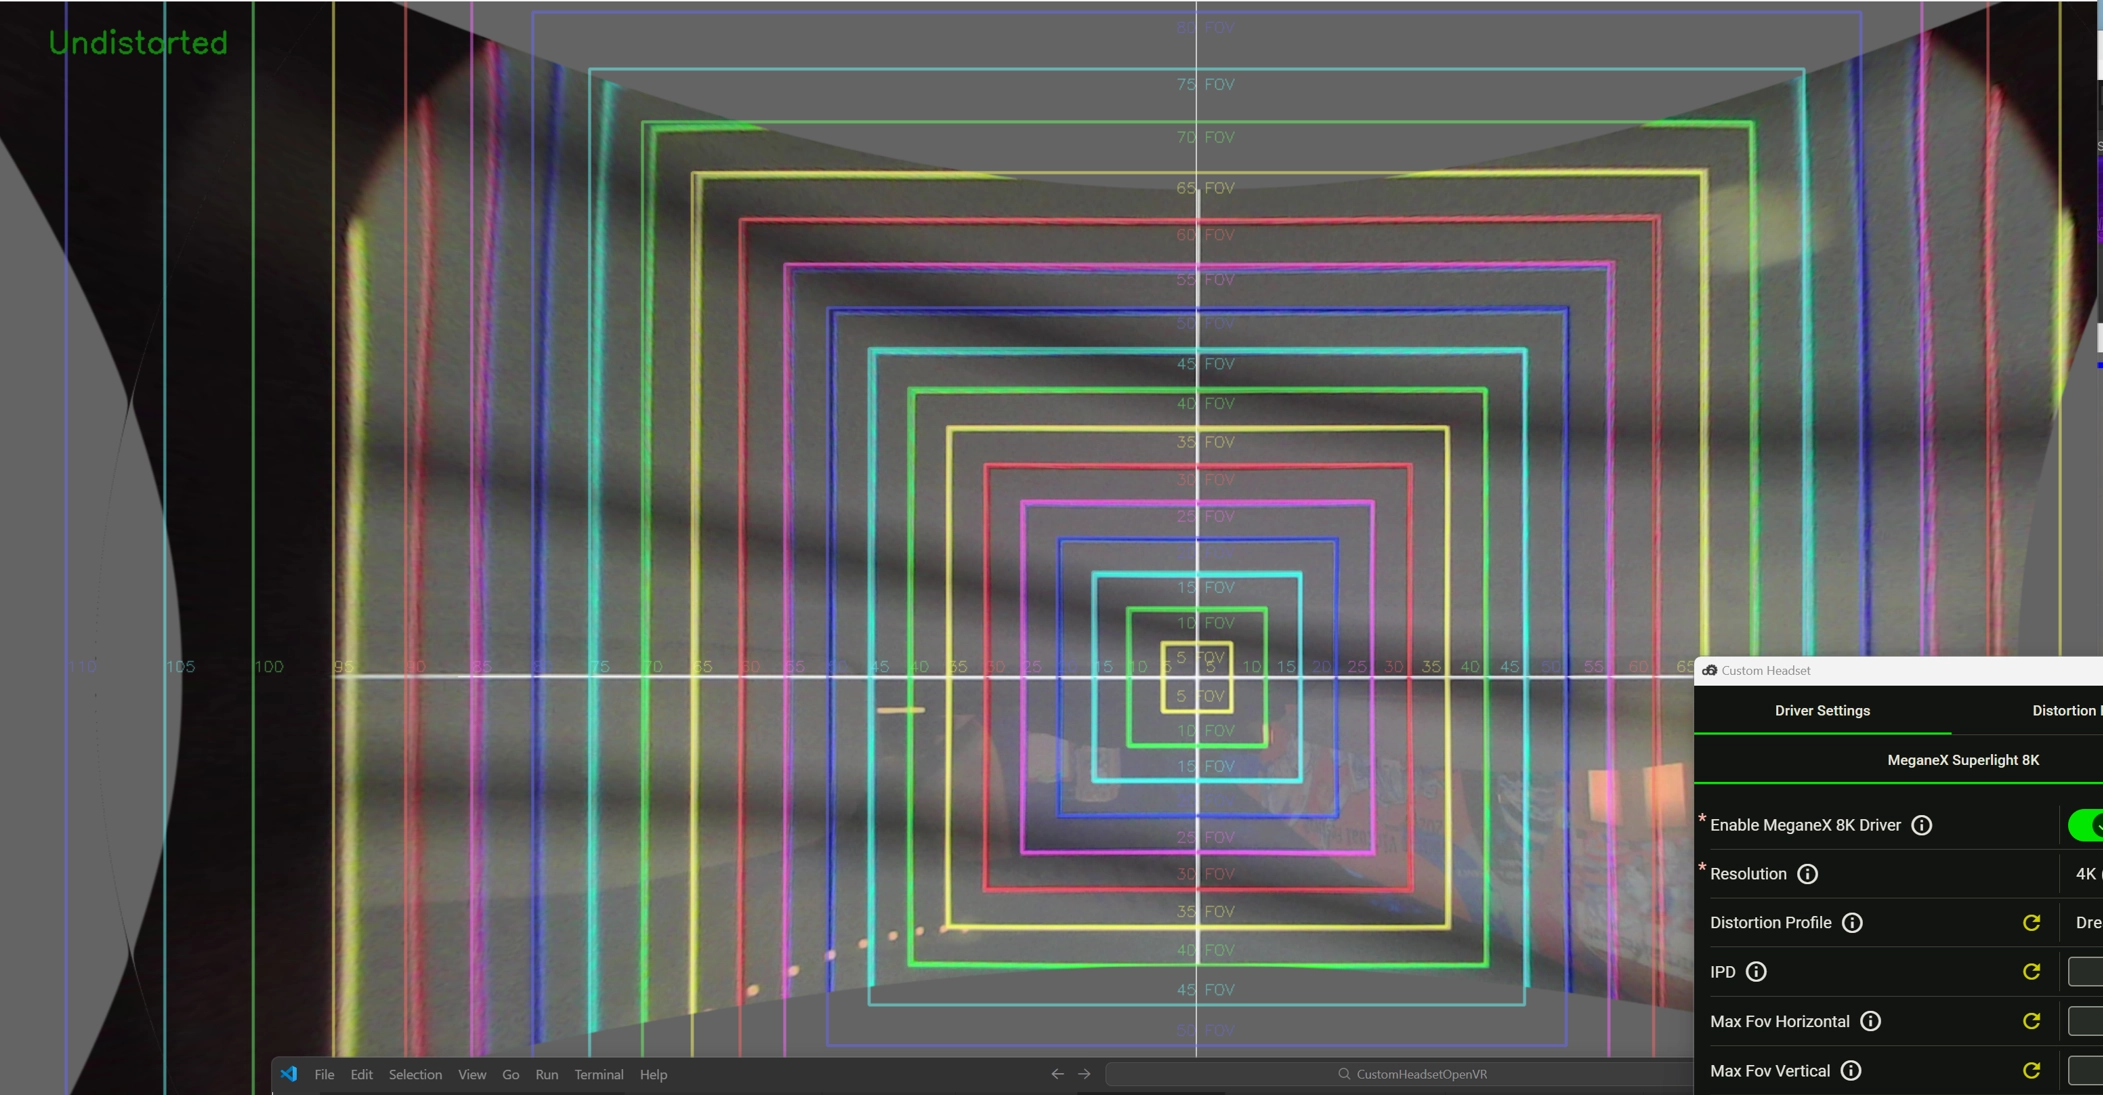 |
I also captured the distortion profile of the original Vive to verify my method of using a calibrated camera through the lenses. The Vive has pretty much no distortion and that shows up here with almost perfect alignment. So I believe that my other tests using the calibrated camera are accurate.
