Learn how to set up StrongSwan configure Ipsec site-to-site , with using python automation scripting for more flexibility and speed of work
- What is VPN : A virtual private network extends a private network across a public network for online privacy and anonymity by providing secure and encrypted connections
- what is StrongSwan : StrongSwan VPN suite uses the native IPsec stack in the standard Linux kernel. It supports both the IKEv1 and IKEv2 protocols
- python Scripting : It's a collection of commands in a file designed to be executed like a program ,Python programming language is extremely powerful and commonly used to automate time-intensive activities/tasks for users
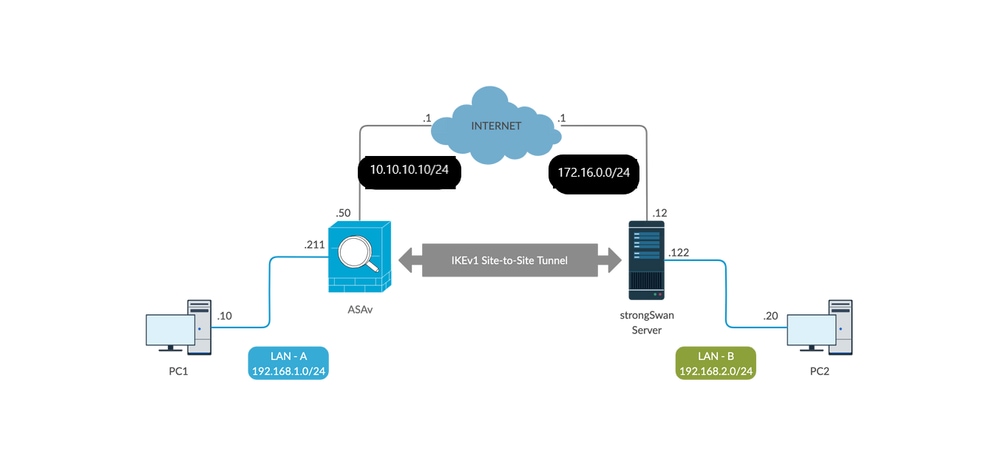
- Install two VMs with Parrot Os or any linux kernel using Vmware Player (you can use any type 2 virtualization program).
- update your system with the latest available packages
sudo apt-get update
you need to configure the kernel to enable packet forwarding for IPv4
open sysctl.conf file :
sudo nano /etc/sysctl.conf
remove the comments (#) to enable these lines :
   net.ipv4.ip_forward = 1
   net.ipv6.conf.all.forwarding = 1
   net.ipv4.conf.all.accept_redirects = 0
   net.ipv4.conf.all.send_redirects = 0
save the file ,Then reload the settings :
sudo sysctl -p
you need to install the strongSwan IPSec daemon in your system.run the following command:
sudo apt-get install strongswan libcharon-extra-plugins strongswan-pki -y
You need to generate the VPN server certificate and key for the VPN client can verify the authenticity of the VPN server.
- generate a private key for self-signing the CA certificate using a PKI utility :
ipsec pki --gen --size 4096 --type rsa --outform pem > ca.key.pem
- create your root certificate authority and use the above key to sign the root certificate :
ipsec pki --self --in ca.key.pem --type rsa --dn "CN=VPN Server CA" --ca --lifetime 3650 --outform pem > ca.cert.pem
- create a private key for the VPN server :
ipsec pki --gen --size 4096 --type rsa --outform pem > server.key.pem
- generate the server certificate :
ipsec pki --pub --in server.key.pem --type rsa | ipsec pki --issue --lifetime 2750 --cacert ca.cert.pem --cakey ca.key.pem --dn "CN=vpn.example.com" -- san="vpn.example.com" --flag serverAuth --flag ikeIntermediate --outform pem > server.cert.pem
- Copy the above certificate to use it later :
   sudo mv ca.cert.pem /etc/ipsec.d/cacerts/
   sudo mv server.cert.pem /etc/ipsec.d/certs/
   sudo mv ca.key.pem /etc/ipsec.d/private/
   sudo mv server.key.pem /etc/ipsec.d/private/
- Rename the default configuration file
ipsec.conffor Buckup :
sudo mv /etc/ipsec.conf /etc/ipsec.conf.bak
- create a new configuration file :
sudo nano /etc/ipsec.conf
- Add the following lines:
config setup
        charondebug="ike 2, knl 2, cfg 2, net 2, esp 2, dmn 2, mgr 2"
        strictcrlpolicy=no
        uniqueids=yes
        cachecrls=no

conn ipsec-ikev2-vpn
      auto=add
      compress=no
      type=tunnel  # defines the type of connection, tunnel (there is also transport Mode).
      keyexchange=ikev2
      fragmentation=yes
      forceencaps=yes
      dpdaction=clear
      dpddelay=300s
      rekey=no
      left=%any
      leftid=X.X.X.X
      leftcert=server.cert.pem  # reads the VPN server cert in /etc/ipsec.d/certs
      leftsendcert=always
      leftsubnet=0.0.0.0/0
      right=%any
      rightid=%any
      rightauth=eap-mschapv2
      rightsourceip=192.168.0.0/24
      rightdns=8.8.8.8 DNS to be assigned to clients
      rightsendcert=never
      eap_identity=%identity  # defines the identity the client uses to reply to an EAP Identity request.
- config setup : Specifies general configuration information for IPSec which applies to all connections.
- charondebug : Defines how much Charon debugging output should be logged.
- leftid : Specifies the domain name or IP address of the server.
- leftcert : Specifies the name of the server certificate.
- leftsubnet : Specifies the private subnet behind the left participant.
- rightsourceip : IP address pool to be assigned to the clients.
- rightdns : DNS to be assigned to clients.
VPN server is configured to accept client connections Now you need to configure client-server authentication
sudo nano /etc/ipsec.secrets
- Add the following lines :
   : RSA "server.key.pem"
   .vpnsecure : EAP "your-secure-password"
- restart the strongSwan service :
   sudo systemctl restart strongswan
   sudo systemctl enable strongswan
- verify the status of the strongSwan service :
sudo systemctl status strongswan
- You should see the following output:
strongswan.service - strongSwan IPsec IKEv1/IKEv2 daemon using ipsec.conf
   Loaded: loaded (/lib/systemd/system/strongswan.service; enabled; vendor preset: enabled)
   Active: active (running) since Fri 2021-05-08 08:02:08 UTC; 8s ago
 Main PID: 29947 (starter)
    Tasks: 18 (limit: 2359)
   CGroup: /system.slice/strongswan.service
           ├─29947 /usr/lib/ipsec/starter --daemon charon --nofork
           └─29973 /usr/lib/ipsec/charon --debug-ike 2 --debug-knl 2 --debug-cfg 2 --debug-net 2 --debug-esp 2 --debug-dmn 2 --debug-mgr 2

May 08 08:02:08 ubuntu1804 charon[29973]: 05[CFG]   eap_identity=%identity
May 08 08:02:08 ubuntu1804 charon[29973]: 05[CFG]   dpddelay=300
May 08 08:02:08 ubuntu1804 charon[29973]: 05[CFG]   dpdtimeout=150
May 08 08:02:08 ubuntu1804 charon[29973]: 05[CFG]   dpdaction=1
May 08 08:02:08 ubuntu1804 charon[29973]: 05[CFG]   sha256_96=no
May 08 08:02:08 ubuntu1804 charon[29973]: 05[CFG]   mediation=no
May 08 08:02:08 ubuntu1804 charon[29973]: 05[CFG]   keyexchange=ikev2
May 08 08:02:08 ubuntu1804 charon[29973]: 05[CFG] adding virtual IP address pool 192.168.0.0/24
May 08 08:02:08 ubuntu1804 charon[29973]: 05[CFG]   loaded certificate "CN=vpn.example.com" from 'server.cert.pem'
May 08 08:02:08 ubuntu1804 charon[29973]: 05[CFG] added configuration 'ipsec-ikev2-vpn'
- verify the strongSwan certificates :
sudo ipsec listcerts
- You should get the following output :
List of X.509 End Entity Certificates

  subject:  "CN=vpn.example.com"
  issuer:   "CN=VPN Server CA"
  validity:  not before May 08 07:59:18 2020, ok
             not after  Nov 18 07:59:18 2027, ok (expires in 2749 days)
  serial:    7b:f8:ab:dc:ca:64:dd:93
  altNames:  vpn.example.com
  flags:     serverAuth ikeIntermediate
  authkeyId: 12:60:f6:05:15:80:91:61:d6:e9:8f:72:a3:a5:a5:ff:a7:38:1a:32
  subjkeyId: bf:1d:b1:1b:51:a0:f7:63:33:e2:5f:4c:cb:73:4f:64:0f:b9:84:09
  pubkey:    RSA 4096 bits
  keyid:     e4:72:d0:97:20:ec:a5:79:f2:e0:bf:aa:0e:41:a8:ec:67:06:de:ee
  subjkey:   bf:1d:b1:1b:51:a0:f7:63:33:e2:5f:4c:cb:73:4f:64:0f:b9:84:09
- run the following command :
sudo apt-get install strongswan libcharon-extra-plugins -y
- disable the strongSwan service to start at boot :
sudo systemctl disable strongswan
- copy the ca.cert.pem file from the VPN server to the VPN client :
sudo scp root@your-vpnserver-ip:/etc/ipsec.d/cacerts/ca.cert.pem /etc/ipsec.d/cacerts/
- configure VPN client authentication :
sudo nano /etc/ipsec.secrets
- Add this line:
sudo vpnsecure : EAP "your-secure-password"
- edit the strongSwan default configuration file
ipsec.conf
sudo nano /etc/ipsec.conf
- Add the following lines :
    conn ipsec-ikev2-vpn-client
    auto=start
    right=vpn.example.com
    rightid=vpn.example.com
    rightsubnet=0.0.0.0/0
    rightauth=pubkey
    leftsourceip=%config
    leftid=vpnsecure
    leftauth=eap-mschapv2
    eap_identity=%identity
- restart the strongSwan service :
sudo systemctl restart strongswan
- On strongSwan server , run the following command :
sudo ipsec status
- You should see this :
Security Associations (1 up, 0 connecting):
ipsec-ikev2-vpn-client[1]: ESTABLISHED 1 minutes ago, [vpnsecure]...192.168.0.1[vpn.example.com]
ipsec-ikev2-vpn-client{1}:  INSTALLED, TUNNEL, reqid 1, ESP in UDP SPIs: 74ab87d0db9ea3d5_i 684cb0dbe4d1a70d_r
ipsec-ikev2-vpn-client{1}:   192.168.0.5/32 === 0.0.0.0/0
Automate all the work using python 🐍 programming language