


A sophisticated biometric authentication system with LCD display feedback for secure access control
🎥 Video Demo • Features • Hardware • Installation • Usage
This project implements a complete fingerprint-based authentication system using Arduino Uno, featuring real-time LCD feedback and dual-mode operation (enrollment and verification). Perfect for DIY security projects, smart locks, attendance systems, and IoT applications.
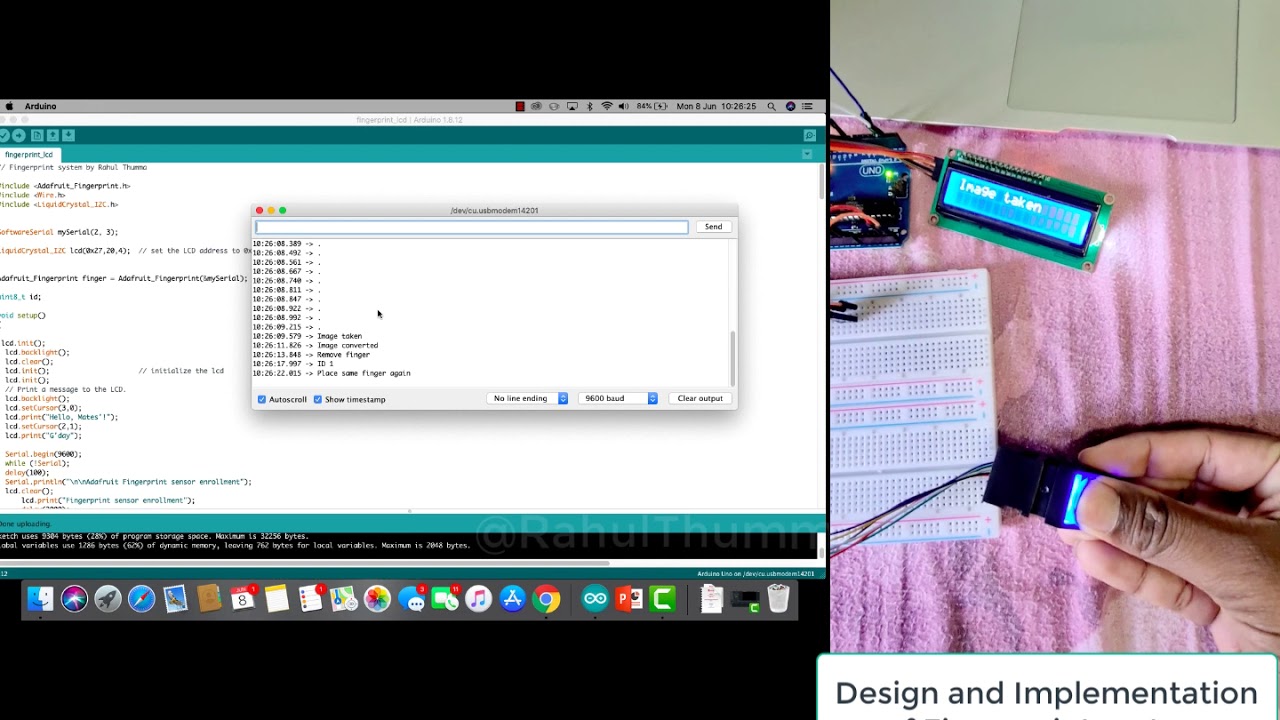
- ✨ User-Friendly: Real-time feedback via 20x4 LCD display
- 🔒 Secure: Biometric authentication with confidence scoring
- 🎯 Dual Mode: Separate programs for enrollment and verification
- 💾 Persistent Storage: Stores up to 127 fingerprint templates
- 🚀 Fast Recognition: Quick matching with high accuracy
- 🔧 Easy to Customize: Clean, well-commented code
| Feature | Description |
|---|---|
| Fingerprint Enrollment | Register new fingerprints with step-by-step LCD guidance |
| Fingerprint Verification | Authenticate users with confidence percentage display |
| LCD Feedback | Real-time status updates on 20x4 I2C LCD screen |
| Template Storage | Store up to 127 unique fingerprint templates |
| Error Handling | Comprehensive error detection and user-friendly messages |
| Confidence Scoring | Match quality percentage for verification |
- Interactive fingerprint registration
- Requires two scans of the same finger for accuracy
- Assigns unique ID to each fingerprint (1-127)
- Step-by-step LCD instructions
- Continuous fingerprint scanning
- Displays matched ID and confidence percentage
- "Finger Not Found" notification for unregistered prints
- Fast search algorithm for quick authentication
💡 Pro Tip: Watch the detailed component overview video for visual guidance on all components and connections!
| Component | Specification | Quantity |
|---|---|---|
| Arduino Uno | ATmega328P based | 1 |
| Fingerprint Sensor | R307 / AS608 | 1 |
| LCD Display | 20x4 I2C (0x27 address) | 1 |
| Jumper Wires | Male-to-Male / Male-to-Female | 8-10 |
| Breadboard | Standard size | 1 |
| USB Cable | Type A to Type B | 1 |
| Power Supply | 5V (Arduino USB or external) | 1 |
Sensor Pin → Arduino Pin
------------------------
VCC (Red)  → 5V
GND (Black)→ GND
TX (White) → Pin 2 (RX)
RX (Green) → Pin 3 (TX)
LCD Pin → Arduino Pin
--------------------
VCC     → 5V
GND     → GND
SDA     → A4
SCL     → A5
                    ┌─────────────┐
                    │  Arduino    │
                    │    Uno      │
                    │             │
    ┌──────────────┤ 5V          │
    │   ┌──────────┤ GND         │
    │   │  ┌───────┤ Pin 2 (RX)  │
    │   │  │  ┌────┤ Pin 3 (TX)  │
    │   │  │  │    │ A4 (SDA)────┼───┐
    │   │  │  │    │ A5 (SCL)────┼─┐ │
    │   │  │  │    └─────────────┘ │ │
    │   │  │  │                     │ │
    │   │  │  │    ┌──────────────┐ │ │
    │   │  │  │    │  Fingerprint │ │ │
    │   │  │  │    │    Sensor    │ │ │
    ├───┼──┼──┼───┤ VCC           │ │ │
    │   └──┼──┼───┤ GND           │ │ │
    │      └──┼───┤ TX            │ │ │
    │         └───┤ RX            │ │ │
    │             └──────────────┘ │ │
    │                               │ │
    │             ┌────────────────┐│ │
    │             │   LCD 20x4     ││ │
    │             │   (I2C 0x27)   ││ │
    └─────────────┤ VCC            ││ │
        ┌─────────┤ GND            ││ │
        │         │ SDA ───────────┘│ │
        │         │ SCL ────────────┘ │
        │         └────────────────┘  │
        │                              │
       GND                            5V
git clone https://github.com/merahulthumma/Arduino-fingerprint-system.git
cd Arduino-fingerprint-systemDownload from Arduino Official Website
Open Arduino IDE and install these libraries via Library Manager (Sketch → Include Library → Manage Libraries):
- Adafruit Fingerprint Sensor Library by Adafruit
- LiquidCrystal I2C by Frank de Brabander
Or install manually:
# Using Arduino CLI
arduino-cli lib install "Adafruit Fingerprint Sensor Library"
arduino-cli lib install "LiquidCrystal I2C"- Connect components as per the pin configuration above
- Double-check power connections (5V and GND)
- Ensure I2C LCD address is 0x27 (check using I2C scanner if needed)
For Enrollment Mode:
1. Open enroll.ino in Arduino IDE
2. Select: Tools → Board → Arduino Uno
3. Select: Tools → Port → [Your Arduino Port]
4. Click Upload (→) button
5. Open Serial Monitor (9600 baud)
For Verification Mode:
1. Open verify.ino in Arduino IDE
2. Follow steps 2-5 above
- Upload
enroll.inoto Arduino - Open Serial Monitor (9600 baud rate)
- Read LCD message: "Ready to enroll a fingerprint!"
- Enter ID number (1-127) in Serial Monitor
- Place finger on sensor when prompted
- Remove finger when instructed
- Place same finger again for verification
- Done! LCD shows "Stored!" message
LCD Display Flow:
-----------------
"Hello, Mates'!"
"G'day"
        ↓
"Ready to enroll a fingerprint!"
        ↓
"Please type in the ID #"
        ↓
"Waiting for valid finger..."
        ↓
"Image taken"
        ↓
"Remove finger"
        ↓
"Place same finger again"
        ↓
"Prints matched!"
        ↓
"Stored!"
- Upload
verify.inoto Arduino - Wait for LCD message: "Waiting for valid finger..."
- Place registered finger on sensor
- View results on LCD:
- ✅ Match Found: Shows ID # and confidence %
- ❌ No Match: "Finger Not Found - Try Later"
LCD Display Flow:
-----------------
"Hello, Mates'!"
"G'day"
        ↓
"Sensor contains X templates"
        ↓
"Waiting for valid finger..."
        ↓
[Place finger]
        ↓
"Found ID # X"
"with % of YY"
    OR
"Finger Not Found"
"Try Later"
For a complete visual walkthrough of the hardware setup, component connections, and system operation, watch the detailed video tutorial:
The video covers:
- 📦 All required components
- 🔌 Step-by-step wiring guide
- 🎯 Enrollment process demonstration
- ✅ Verification process in action
- 💡 Tips and troubleshooting
Enrollment Process:
[LCD] Hello, Mates'! G'day
[LCD] Found fingerprint sensor
[LCD] Ready to enroll a fingerprint!
[Serial] Please type ID (1-127): 5
[LCD] Waiting for valid finger...
[LCD] Image taken
[LCD] Remove finger
[LCD] Place same finger again
[LCD] Image taken
[LCD] Prints matched!
[LCD] Stored!
Verification Process:
[LCD] Hello, Mates'! G'day
[LCD] Sensor contains 5 templates
[LCD] Waiting for valid finger...
[User places finger]
[LCD] Found ID # 5
[LCD] with % of 95
Arduino-fingerprint-system/
│
├── 📄 enroll.ino              # Fingerprint enrollment program
│   ├── Setup initialization
│   ├── LCD welcome message
│   ├── Sensor verification
│   ├── ID input handling
│   └── Two-stage fingerprint capture
│
├── 📄 verify.ino              # Fingerprint verification program
│   ├── Setup initialization
│   ├── Template count display
│   ├── Continuous scanning loop
│   └── Match result display
│
├── 📄 README.md               # This file
└── 📄 circuit_diagram.png     # Wiring diagram (recommended to add)
getFingerprintEnroll()  // Main enrollment function
- getImage()            // Capture fingerprint image
- image2Tz(1)          // Convert first image to template
- image2Tz(2)          // Convert second image to template
- createModel()         // Create fingerprint model
- storeModel(id) // Store in sensor memorygetFingerprintIDez() // Quick verification function
- getImage() // Capture fingerprint image
- image2Tz() // Convert to template
- fingerFastSearch() // Search database for match
- Return fingerID // Return matched ID or -1// In both enroll.ino and verify.ino
// Sensor Configuration
finger.begin(57600); // Baud rate (9600, 57600, 115200)
// LCD Configuration
LiquidCrystal_I2C lcd(0x27,20,4); // Address, columns, rows
// Common addresses: 0x27, 0x3F
// Serial Configuration
Serial.begin(9600); // Serial monitor baud rate
// Fingerprint Storage
#define MAX_FINGERPRINTS 127 // Maximum templates (1-127)If LCD doesn't work, scan for I2C address:
#include <Wire.h>

void setup() {
  Wire.begin();
  Serial.begin(9600);
  Serial.println("I2C Scanner");
}

void loop() {
  for(byte i = 1; i < 127; i++) {
    Wire.beginTransmission(i);
    if(Wire.endTransmission() == 0) {
      Serial.print("Found: 0x");
      Serial.println(i, HEX);
    }
  }
  delay(5000);
}Possible Causes:
- Incorrect wiring connections
- Sensor not powered properly
- Wrong TX/RX connections
Solutions:
✓ Check VCC connected to 5V
✓ Verify GND connections
✓ Swap TX and RX pins (common mistake)
✓ Test with different baud rate: finger.begin(9600)
Possible Causes:
- Wrong I2C address
- Loose connections
- Insufficient power
Solutions:
✓ Run I2C scanner to find address
✓ Try address 0x3F if 0x27 doesn't work
✓ Check SDA → A4, SCL → A5
✓ Adjust contrast potentiometer on LCD
Possible Causes:
- Dirty sensor surface
- Wet or dirty finger
- Improper finger placement
Solutions:
✓ Clean sensor with soft cloth
✓ Clean and dry finger
✓ Press firmly but gently
✓ Place finger flat on sensor
Possible Causes:
- Different finger placement
- Finger moved between scans
- Pressure variation
Solutions:
✓ Keep finger still during scan
✓ Use same pressure for both scans
✓ Wait for "Remove finger" message
✓ Ensure good contact with sensor
Possible Causes:
- Invalid ID number
- Memory full
- ID already in use
Solutions:
✓ Use ID between 1-127
✓ Delete old fingerprints if memory full
✓ Use different ID number
Enable verbose output for debugging:
// Add to setup()
Serial.println("System initialized");
Serial.print("Template count: ");
Serial.println(finger.templateCount);
Monitor Serial output at 9600 baud for detailed status messages.
- 🚪 Smart Door Locks - Keyless entry systems
- 🔒 Personal Safe - Biometric cabinet locks
- 💻 Computer Security - Physical authentication device
- 📦 Secure Storage - Jewelry boxes, documents
- ⏰ Attendance System - Employee time tracking
- 🏛️ Access Control - Restricted area entry
- 🖥️ Workstation Security - Computer login
- 📁 File Cabinet Lock - Document security
- 🔬 Learning Projects - Embedded systems education
- 🤖 IoT Integration - Smart home automation
- 🏆 Competition Projects - Robotics and maker fairs
- 📚 Research - Biometric authentication studies
- Multi-User Systems - Household/office access
- Cloud Integration - Log attendance to database
- Mobile Alerts - Notify via SMS/email on access
- Time-Based Access - Scheduled entry permissions
| Component | Details |
|---|---|
| Microcontroller | ATmega328P @ 16MHz |
| Operating Voltage | 5V DC |
| Sensor Type | Optical fingerprint sensor |
| Sensor Baud Rate | 9600 / 57600 bps |
| Image Resolution | 256 x 288 pixels |
| Template Size | 512 bytes |
| Storage Capacity | 127 templates |
| False Acceptance Rate | < 0.001% |
| False Rejection Rate | < 1% |
| Matching Speed | < 1 second |
| LCD Type | 20x4 characters, I2C interface |
| Feature | Implementation |
|---|---|
| Programming Language | C++ (Arduino) |
| IDE | Arduino IDE 1.8+ |
| Libraries | Adafruit Fingerprint, LiquidCrystal I2C |
| Communication | SoftwareSerial, Wire (I2C) |
| Error Handling | Comprehensive status codes |
| User Interface | Serial + LCD display |
// Stage 1: Capture first image
finger.getImage()        // Scan finger
finger.image2Tz(1)       // Store in buffer 1

// Stage 2: Capture second image
finger.getImage()        // Scan same finger
finger.image2Tz(2)       // Store in buffer 2

// Verification & Storage
finger.createModel()     // Compare buffers
finger.storeModel(id) // Save if matched// Optimized search through all templates
finger.fingerFastSearch()
// Returns:
// - FINGERPRINT_OK: Match found
// - FINGERPRINT_NOTFOUND: No match
// - finger.fingerID: Matched template ID
// - finger.confidence: Match quality (0-255)// Real-time user feedback
lcd.clear(); // Clear display
lcd.print("Message"); // Show status
delay(2000); // Visible durationContributions make the open-source community an amazing place to learn and create! Any contributions are greatly appreciated.
- Fork the repository
- Create your feature branch
git checkout -b feature/AmazingFeature
- Commit your changes
git commit -m 'Add some AmazingFeature' - Push to the branch
git push origin feature/AmazingFeature
- Open a Pull Request
- 🎨 Improve LCD messages and UI
- 🔒 Add multi-level access control
- 📱 Integrate with mobile apps
- 🌐 Add WiFi/Bluetooth connectivity
- 📊 Implement access logging
- 🔔 Add buzzer feedback
- 🎯 Create web interface for management
- 📸 Add OLED display support
- ⚡ Optimize performance
- 📖 Improve documentation
This project is licensed under the MIT License.
MIT License

Copyright (c) 2024 Rahul Marreddy Thumma

Permission is hereby granted, free of charge, to any person obtaining a copy
of this software and associated documentation files (the "Software"), to deal
in the Software without restriction, including without limitation the rights
to use, copy, modify, merge, publish, distribute, sublicense, and/or sell
copies of the Software, and to permit persons to whom the Software is
furnished to do so, subject to the following conditions:

The above copyright notice and this permission notice shall be included in all
copies or substantial portions of the Software.

THE SOFTWARE IS PROVIDED "AS IS", WITHOUT WARRANTY OF ANY KIND, EXPRESS OR
IMPLIED, INCLUDING BUT NOT LIMITED TO THE WARRANTIES OF MERCHANTABILITY,
FITNESS FOR A PARTICULAR PURPOSE AND NONINFRINGEMENT. IN NO EVENT SHALL THE
AUTHORS OR COPYRIGHT HOLDERS BE LIABLE FOR ANY CLAIM, DAMAGES OR OTHER
LIABILITY, WHETHER IN AN ACTION OF CONTRACT, TORT OR OTHERWISE, ARISING FROM,
OUT OF OR IN CONNECTION WITH THE SOFTWARE OR THE USE OR OTHER DEALINGS IN THE
SOFTWARE.
Rahul Marreddy Thumma
- 🌐 GitHub: @merahulthumma
- 💼 LinkedIn: Rahul Thumma
- 📧 Email: your.email@example.com
- 🎓 Education: Master of Engineering (Telecommunications), Melbourne Institute of Technology
Special thanks to:
- Adafruit Industries - For the excellent fingerprint sensor library
- Arduino Community - For extensive documentation and support
- Frank de Brabander - For the LiquidCrystal I2C library
- Open Source Contributors - For inspiring this project
- Adafruit Fingerprint Sensor Library Documentation
- Arduino Official Documentation
- LiquidCrystal I2C Library
Want to learn more? Check out these resources:
- 📺 Arduino Fingerprint Sensor Tutorial
- 📖 I2C LCD Display Guide
- 🔧 Biometric Systems Basics
- 💡 Arduino Project Ideas


- ✅ Basic enrollment functionality
- ✅ Fingerprint verification
- ✅ LCD display integration
- ✅ Serial communication
- ⏳ Web-based management interface
- ⏳ WiFi connectivity (ESP8266/ESP32)
- ⏳ Database logging
- ⏳ Mobile app integration
- ⏳ Multi-language support
- ⏳ OLED display option
- ⏳ Buzzer feedback
Q: Can I use a different fingerprint sensor?
Yes! Most optical fingerprint sensors (R307, AS608, GT-511C3) work with minor modifications to the baud rate.
Q: How secure is this system?
The sensor has a False Acceptance Rate (FAR) of < 0.001% and stores templates as mathematical representations, not actual fingerprint images.
Q: Can I store more than 127 fingerprints?
The sensor's hardware limit is 127 templates. For larger capacity, consider upgrading to a database-backed system with multiple sensors.
Q: Does it work with Arduino Mega/Nano?
Yes! Just adjust the pin numbers in the code. Mega has more serial ports, Nano works identically to Uno.
Q: Can I add WiFi to send notifications?
Absolutely! Integrate ESP8266 or ESP32 to add IoT features like cloud logging and mobile notifications.
If you found this project helpful, please consider giving it a ⭐ on GitHub!
Need help? Here's how to get support:
- 📝 Documentation: Read this README thoroughly
- 🐛 Bug Reports: Open an issue
- 💡 Feature Requests: Open an issue
- 💬 Discussions: Start a discussion
- 📧 Email: your.email@example.com
Made with ❤️ by Rahul Thumma