English | 한국어


Add a PowerPoint-grade presenter view to your HTML slides. One file · no install · no internet.
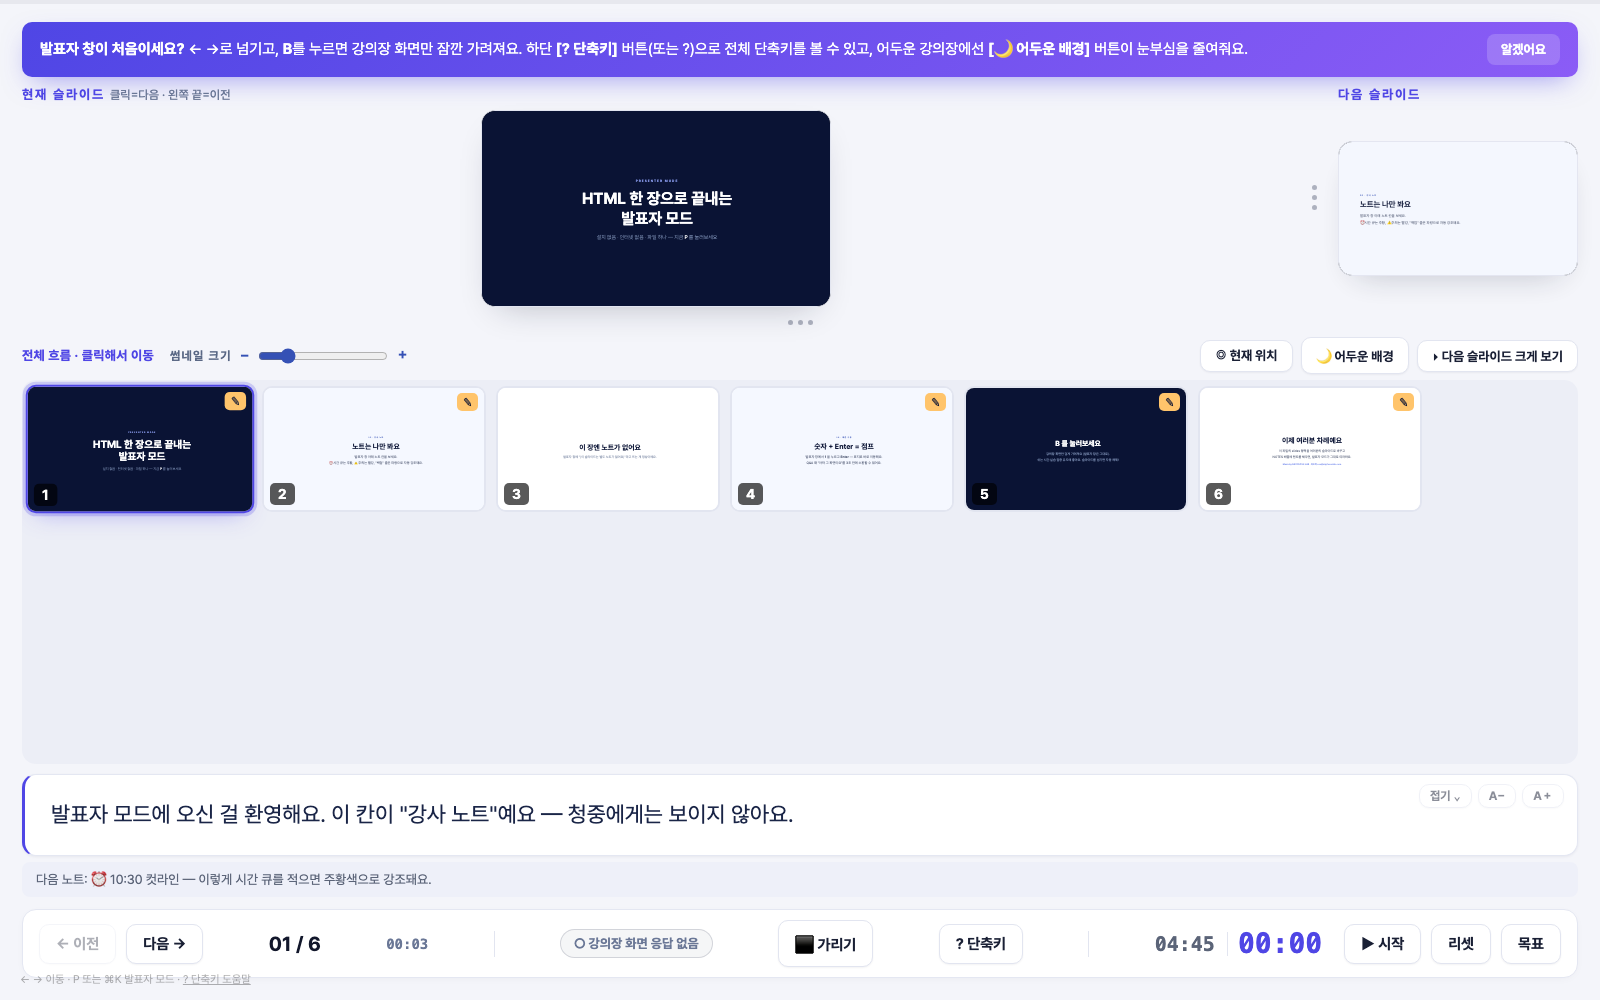
- 🖥️ Presenter window (only you see it) — current/next slide · speaker notes · timer · filmstrip
- 📽️ Audience screen — clean fullscreen slides, nothing else
- 🔌 Keeps working when the venue Wi-Fi dies — battle-tested in real corporate and institutional lectures (including 7-hour full days)
- 🌐 English & Korean UI — auto-detected from your browser, switchable anytime with the 🌐 button (or
?lang=en/?lang=ko)
I'm a lecturer who teaches AI classes. I build my course decks as HTML slides with AI coding agents — much faster than PowerPoint, and they look better too.
But one thing was missing: presenter view.
The screen PowerPoint gives you for free — your notes, the next slide, a timer, all while the audience sees only the slides. HTML slides don't have it, so I ran 7-hour lectures holding printed notes. So I built it, and now I'm sharing it with everyone who presents with HTML slides.
| Contents | ① Try it in 3 minutes → ② Attach it to your slides → ③ Features → ④ Shortcuts → ⑤ Venue setup → ⑥ How it works → FAQ · Changelog |
|---|
npx presenter-mode        # opens the demo — press P!
npx presenter-mode init   # copies the template into the current folder
No Node? No problem:
- Green
Codebutton →Download ZIP→ unzip - Double-click
index.html(opens in Chrome) - Press
P— the presenter window appears!
Tip
The 7 demo slides are the tutorial. Use the arrow keys and try, in order: note highlighting → B break screen → D draw → M magnifier → Z area zoom → 4 Enter jump.
| Way 1 · Ask an AI ⭐ | Way 2 · Do it by hand | |
|---|---|---|
| Best for | Non-developers, busy people | Anyone comfortable with HTML |
| Time | ~5 minutes | 10–20 minutes |
| You need | An AI coding tool (e.g. Claude Code) | A text editor |
Paste the prompt below into Claude Code (or any AI coding tool). Only the two [ ] brackets need editing.
Attach the "Presenter Mode" from the repo below to my slide file.

Repo: https://github.com/jinnyjiinlee/presenter-mode
My slide file: [path to my slide HTML, e.g. ~/Desktop/deck.html]

Steps:
1. Take the whole presenter-mode engine from the repo's index.html
   (from the "Presenter View" CSS section to the end + the entire <script> block)
2. Read my slide file's structure first, then make each slide one
   <section class="slide"> (only the first one class="slide active").
   If my slides aren't 1600×900, adjust .deck-inner/.slide sizes and
   the fit() calculation to my slide dimensions.
3. Build the NOTES array with one entry per slide. Leave them all as
   empty strings, but add a /*number slide-title*/ comment on each line
   so I can fill them in later.
4. Change DECK_ID to '[my deck name, e.g. sales-2026]'.
5. When done, open it in Chrome and verify: P opens the presenter
   window, both windows move together with the arrow keys, and B
   blacks out the screen.

Important: do not change the design or content of my original slides.
When it's done, open the file in Chrome and press P — that's it. Notes can be delegated too:
Put "take questions here" in the notes for slide 3.
Way 2 · Do it by hand — only three places to change (click to expand)
index.html is the template.
① Replace the slides — swap the <section class="slide"> blocks between the ▼▼▼ REPLACE FROM HERE comments with your own slides.
<section class="slide">   <!-- one slide = one section.slide -->
  <!-- design at 1600×900 and it scales to any screen automatically -->
</section>- Only the first slide gets
class="slide active"— the design inside is entirely up to you
② Fill in the notes — write your lines, in slide order, in the NOTES array inside <script>.
const NOTES = [
/*01*/ `Opening line. ⏰ 10:30 cutline — time cues are highlighted orange.`,
/*02*/ ``,   // slides without notes: empty string
/*03*/ `⚠️ This demo needs Wi-Fi. backup: backup.png`,
];
③ Name the deck — give each deck its own DECK_ID. (This is what keeps slide position and timer separate when you use several decks in one browser.)
const DECK_ID='my-lecture-2026';| 🖥️ Presenter window | 📽️ Audience screen | 🎯 Flow |
|---|---|---|
| Current/next slide (drag-resizable ratio) | B/W blackout — auto-cleared on slide change |
Remote clicker compatible |
Speaker notes — ⏰ orange, ⚠️ red, backup blue auto-highlighting + next-note preview |
✏️ Ink — pen·highlighter·eraser, live-synced across both windows | number+Enter jump |
| Filmstrip — click to jump · ✎ badge on slides with notes | ☕ Break screen — plain black by default, customizable with logo·message·QR·clock·BGM via the [☕ Break screen] button | Both windows auto-sync (self-heals within 2s) |
| Timer — set a target → time left + 5-min warning, survives window close | 🔍 Magnifier · Z area zoom — enlarge exactly what matters |
No wrap-around at the last slide |
| Clock · dwell time · connection status ●/○ · 🌙 dark toggle | Cursor/hints auto-hide after 4s · Wake Lock · help never leaks to the audience | Home/End · F5 |
Press D and a floating toolbar appears at the bottom.
| Tools | ✏️ Pen D · 🖍️ Highlighter G · ⌫ Eraser E — press the same key again to turn off (Esc also exits) |
| Colors | red · orange · yellow · green · blue · black — pen and highlighter remember their colors separately |
| Sync | Draw on the presenter window's "current slide" or directly on the audience screen — it appears on both, in real time |
| Persistence | Per slide — leave and come back and it's still there. Cleared on window refresh |
| Erasing | ⌫ eraser removes whole strokes as you rub · 🗑 Clear all wipes the current slide |
Tip
Ink coordinates are stored in slide space (1600×900), so strokes land in exactly the same spot even when the two windows are different sizes.
For "let me blow up just that table/code/diagram" moments.
- Press
Z— the cursor enters 🔎 select mode - Drag the area you want enlarged → it fills the screen (a plain click zooms 2× at that point)
- Reset with any of:
Zagain ·Esc· changing slides
- Dragging on the presenter window's "current slide" zooms the audience screen (your own view stays put, so you keep the full picture)
- The zoom factor is computed from the selected area automatically (up to 5×)
- Draw (
D) while zoomed to annotate enlarged details precisely
A circular lens that follows your cursor. Z is "fixed zoom"; the magnifier is "sweep and zoom".
- Click the audience screen (slide window) first to focus it, then press
M— pressing it in the presenter window just shows a hint - Scroll to adjust magnification (1.5–4×),
Magain to turn off - Great for pointing at small text while screen-sharing on Meet/Zoom
B defaults to a plain black screen. If you want more, it becomes a waiting-room / break-time notice. Two ways:
- Way 1 · The button (no code) — the [☕ Break screen] button at the bottom of the presenter window → apply a preset in one click (☕ Break · 🍽 Lunch · 💻 Hands-on · 🙋 Q&A · 🕘 Starting soon), or set the heading, message, logo/QR image, clock and BGM in the form. Saved per deck in your browser.
- Way 2 · Code defaults — fill in
BREAK_SCREENinside<script>and that becomes the deck's default (button settings take precedence).
const BREAK_SCREEN={
  title:'☕ Take a short break',   // heading — leave all empty (default) for plain black
  sub:"We'll be back in 10 minutes",
  logoText:'ACME Inc.',            // text logo (or set logoImg to an image path)
  logoImg:'',                      // e.g. 'logo.png'
  qrImg:'',                        // e.g. 'qr.png' — community / website QR
  qrLabel:'',                      // caption under the QR
  showClock:true,                  // show the current time
  bgm:''                           // e.g. 'break.mp3' — break BGM (♪ button to play/pause)
};
Note
Because of browser autoplay policies, the first BGM playback may need one click on the on-screen ♪ button.
Tip
No need to memorize — the [? Shortcuts] button (or ?) in the presenter window shows them all.
| Key | Action |
|---|---|
← → · Space · Enter · clicker |
Move between slides |
number + Enter |
Jump to that slide |
Home / End |
First / last slide |
B / W |
Hide the audience screen — B is the (customizable) break screen / W is plain white |
D / G / E |
Pen / highlighter / eraser — live-synced across windows · Esc to exit |
M |
Mouse magnifier (audience screen) · scroll to zoom |
Z |
Area zoom — drag an area to fill the screen (click = 2× · Z again to reset) |
F or F5 |
Fullscreen |
P · ⌘K (Mac) · Ctrl+K (Windows) |
Open the presenter window |
V |
Switch presenter view |
T / R |
Timer start·pause / reset (press twice) |
? or H |
Shortcut help |
Important
Set the display to "Extend"! In mirror mode your speaker notes are projected to the audience.
- Connect the projector → "Extend" mode (Mac:
⌘+Fn+F1toggles · Windows:Win+P) - Open your deck HTML, press
P→ presenter window appears - Drag the slide window (= audience screen) onto the projector →
Ffor fullscreen - Check the green "● Audience screen connected" light at the bottom of the presenter window — done!
For live demos, ⌘+Fn+F1 to mirror briefly → back to extend when done. Your slide position is preserved.
Same flow — only the projector becomes screen sharing.
- Open the deck HTML and press
P→ two windows appear - In Meet/Zoom choose "Share a window" → the slide window (audience screen) — share a window, not the entire screen, so your notes never leak
- Present from the presenter window — navigation, ink and zoom all appear live in the shared window
- On breaks press
B— participants see your break screen (logo·QR·BGM). The "🕘 Starting soon" preset makes a perfect pre-webinar waiting screen
[Your laptop]   Presenter window (#presenter) — notes · timer · next slide
     ▲
     │  localStorage + BroadcastChannel real-time sync
     │  (all inside the browser — no internet needed)
     ▼
[Projector]     Audience screen — fullscreen slides only
- The same HTML file is opened in two windows. With the
#presenterURL hash it renders the presenter UI; without it, the slides. - The presenter window pings every 2 seconds and the audience screen pongs back — that's the connection light (●/○) and automatic drift recovery.
- Previews and thumbnails are the slide DOM itself, shrunk with
cloneNode+scale()— not screenshots, so they always match the real thing. - Timer, theme and layout live in
localStorage— they survive closing the window.
Requirements — Chrome/Edge recommended · macOS & Windows · no server, no build, no install (just open via file://)
I closed the presenter window by accident.
Press P to reopen — current slide and timer carry right over.
The popup was blocked.
Choose "Always allow" from the popup icon at the right of the address bar, then press the [Allowed — open again] button in the on-screen notice.
Can I export a PDF?
Chrome print (⌘P) → save as PDF — the presenter UI is automatically excluded from printing.
Can I use it across two computers?
No — it's a two-screens-one-computer design (laptop + projector), because the sync happens entirely inside one browser.
Is ink saved?
It persists throughout the talk (even as you move between slides) and resets when the window is refreshed or closed. If you want to keep it, take a screenshot.
The magnifier (M) won't turn on.
The magnifier lives on the audience screen (slide window). Click that window once to focus it, then press M. In the presenter window use Z area zoom instead.
I want our company logo·QR on the B screen.
Use the [☕ Break screen] button at the bottom of the presenter window — no code needed. Logo and QR are file pickers, and presets (Break · Lunch · Hands-on · Q&A · Starting soon) are ready to go.
Can it play music (BGM) during breaks?
Yes — put an mp3 filename in the BGM field of the [☕ Break screen] settings (keep the file next to your deck). Due to autoplay policies, the first playback may need one click on the on-screen ♪ button.
Does it work with PowerPoint/Keynote files?
No — HTML slides only. These days you can also ask an AI to "turn this PPT into HTML slides" and then attach it.
How do I change the language?
The UI auto-detects your browser language (Korean → Korean, everything else → English). Switch anytime with the 🌐 button in the bottom bar / presenter window, or open the file with ?lang=en / ?lang=ko.
Rough edges? Ideas? —
- Open an Issue on this repo
- Or email ceo@dayfocuslab.com with the subject
[Presenter Mode Feedback]
MIT — use it, change it, share it. © DAYFOCUS LAB