

Modules for ultrasound data processing, including anonymization, conversion between data formats and imaging modes, and annotations.
This Slicer extension provides several modules for ultrasound data processing:
- AnnotateUltrasound: Interactive annotation of ultrasound images with pleura lines and B-lines
- AnonymizeUltrasound: Anonymization of ultrasound DICOM data
- MmodeAnalysis: M-mode analysis of ultrasound sequences
- TimeSeriesAnnotation: Time series annotation tools
- SceneCleaner: Scene cleanup utilities
- 3D Slicer 4.11 or later
- Python 3.9+ (included with Slicer)
-
Clone the repository:
git clone https://github.com/SlicerUltrasound/SlicerUltrasound.git cd SlicerUltrasound -
Build the extension:
mkdir build cd build cmake .. make -
Install in Slicer:
- Copy the built extension to Slicer's extension directory
- Or use Slicer's Extension Manager to install from the built package
This project uses 3D Slicer's native testing infrastructure with CTest.
# Build with testing enabled
make build-testing

# Run all tests
make test

# Run specific test patterns
make test-pattern PATTERN=AnnotateUltrasound# Build with testing
mkdir build
cd build
cmake -DBUILD_TESTING=ON ..
make
# Run all tests
ctest -V
# Run tests with specific labels
ctest -L unit
ctest -L integration
ctest -L gui
# Run tests with coverage
ctest -V --output-on-failure- Unit Tests (
unitlabel): Test individual module logic and functions - Integration Tests (
integrationlabel): Test module interactions and workflows - GUI Tests (
guilabel): Test user interface and interactions - Slicer Tests (
slicerlabel): Tests that run within Slicer's environment - Ultrasound Tests (
ultrasoundlabel): Ultrasound-specific functionality tests
| Target | Description |
|---|---|
make test |
Run all Slicer-native tests (recommended) |
make test-slicer |
Run Slicer-native tests with CTest |
make test-gui |
Run GUI tests (requires display) |
make test-pattern |
Run tests matching a pattern |
make test-cov |
Run tests with coverage reporting |
make build-testing |
Build with testing enabled |
AnnotateUltrasound/Testing/Python/AnnotateUltrasoundLogicTest.py- Unit tests for AnnotateUltrasoundAnnotateUltrasound/Testing/Python/AnnotateUltrasoundWidgetTest.py- GUI tests for AnnotateUltrasoundAnonymizeUltrasound/Testing/Python/AnonymizeUltrasoundModuleTest.py- Unit tests for AnonymizeUltrasound
The project includes:
CTestConfig.cmake- CTest configurationCMakeLists.txt- Build and test configuration- Module-specific test configurations in each module's
Testing/directory
- Create test file in
ModuleName/Testing/Python/ModuleNameTest.py - Inherit from
ScriptedLoadableModuleTest - Add test methods with descriptive names
- Update the module's
Testing/Python/CMakeLists.txtto include the test - Add appropriate test labels and properties
- Use descriptive test method names
- Test both success and failure cases
- Include edge case testing
- Use appropriate test labels for categorization
- Keep tests independent and isolated
- Clean up resources in
setUp()andtearDown()
# Run tests with verbose output
ctest -V

# Run specific test with debug output
cd build
./bin/AnnotateUltrasoundLogicTest

# Run GUI tests manually
/Applications/Slicer.app/Contents/MacOS/Slicer --python-script AnnotateUltrasound/Testing/Python/AnnotateUltrasoundWidgetTest.py- Fork the repository
- Create a feature branch
- Add tests for new functionality
- Ensure all tests pass
- Submit a pull request
(MIT License)[https://github.com/SlicerUltrasound/SlicerUltrasound?tab=MIT-1-ov-file#readme]
For issues and questions:
- Create an issue on GitHub
- Check the documentation
- Review existing test cases for examples
This module reads a folder of ultrasound cine loops in DICOM format and iterates through them. It allows masking the fan shaped or rectangular image area to erase non-ultrasound information from the images. It also allows associating labels to loops, so classification annotations can start during anonymization. The masked loops are exported in DICOM format. The exported DICOM files only contain a specific set of DICOM tags that do not contain any personal information about the patient.
- Select Input folder as the folder that contains all your DICOM files. They can be in subfolders.
- Select Output folder as an empty folder, or which contains previously exported files using this module.
- Click Read DICOM folder and wait until the input and output folders are scanned to compile a list of files to be anonymized.
- Click Load next to load the next DICOM file in alphabetical order.
- Click Define mask and click on the four corners of the ultrasound area. Corner points can be modified later by dragging.
- Click Export to produce three files in the output folder: the anonymized DICOM, an annotation file with the corner points, and a json file with all the original DICOM tags that went through light anonymization.
- The area outside the defined fan or rectangle region is erased on all frames.
- A PatientUID is generated as a 10-digit hash of the input DICOM Patient ID, and a FileUID is generated as an 8-digit hash of the DICOM SOP Intance UID.
- The exported output file will be named PatientUID_FileUID.dcm
- When Hash Patient ID is selected, the patient name is replaced the PatientUID and the Series Description is replaced by PatientUID_FileUID.
- New SOP Series UID is generated for every exported file (cine loop) so all DICOM browsers can load them one-by-one. (Most DICOM browsers load all instances of a series at a time, but some ultrasound machines export all cine loops of an exam under a single series UID.)
Options under Settings collapsible button:
- Skip single-frame input files: use this for efficiency if you only need to export multi-frame DICOM files.
- Skip input if output already exists: prevents repeated loading of files whose output already exists.
- Keep input folders and filenames in output folder: keeps the subfolder structure and file names of input files.
- Convert color to grayscale: use this if you want to eliminate colors in the exported images.
- JPEG compression in DICOM: use this to apply compression in exported files without visual information loss.
- Labels file: Select a CSV file that contains classification labels. These labels will populate the GUI with checkboxes. Checked labels will be saved in the exported annotation json files.

This module generates an M-mode image from a B-mode loop along a user-specified line (see US types). The line can be arbitrary, not just ultrasound scan lines. Measurements on the M-mode image can be saved.
- Select Output folder where exported files will be saved.
- Click Scanline to add a line markup on the B-mode image.
- Click Generate M-mode image to generate the M-mode ultrasound in the lower view.
- Optionally click Measurement line to add a ruler on the M-mode image.
- Click Save M-mode image to export both the current B-mode image and the M-mode image with their lines. And the measurement in a CSV file in the output folder.

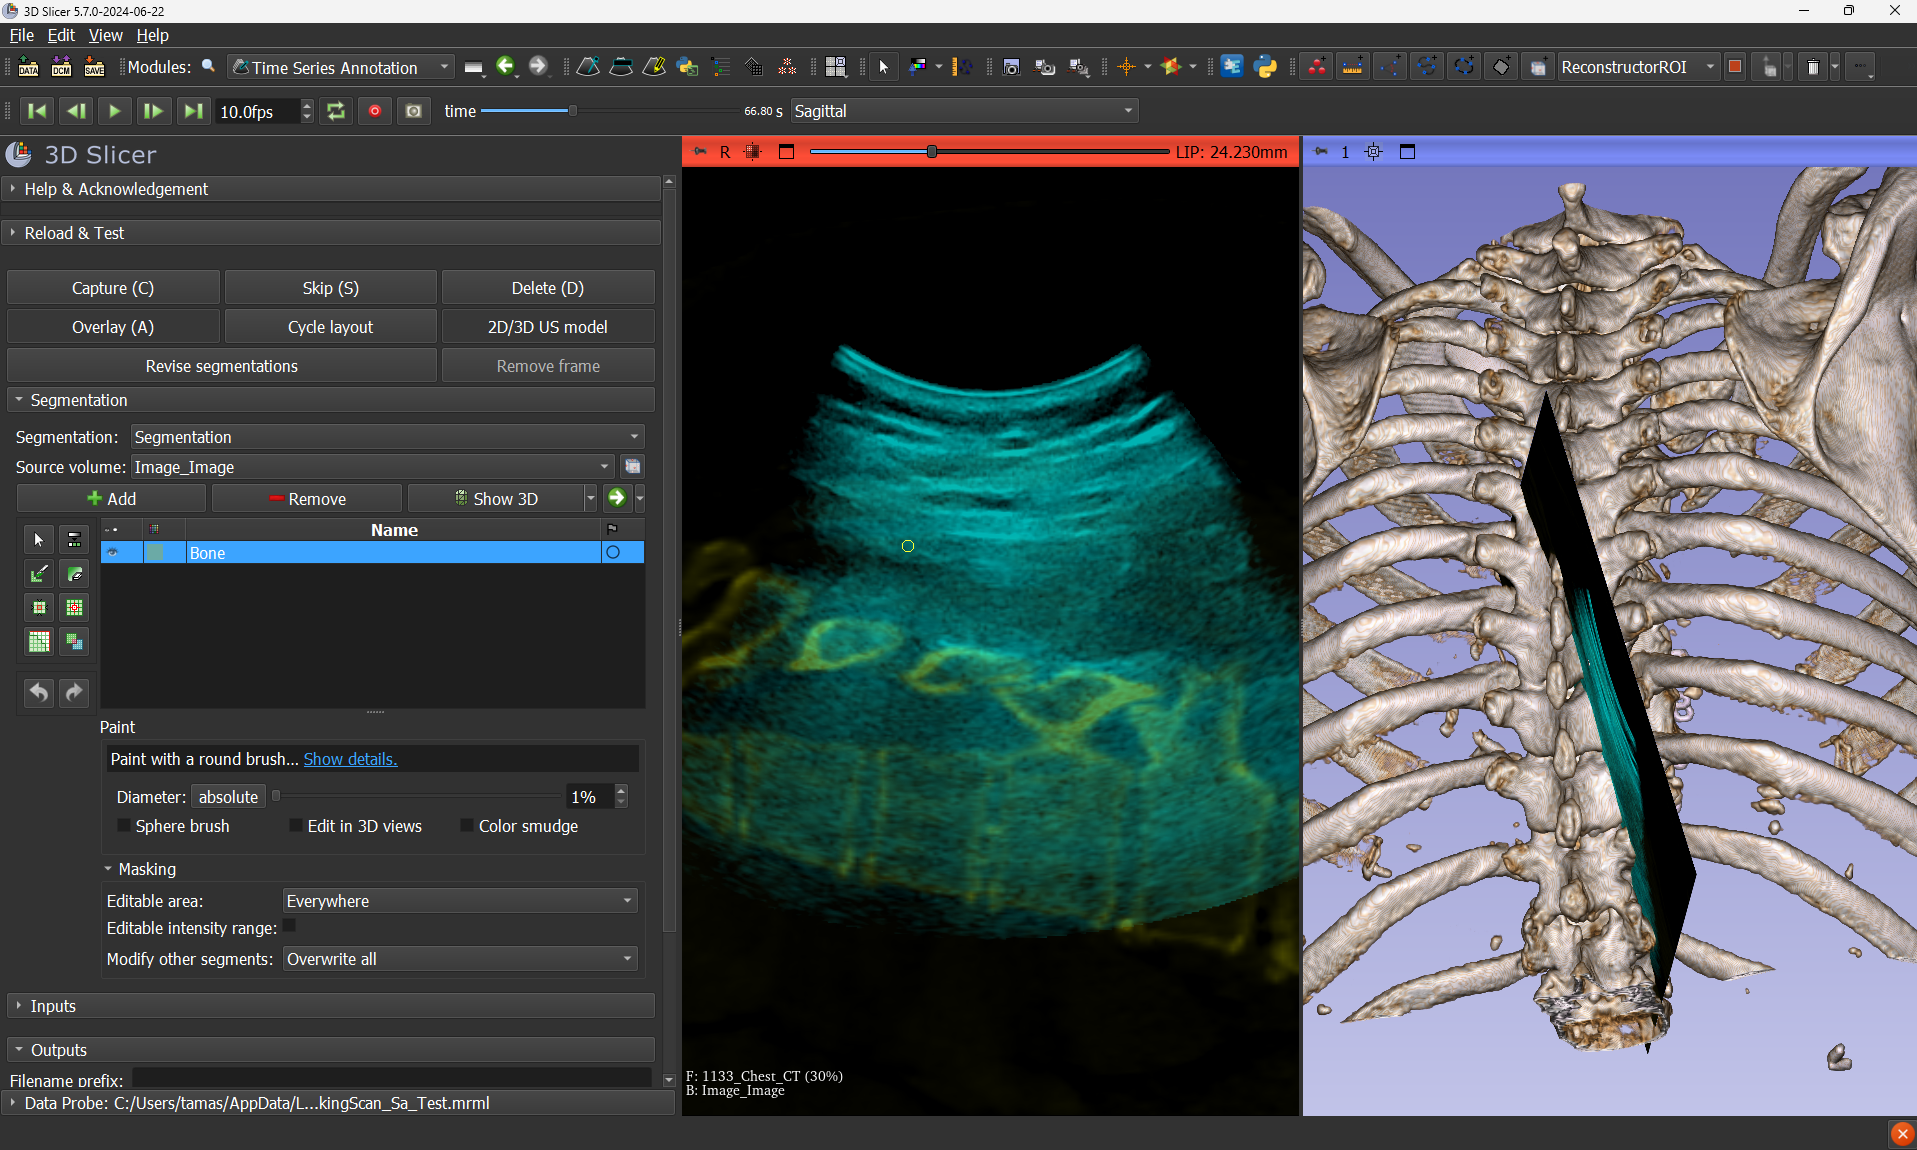
This module facilitates the process of creating segmentations for time-series 2D images (ultrasound) and saving segmentations into an output sequence browser.
- Prepare a Slicer scene with a recorded sequence browser with image frames and optionally tracking (transform) data, registered CT or MRI, ultrasound beam surface model, etc. Althernatively, use the 'Load sample data' button.
- Make selection in the module's Inputs section.
- Use the Segmentation section to create segmentations for frames.
- Keyboard shortcuts facilitate the workflow: C saves current frame, S skips current frame without saving, D erases current segmentation, A shows/hides foreground volume.
Refer to the docs/ directory for more information about development, debugging, and testing.