Azure Files is Microsoft Azure's managed cloud file system that offers customers the ability to mount file shares from the cloud or on-premises while leveraging SMB and NFS protocols. This repo contains several deployments scripts using a packaged helm chart that enable an user to conduct file throughput and IOPS performance tests on a single Azure Files share.
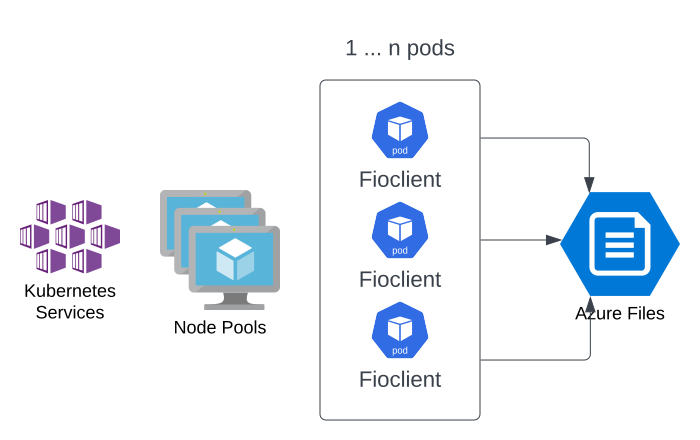
The terraform scripts deploy the infrastructure with an AKS cluster with the cluster autoscaler enabled and a single azure files share.
The Helm package deploys a kubernetes jobs which consists of one or more worker pods, defined by the user, and can run on one or more nodes. An external FIO parameter file is provided as an input to the helm deployment which enables kubernetes jobs to have the same FIO settings.
Detailed instructions on customizing the helm chart is documented below in the Deploying the FIO Helm Chart section.
Once the job is started and completed, the performance results can be viewed on the deployed Azure monitor workspace. The terraform scripts automatically
This repo contains several artifacts to enable a the deployment of full test environment with several clients running on AKS to run a stress test on Azure Files.
- A Terraform script that deploys an AKS Cluster and Azure Files (An NFS or SMB share can be selected using a terraform variable setting)
- A prepacked Helm Chart that deploys fio with several clients
- A DockerFile containing the shell script to build and/or customize the Docker image to push to a local container repo of your choice
This deployment assumes that you are using the latest Terraform. Hashicorp has an excellent tutorial on how to install Terraform on Mac or Windows: Install Terraform
This guide assumes that helm is installed. Detailed instructions can be found at: Install Hashicorp
When the Terraform scripts are run, there is an assumption that the user has already logined into Azure and selected the proper subscription. Ensure that this step is completed.
az login

az account set --subscription="YOUR_AZURE_SUBSCRIPTION"
This script runs commands to merge the local kubernetes management certificate into your local home drive located in ~/.kube, where ~ is the user profile home directory. If you do not have the kubectl command installed, this can be installed using the Azure CLI
az aks install-cli
This deployment assumes that you have an Azure subscription with owner privileges. This setup deploys several Azure Resources and grants RBAC roles to the AKS user managed identity to successfully enable an end-to-end test.
This deployment takes advantage of some AKS features that are currently in preview. You will need to register for the preview before running this deployment. You can use the Azure CLI to do this. Assuming you have completed the login and set the active subscription as described above, register the KubeletDisk and EnableWorkloadIdentityPreview feature previews.
az feature register -n KubeletDisk --namespace microsoft.ContainerService
az feature register -n EnableWorkloadIdentityPreview --namespace "Microsoft.ContainerService"
You will need to re-register the provider in order to propagate the change to your aubscription. You can check the state of the feature registration using this CLI command
az feature show --namespace "Microsoft.ContainerService" --name "EnableWorkloadIdentityPreview"
The output of this command looks like this
{
  "id": "/subscriptions/<<YOUR_SUBSCRIPTION_ID/providers/Microsoft.Features/providers/Microsoft.ContainerService/features/EnableWorkloadIdentityPreview",
  "name": "Microsoft.ContainerService/EnableWorkloadIdentityPreview",
  "properties": {
    "state": "Registered"
  },
  "type": "Microsoft.Features/providers/features"
}
Use the command to check the registration state for both features. When the value of the state property for each one is Registered, you can re-register the provider using this command,
az provider register -n microsoft.ContainerService
| Terraform Resource Type | Description |
|---|---|
azurerm_resource_group |
The resource group all resources get deployed into. |
azurerm_virtual_network |
The VNET used for all resources. |
azurerm_subnet |
The subnet used for AKS. |
azurerm_user_assigned_identity |
The user managed identity used for the AKS API server. |
azurerm_kubernetes_cluster |
An AKS cluster used to run the fio pod clients. |
azurerm_kubernetes_cluster_node_pool |
An optional spot instance pool. |
azurerm_storage_account |
An azure storage account used to host the Azure Files share |
azurerm_storage_share |
An NFS or SMB Azure Files share |
null_resource |
A null resource to retrieve the storage account key and create a kubernetes secret. |
azurerm_role_assignment |
Several RBAC role assignments to grant the proper permissions to AKS. |
azurerm_log_analytics_workspace |
A log analytics workspace to store the storage account performance metrics. |
azurerm_monitor_diagnostic_setting |
An Azure monitor storage diagnostics setting to enable the file share to save performance metrics to the log analytics workspace. |
| Name | Description | Default |
|---|---|---|
aksprefix |
A Prefix for the AKS cluster | daaks |
storageaccountnameprefix |
Storage tier for the storage account | dapol |
account_tier |
The Azure region used for deployments | Premium |
nfs_share_enabled |
The value to enable NFS or SMB | false |
node_count |
Number of nodes in the system node pool | 1 |
account_kind |
Storage account kind | FileStorage |
azure_location |
The Azure region used for deployments | centralus |
system_vm_sku |
VM SKU for the system node pool | standard_d2_v2 |
nodepool_vm_sku |
VM SKU for the node pool | Standard_D8d_v4 |
node_count |
Number of nodes in the system node pool | 1 |
service_cidr |
Service CIDR | 10.211.0.0/16 |
dns_service_ip |
dns_service_ip | 10.211.0.10 |
docker_bridge_cidr |
Docker bridge CIDR | 172.17.0.1/16 |
Ensure that the following commands are run from the following path:
[YOUR_CUR_DIR]/fioperf/deploy/templates where your YOUR_CUR_DIR is the current directory where the GitHub repo was cloned.
For example, on my machine, I am have this repo cloned to my user profile directory:
/Users/davidapolinar/fioperf/templatesIn this example, state is stored in an Azure Storage account that was created out-of-band. All deployments reference this storage account to either store state or reference variables from other parts of the deployment however you may choose to use other tools for state management, like Terraform Cloud after making the necessary code changes.
# Bash
REGION=<REGION>
STORAGEACCOUNTNAME=<STORAGEACCOUNTNAME>
CONTAINERNAME=<TERRAFORMSTATECONTAINER>
TFSTATE_RG=<STORAGERESOURCEGROUP>
Create a Resource Group:
az group create --name $TFSTATE_RG --location $REGIONCreate a Storage Account:
az storage account create -n $STORAGEACCOUNTNAME -g $TFSTATE_RG -l $REGION --sku Standard_LRSCreate a Storage Container within the Storage Account:
az storage container-rm create --storage-account $STORAGEACCOUNTNAME --name $CONTAINERNAME -g $TFSTATE_RGTo store the state on the newly created storage account, modify the backend.conf file:
resource_group_name  = <STORAGERESOURCEGROUP>
storage_account_name = <STORAGEACCOUNTNAME>
container_name       = <TERRAFORMSTATECONTAINER>
key                  = "terraform.tfstate"
The commands below assume that the default user variables settings have been overridden with a values.tfvars file. If using you are storing the state in an azure storage account, you can provide the backend.conf
# Run this command if the storage account was created and the backend.conf values were populated (Recommended)
terraform init -backend-config=backend.conf
# Run this command is a local state file will be used
terraform init

terraform plan -var-file="values.tfvars" -out demo.tfplan

terraform apply "demo.tfplan"By default, the helm chart will pull the container image from DockerHub: dapolloxp/fio:1.0*
NOTE: This container image is updated regularly and this document may not reflect the latest updates.
However, if you prefer to build out your own container image, the following commands can be run on a Linux x64 machine from the following directory:
fioperf/deploy/dockerBuild
docker build . -t [MY_REPO]/[IMAGE_NAME]:[MY_VER]Where [MY_REPO] is the name of your container repository, [IMAGE_NAME] is the name of the container image, and [MY_VER] is the image version. For example, in the command below, dapolina.azurecr.io is my container repository, fioperf is the image name, and 1.0 is the image version:
docker build . -t dapolina.azurecr.io/fioperf:1.0The Helm charts are located in the fioperf/deploy/charts directory.
To build out the helm package navigate to fioperf/deploy/charts/fio-perf-job and execute the following command:
helm package fio-perf-job --version=[YOUR_VERSION_NUMBER]For example, if the Helm chart version is 1.0.0, the default, the package command would be as follows:
helm package fio-perf-job --version=1.0.0This will generate a tgz file with the following name: fio-perf-job-1.0.0.tgz. This is the file that we can use to install the Helm chart
The values.yaml file uses the following defaults
| Name | Description | Default |
|---|---|---|
storageclass.parameters.protocol |
Default protocol. Must match what is configured with the Azure Files Share type | smb |
storageclass.parameters.skuName |
Storage Account SKU | Premium_LRS |
storageclass.parameters.enableLargeFileShares |
Setting to enable large file share support | "true" |
storageclass.parameters.shareName |
Default Azure Files share name. Must match what is configured with Azure Files | "fileshare01" |
storageclass.parameters.storageAccountName |
Default storage account name. Must match what is configured in terraform | "dapolinasafileperf" |
storageclass.reclaimPolicy |
The default reclaim policy | Delete |
storageclass.volumeBindingMode |
The default volume binding mode | Immediate |
storageclass.allowVolumeExpansion |
The default volume expansion mode | true |
aksRG |
The resource group where the storage account exists | aks-rg |
persistentvolumeclaim.spec.accessModes |
The default access mode | ReadWriteMany |
persistentvolumeclaim.resources.requests.storage |
The default | 100Ti |
runOnSpot.enabled |
Enables the Helm chart to run on spot pools if they exist | true |
job.backoffLimit |
The number of retries before considering a Job as failed | 5 |
job.parallelism |
The default setting for parallel jobs | 100 |
job.ttlSecondsAfterFinished |
The default clean-up time for completed jobs | 600 |
fioconfig |
The default fio config file | /fio-perf-job/config/fiorandreadiops.ini |
image.repository |
The default image repository | dapolloxp/fio |
image.pullPolicy |
The default image pull policy | IfNotPresent |
image.tag |
The default image tag | 2023-02-23 |
env.runtime |
The default job runtime | 600 |
By default, sample fio files are located in the following directory: /fio-perf-job/config. These files can be modified as needed. More information on the available parameters can be found on https://fio.readthedocs.io. Below is an example of an FIO parameter file:
[global]
size=1g
direct=1
iodepth=16
ioengine=libaio
bs=24k
numjobs=16
nrfiles=4
group_reporting=1
filename_format=${HOSTNAME}.$jobname.$jobnum.$filenum
time_based=600
runtime=600
ramp_time=60
[randread1]
rw=randread
directory=/mnt/azurefiles/If the package name is fio-perf-job-1.0.0.tgz, and the fio parameters file is in the following directory /fio-perf-job/config/fiorandreadiops.ini, then the helm install command can be run as follows:
helm install --generate-name fio-perf-job-1.0.0.tgz -f fio-perf-job/values.yaml --set-file=fioconfig=./fio-perf-job/config/fiorandreadiops.iniOnce the install kicks off and the job starts, you will see several pods running:
$ helm list
NAME                            NAMESPACE       REVISION        UPDATED                                 STATUS          CHART                   APP VERSION
fio-perf-job-1-1678370182       default         1               2023-03-09 08:56:23.419338 -0500 EST    deployed        fio-perf-job-1.0.0      1.0.0

$ kubectl get job
NAME                        COMPLETIONS   DURATION   AGE
fio-perf-job-1-1678370182   0/1 of 30     4m         4m

$ kubectl get po
NAME                                 READY   STATUS              RESTARTS   AGE
fio-perf-job-1-1678370182-27dqd   1/1     Running       0          3m29s
fio-perf-job-1-1678370182-28vtk   1/1     Running       0          3m29s
fio-perf-job-1-1678370182-4zxbc   1/1     Running       0          3m29s
fio-perf-job-1-1678370182-56zhw   1/1     Running       0          3m29s
...
Once the job completes, the resulting FIO output will be copied to the Azure File shares that was used for benchmarking.
To view the generate FIO files, the following command can be run. Substitute the storage account name for your storage account name.
az storage file list --account-name dapolinasafileperf --share-name fileshare01 --query "[].name"
All pod metrics results are stored on Log Analytics. By default, this is located in the same resource group as the AKS cluster. In our example, this resource group is called aks-rg.
To view IOPS for the file share, use the following KQL query:
StorageFileLogs
| where TimeGenerated > ago (2hr)
| where OperationName == "Read"
    or OperationName == "Nfs4Read"
    or OperationName == "Write"
    or OperationName == "Nfs4Write"
| summarize IOPS=count() by OperationName, bin(TimeGenerated, 500ms)
| render areachart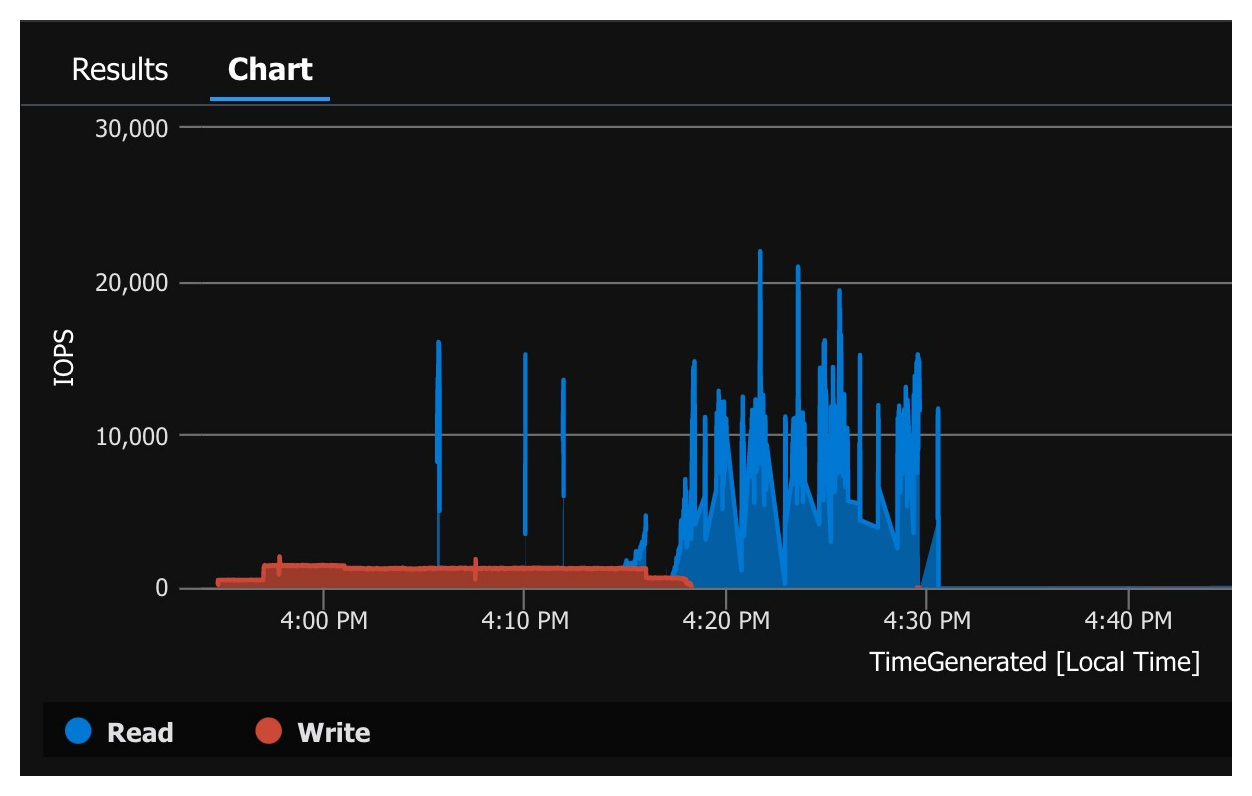
To view IO bandwidth for the file share, use the following KQL query:
StorageFileLogs
| where TimeGenerated > ago (2hr)
| where OperationName == "Write"
    or OperationName == "Nfs4Write"
    or OperationName == "Read"
    or OperationName == "Nfs4Read"
| summarize GiB_PerSecond =sum(ContentLengthHeader) / pow(1024, 3) by OperationName, bin(TimeGenerated, 300ms)
| render areachart
TODO PICTURE HERE