

Checkpoint 401 aims to be the SIMPLEST Forward Auth Security Server to implement and use - this is the primary goal. Checkpoint 401 is written in TypeScript and Deno and you need to write TypeScript code to utilise it in your applications.
The entire server is a single TypeScript file of under 1000 lines - it is a short read:
https://github.com/crowdwave/checkpoint401/blob/master/checkpoint401.ts
Upgrading from version 4? Version 5 requires Deno 2 and changes several defaults so that requests version 4 allowed are now denied. Read MIGRATING.md before you upgrade.
Important May 2024 note: Checkpoint 401 is aimed at sophisticated TypeScript developers... it is brand new and is not battle-tested. We recommend you first read the source code in detail and assure yourself of its suitability for your needs - there is only a single source file - small enough for a skilled TypeScript developer to understand. We welcome code reviews and feedback to improve its reliability and security. Checkpoint 401 has no guarantee at all - use at your own risk.
A forward auth server is a specialised web server that handles authentication on behalf of another server. It acts as an intermediary, verifying permissions for requests to access resources. A forward auth server is used in conjunction with reverse proxies like Caddy, NGINX, and Traefik to enhance security and simplify auth management. These web servers have forward auth functionality which when enabled, sends inbound requests first to the forward auth server, and any other response than 200 OK means the web server will reject the request.
This diagram, from the Traefik documentation link below, shows how a forward auth server fits into the architecture of a reverse proxy:
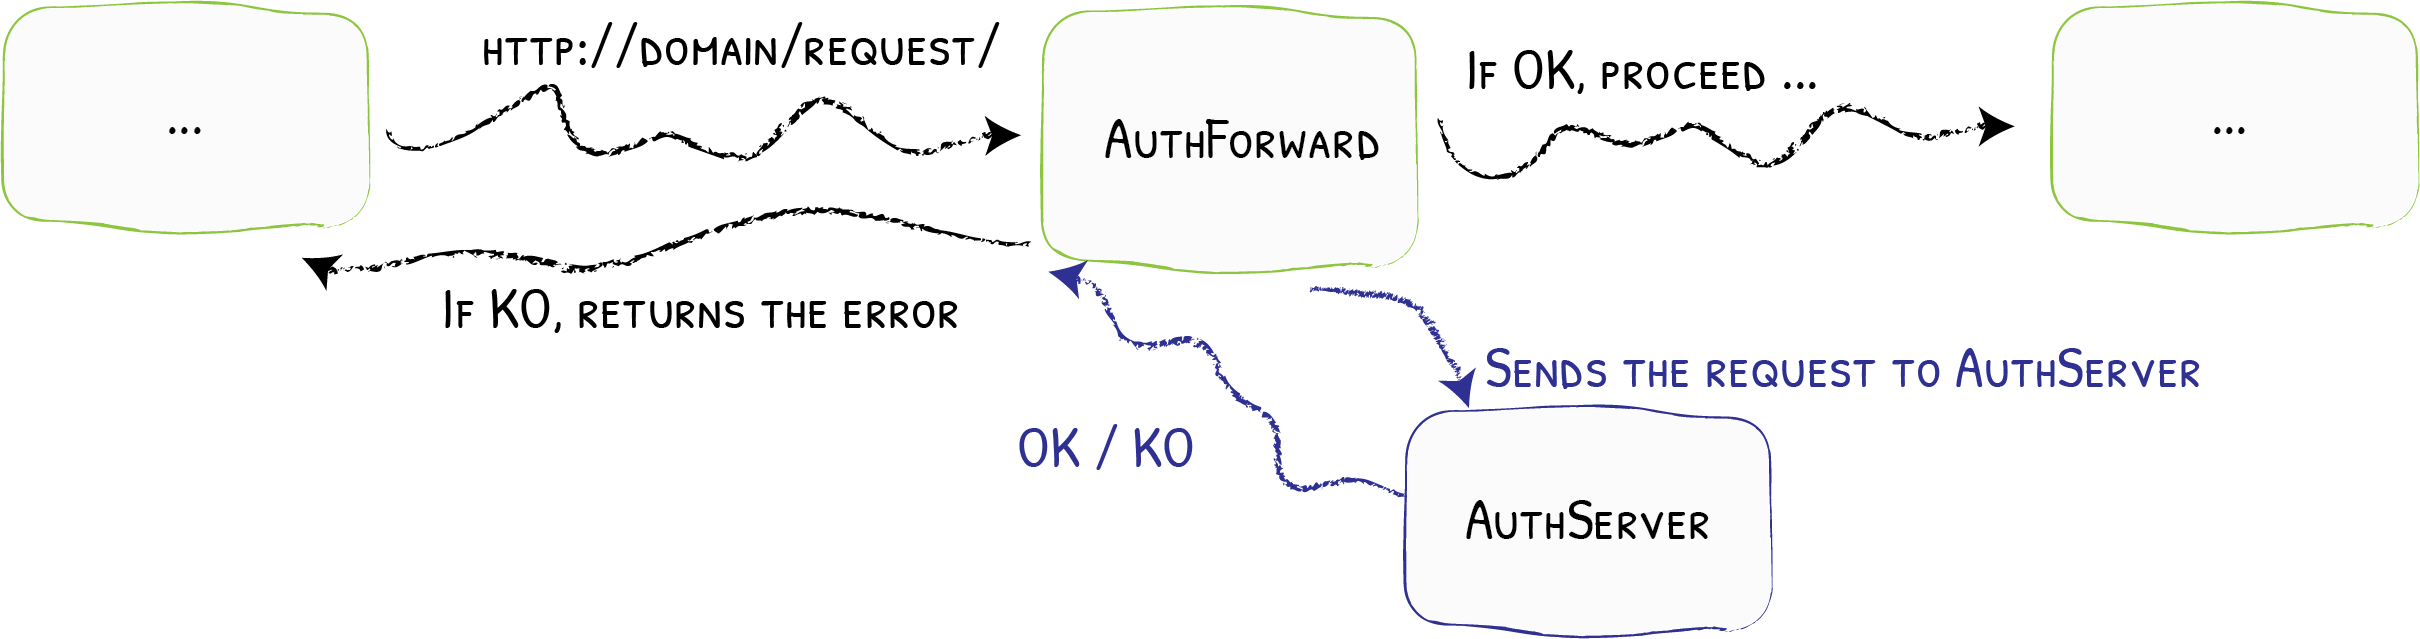

Caddy forward auth doc: https://caddyserver.com/docs/caddyfile/directives/forward_auth
Nginx forward auth doc: https://docs.nginx.com/nginx/admin-guide/security-controls/configuring-subrequest-authentication/
Traefik forward auth doc: https://doc.traefik.io/traefik/middlewares/forwardauth/
When you separate auth from the application server, you no longer need to implement as much auth logic in each application - in an ideal case there would be no auth logic in your application - it would all be handled by the forward auth server. This simplifies application code, reduces security risks, and provides a centralised auth mechanism for all applications behind the reverse proxy.
Instead of having auth code like spaghetti hairball gumball through your application code, you focus your auth coding on the TypeScript endpoint functions in the Checkpoint 401 server. This makes your application code cleaner and easier to maintain.
- Checkpoint 401 is written in Typescript and runs on Deno 2.x.
- Checkpoint 401 aims for simplicity and minimalism - it is easy to understand.
- Checkpoint 401 requires that you provide a routes.json file to define methods/URL patterns and an endpoint function to run when a request matches.
- You write the endpoint functions in TypeScript.
- Your endpoint functions must adhere to a specific signature, returning true or false to allow or deny requests and an optional error message.
- You can provide additional TypeScript files beyond the endpoint functions for additional logic.
- That is the entirety of Checkpoint 401.
Pay particular attention to these two command line arguments:
--header-name-uri
--header-name-method
To understand why these are important, you must first understand that Nginx and Caddy (and presumably Traefik) will pass the URI and method of the inbound request to the forward auth server in headers.
The exact headers they use differs between Nginx/Caddy/Traefik and is also configurable by you in your web server setup.
So these define the headers that Checkpoint 401 will use to pass the URI and method of the inbound request to your endpoint function.
- clone the repository
- install Deno
- create your routes.json file (or modify the example one in the repository)
- write your endpoint functions in TypeScript
- run the server, making sure to specify --header-name-uri and --header-name-method correctly for your web server setup.
- configure a systemd service file to run the server as a service (see the example provided)
Have a look at the files in the config directory of this repository for a practical example of how to use Checkpoint 401.
Exploring the code in the config directory will give you an understanding that you cannot get from reading this documentation page alone.
routes.json: This file defines the routes for the server. It should be a JSON array with each object containing the following properties:
- method: HTTP method (GET, POST, etc.).
- routeURLPattern: The route pattern to match to the inbound request url, which must be a URL pattern as defined in the URL Pattern API documented at: https://developer.mozilla.org/en-US/docs/Web/API/URLPattern/URLPattern
- routeEndpointTypeScriptFile: The flat filename (no directory part) of the TypeScript endpoint handler, located in the config directory (the directory holding routes.json: the current directory, or whatever
--config-dirpoints at).
Example routes.json
[
  {
    "method": "GET",
    "routeURLPattern": "/index.html",
    "routeEndpointTypeScriptFile": "authFuncAnonymous.ts"
  },
  {
    "method": "GET",
    "routeURLPattern": "/api/users",
    "routeEndpointTypeScriptFile": "getUsers.ts"
  },
  {
    "method": "POST",
    "routeURLPattern": "/api/createpost",
    "routeEndpointTypeScriptFile": "createPost.ts"
  },
  {
    "method": "PUT",
    "routeURLPattern": "/api/posts/:id",
    "routeEndpointTypeScriptFile": "updatePost.ts"
  }
]
The endpoint function in Checkpoint 401 does the job of checking if a request is allowed or denied.
It may only return boolean true or false to indicate if the request is allowed or denied, along with an optional errorMessage to return a message to the client.
The filename of your endpoint function must match the routeEndpointTypeScriptFile in routes.json.
Your TypeScript endpoint functions must have a very specific signature to function correctly with Checkpoint 401. The function signature should be:
type EndpointFunction = (req: Request, match: URLPatternResult | null, signal?: AbortSignal) => Promise<{ success: boolean; errorMessage?: string; }>;
Each endpoint function TypeScript file must export a default function that adheres to this signature.
The third argument is optional. It is an AbortSignal that fires when --endpoint-timeout-ms elapses. Pass it to fetch() or your database client so that a timed-out request also cancels the work behind it; the server has already answered 401 by then, so there is no point letting the query run on.
Anything an endpoint does other than return that object - throw, return the wrong shape, or run past the timeout - is treated as a denial and logged as a single line.
Example endpoint function for anonymous:
export default async function authFuncAnonymous(req: Request, match: URLPatternResult | null): Promise<{ success: boolean; errorMessage?: string; }> {
    return { success: true };
}
Example endpoint Function (config/getUsers.ts):
export default async function getUsers(req: Request, match: URLPatternResult | null): Promise<{ success: boolean; errorMessage?: string; }> {
    // Example logic to validate user
    const userId = 2;
    const users = [
        {id: 1, name: "User 1"},
        {id: 2, name: "User 2"},
        {id: 3, name: "User 3"}
    ];

    // Check if the request contains a user with an id of 2
    const userExists = users.some(user => user.id === userId);
    return { success: userExists};
}
Another example endpoint function:
export default async function myAuthEndpointFunction(req: Request, match: URLPatternResult | null, signal?: AbortSignal): Promise<{ success: boolean; errorMessage?: string; }> {
    try {
        // Perform asynchronous operations such as a session lookup
        // against your own user store. Build the URL from values you
        // control - never from req.url, since req.url is the
        // attacker-controlled value the reverse proxy passed in via
        // the X-Forwarded-Uri header and using it as a fetch target
        // would be SSRF.
        const sessionId = getSessionIdFromCookie(req);
        if (!sessionId) return { success: false, errorMessage: 'No session' };

        const response = await fetch(`http://127.0.0.1:5000/sessions/${encodeURIComponent(sessionId)}`, { signal });
        if (!response.ok) return { success: false, errorMessage: 'Session lookup failed' };
        const data = await response.json();

        if (data.valid) {
            return { success: true};
        } else {
            return { success: false, errorMessage: 'Request denied'}
        }
    } catch (error) {
        console.error('Error handling request:', error);
        return { success: false, errorMessage: 'An error occurred while processing the request'};
    }
}
This file in the repository shows how to access cookies in the request:
https://github.com/crowdwave/checkpoint401/blob/master/config/checkCookieIsValidReturningUserId.ts
The match argument contains the match returned by the URL Pattern match against the inbound request. The match object is what is returned by exec as defined here: https://developer.mozilla.org/en-US/docs/Web/API/URLPattern/exec
Most useful, simply console.log it:
console.log(match);
This is an example of how you can use the match object to get values from the inbound URL:
export default async function authFuncUsernameInURLMustMatchSignedInUser(
    req: Request,
    match: URLPatternResult | null,
): Promise<{ success: boolean; errorMessage?: string; }> {
    const userId = await getUserIdFromRequest(req);
    if (!userId) return { success: false, errorMessage: "Failed to get ID from cookie"};
    const userFromDb: UserMinimal | null = await queryGetUser(undefined, undefined, userId);
    if (!userFromDb) return { success: false, errorMessage: "User not found"}
    const outcome  = match?.pathname?.groups?.username === userFromDb.username;
    if (outcome) {
        return { success: true}
    } else {
        return { success: false, errorMessage: "User not found"}
    }
}
When the Checkpoint 401 server starts, it imports all the TypeScript files in the config directory. This means you can import additional TypeScript files beyond the endpoint functions for the routes. These additional TypeScript files can contain any valid TypeScript code you want.
Have a look in the config directory of this repository for an example of how to use additional TypeScript files.
You will find there files that do things like process cookies and access a database to look up user details.
Two rules for config modules:
- Do not install signal handlers or call
Deno.exit(). The server owns process shutdown. A module that exits on SIGTERM races the server's graceful shutdown and loses in-flight responses and the final stats flush. - Export
onShutdownif you hold resources. An endpoint file, or any top-level.tsfile in the config directory, may exportonShutdown(): Promise<void> | void. The server awaits every hook during graceful shutdown, after in-flight requests have drained and counters are flushed, and before it exits. Seeconfig/db.ts, which closes its Postgres pool this way. Only the top level of the config directory is scanned, so a helper in a subdirectory must be re-exported, or its cleanup called, from a top-level file.
The example config reads JWT_SECRET and DATABASE_URL from config/.env. Copy config/.env.example to config/.env and fill it in. .env is gitignored; never commit it.
- Client Request: The client sends a request to the reverse proxy (NGINX/Caddy).
- Forward Auth: NGINX/Caddy forwards the request to the Checkpoint 401 server.
- Checkpoint 401: The request is processed by Checkpoint 401, which runs the appropriate route handler (e.g., getUsers.ts).
- Route Handler: The handler function checks the request and returns true or false.
- Decision: Checkpoint 401 returns a 200 OK response if the request is allowed, or a 401 Deny response if it is denied. The only other status values that Checkpoint 401 can return are 404 (no route matched) and 503 (over the
--max-in-flightlimit). Missing or malformed forwarded headers, and anything that escapes a handler, are answered with 401. - Response to NGINX/Caddy: The decision is sent back to NGINX/Caddy as an HTTP status code. Only 200 means approved.
- NGINX/Caddy Decision: NGINX/Caddy forwards the request to the application server only if an HTTP status 200 was returned from the forward auth server.
Centralized Auth: With a forward auth server, auth logic is centralized, making it easier to manage and update. This ensures that all applications behind the reverse proxy use the same auth mechanism, providing consistency and reducing the risk of security gaps.
Simplified Application Logic: By offloading auth to a dedicated server, the application code becomes simpler and cleaner. The application can focus on its core functionality without worrying about auth, resulting in easier maintenance and fewer bugs.
Enhanced Security: A forward auth server provides a single point of control for auth, allowing for better enforcement of security policies.
Scalability: Centralizing auth allows you to scale your applications independently of the auth system. The forward auth server can handle authentication requests for multiple applications, improving overall system auth and performance.
Flexibility: Forward auth servers can be easily integrated with various reverse proxies like Caddy, NGINX, and Traefik. This flexibility allows you to choose the best reverse proxy for your needs while maintaining a consistent auth mechanism.
Install Deno:
Checkpoint 401 requires Deno 2.x. If you don't have Deno installed, follow the instructions on the official Deno website. If you are upgrading an existing version 4 deployment, follow MIGRATING.md. All dependencies are pinned to exact versions in the source and in deno.lock; run deno task cache once to download and verify them.
Create a Configuration Directory: Create a directory named config and place your routes.json file and endpoint TypeScript files in this directory.
Run the Server: Change your current working directory to config and run the server:
cd config
deno run \
  --allow-net=127.0.0.1:3000 \
  --allow-read=. \
  --allow-write=. \
  --allow-env=PORT,LISTEN_ADDRESS \
  ../checkpoint401.ts
--allow-write must cover the directory that holds the stats
database, not just the database file: SQLite creates journal files
beside it, and a file-scoped grant fails at startup. If you don't want
the stats feature, pass --disable-stats and drop --allow-write
entirely; no database is opened.
The unscoped form (--allow-net --allow-read --allow-env --allow-write)
also works but grants the process arbitrary outbound network access,
read access to the entire filesystem, and write access to the entire
filesystem. Prefer the scoped form above. Adjust the values to match
your --port, --listen-address, and --db-filename if you change
them, and add any additional env vars or hosts your endpoint functions
need. The example config connects to Postgres, so to run it you must
add the database host to --allow-net, for example
--allow-net=127.0.0.1:3000,127.0.0.1:5432, and let the driver read its
standard PG* variables (it consults them even when the connection URL
is complete; Deno 2 accepts a trailing wildcard):
--allow-env=PORT,LISTEN_ADDRESS,PG*
Checkpoint 401 has several optional command-line arguments:
--config-dir <config-dir>: Directory containing routes.json, the endpoint files and any helper .ts files (default: the current directory).--db-filename <database_path>: Path to the SQLite stats database (default: route_stats_counters.db in the current directory). Its directory must be writable.--update-period <update_period_in_milliseconds>: Period in milliseconds to flush counters to the database (default: 10000).--disable-stats: Disable the stats feature entirely. No database is opened or created.--verbose: Log one line per request: status, method, matched pattern and request path. The query string is never logged. Off by default.--quiet: The default; kept for compatibility.--version: Display server version.--help: Show help message.--port <port_number>: Port number to listen on (default: 3000 or PORT environment variable). Setting both is an error.--listen-address <listen_address>: Address to listen on (default: 127.0.0.1 or LISTEN_ADDRESS environment variable). Setting both is an error. Bind to 0.0.0.0 only if you have a network ACL or shared-secret in front; the server treats inbound headers as trusted.--header-name-uri <header_name>: The name of the header that contains the URI of the inbound request (default: X-Forwarded-Uri).--header-name-method <header_name>: The name of the header that contains the method of the inbound request (default: X-Forwarded-Method).--strict-uri/--no-strict-uri: Strict mode is on by default. It rejects (with 401) any forwarded URI that is not a plain/-prefixed path: absolute or protocol-relative URLs, backslashes,.or..segments, fragments, control bytes, and percent-encoded forms of any of those (%2e,%2f,%5c,%23,%00-%1f,%7f), plus%25so a double-decoding backend cannot be fed%252e%252e. Query strings are exempt from the path rules. The URL parser used for route matching normalises all of these, while your backend may not, so authorising on the normalised form would be authorising a different request than the one the backend serves. Only turn this off if your proxy sends something other than a plain request path and you have checked that your backend parses paths the same way.--allow-encoded-path: Keep strict mode but permit percent-encoded/,\,#and%inside path segments, for backends whose routes legitimately carry them (GitLab-stylegroup%2Fprojectids, file names containing%). Enable it only after confirming your backend does not decode and then re-split the path. Encoded control bytes and%2estay refused (the URL parser resolves%2e%2eas a dot segment), as do raw backslashes, dot segments (including the servlet-container form..;), fragments and absolute URLs.--allow-header <Name: Value>: Add this header to every 200 (allow) response. Repeatable. A reverse proxy can copy it onto the upstream request, for example Caddy'scopy_headers, so the application can refuse any request that did not pass through the auth layer. Only safe if the application port is reachable solely via the proxy.--no-error-body: Do not include the endpoint's errorMessage in 401 response bodies. Recommended if your reverse proxy forwards the auth response body to clients, since distinct error strings can enable user enumeration.--endpoint-timeout-ms <ms>: Maximum time an endpoint function may run before the request is denied and the endpoint's AbortSignal fires (default: 10000). 0 disables.--shutdown-timeout-ms <ms>: On SIGTERM or SIGINT, how long to wait for in-flight requests to finish before flushing counters and exiting anyway (default: 10000). A second signal exits immediately.--max-in-flight <n>: Maximum number of live evaluations (default: 1024): requests being handled, plus endpoint invocations that ran past--endpoint-timeout-msand are still running. Requests above the limit receive 503 withRetry-Afterand no endpoint code runs. 0 disables.
The --header-name-uri and --header-name-method arguments are particularly important as they define the headers that Checkpoint 401 will use to pass the URI and method of the inbound request to your endpoint function. The exact headers used can differ between Nginx/Caddy/Traefik and are also configurable by you in your web server setup.
The following ASCII diagram illustrates what Checkpoint 401 does when it starts up:
+---------------------+
|   Checkpoint 401    |
|      Starts Up      |
+---------------------+
          |
          v
+---------------------+
| Read Configuration  |
|   (routes.json)     |
+---------------------+
          |
          v
+---------------------+
| Import TypeScript   |
|   Files in Config   |
+---------------------+
          |
          v
+---------------------+
| Setup Routes from   |
|   routes.json       |
+---------------------+
          |
          v
+---------------------+
| Start HTTP Server   |
|  Listening on Port  |
+---------------------+
Overview of Server Logic
- Read Configuration: Checkpoint 401 reads the routes.json file to get the route configurations. Duplicate method/pattern pairs are rejected, since the later entry could never be reached.
- Import TypeScript Files: It imports all the TypeScript files in the config directory. This allows you to include additional TypeScript files beyond the endpoint functions. A file that fails to import stops startup.
- Setup Routes: It sets up the routes from routes.json.
- Start HTTP Server: Finally, it starts the HTTP server, which listens on the specified port.
On SIGTERM or SIGINT the server stops accepting connections, waits up to --shutdown-timeout-ms for in-flight requests, flushes the counters, runs every module's onShutdown hook, closes the database and exits. A second signal exits at once.
This concludes the full document for Checkpoint 401 Forward Auth Server.
Example nginx configuration
This is untested! It is an example of how you might configure NGINX to use Checkpoint 401:
server {
    listen 80;
    server_name example.com;

    location /protected/ {
        auth_request /auth;  # This specifies the subrequest location for authentication

        # Define the behavior when access is denied
        error_page 401 = @error401;

        # The actual resource
        proxy_pass http://backend;
    }

    location = /auth {
        internal;  # This location should not be accessed directly by clients
        proxy_pass http://auth_service;  # The authentication service

        # auth_request subrequests must not carry the client's body.
        # Without these two lines nginx forwards the original
        # Content-Length with no body and the auth request stalls.
        proxy_pass_request_body off;
        proxy_set_header Content-Length "";

        # Pass the necessary headers to the authentication service.
        # The header names below match the Checkpoint 401 defaults
        # (--header-name-uri / --header-name-method). If you change
        # those flags, change these names to match.
        proxy_set_header X-Forwarded-Uri $request_uri;
        proxy_set_header X-Forwarded-Method $request_method;
        proxy_set_header X-Forwarded-Host $host;
        proxy_set_header X-Forwarded-For $remote_addr;
    }

    # Checkpoint 401 answers 200, 401, 404 or 503. nginx turns every
    # non-200 auth response into a 401 (or 500 for 5xx), so this is the
    # only error handler needed.
    location @error401 {
        return 401 'Unauthorized';
    }
}
Security reports
If you have a security concern, please email andrew.stuart@supercoders.com.au AND leave a security issue in the GitHub issues - do not disclose it there, just say you have a security concern and we will contact you.
License
MIT