前后端分离博客系统 · 双后端架构
Spring Boot 4.x / Go 1.26 · JDK 25 · Vue 3 · Elasticsearch 8.x
⭐ 开源不易,希望大家 Star 支持一下!
由于本人还在上班,主语言并不是 Java,所以项目更新频率较慢,但是本项目会长期维护。有问题可以提 Issue,也欢迎大家来共建此项目,包括但不限于:🐛 Bug 修复、✨ 代码优化、🎉 功能开发 等。
| 🖥️ 站点 | 🔗 链接 | 🔑 账号 |
|---|---|---|
| 🏠 前台 | www.aqi125.cn | — |
| ⚙️ 后台 | admin.aqi125.cn | test@163.com / 123456 |
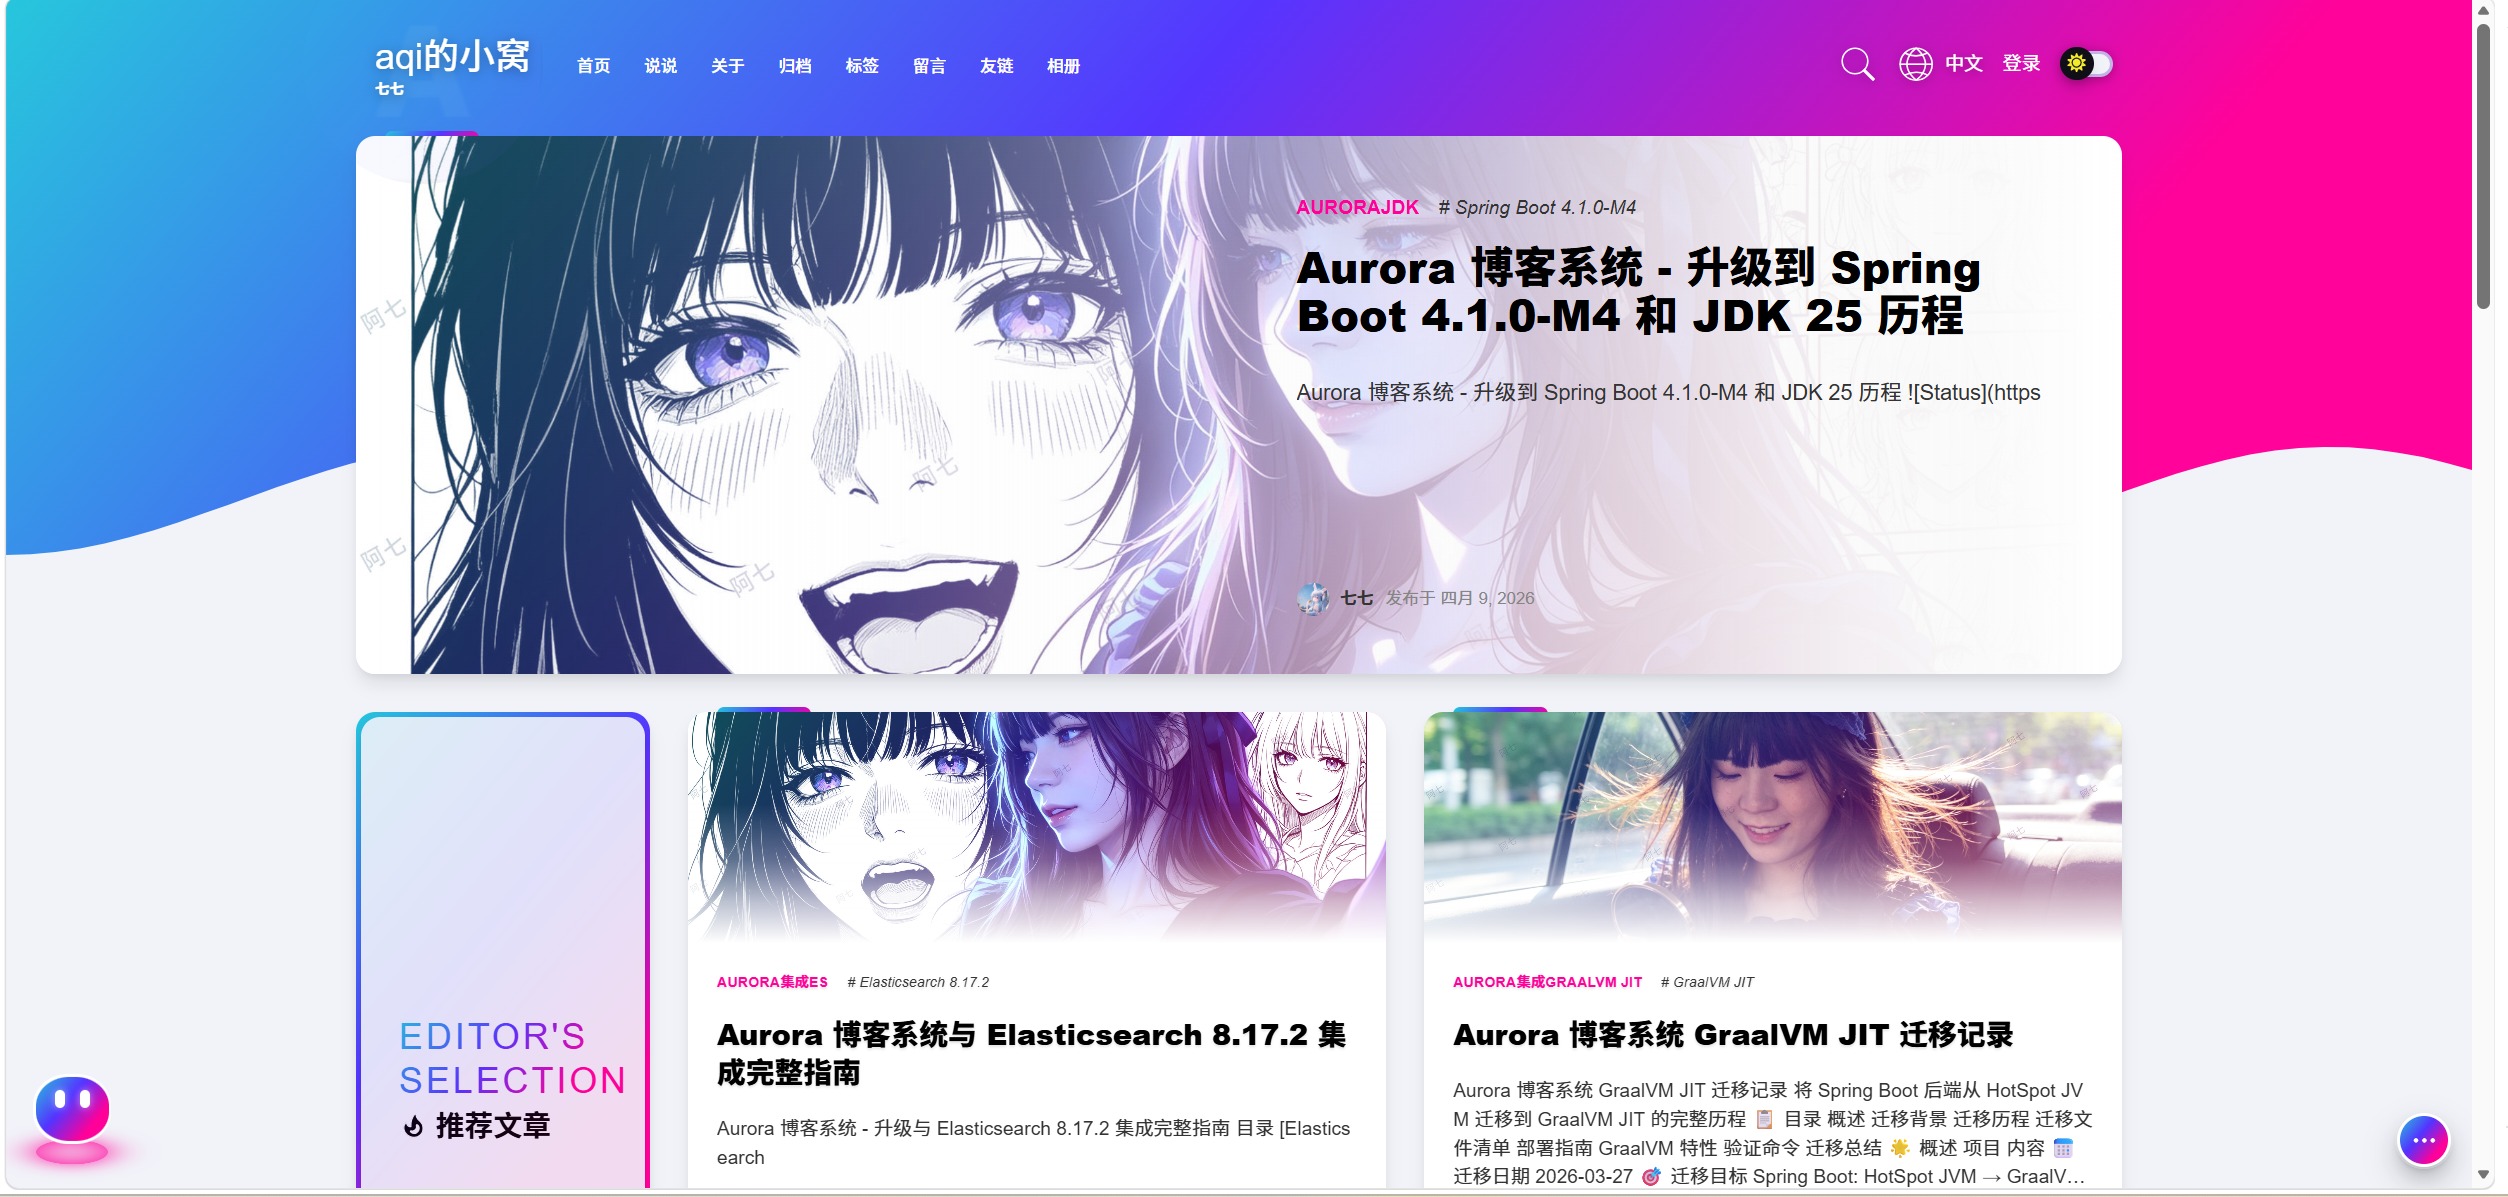
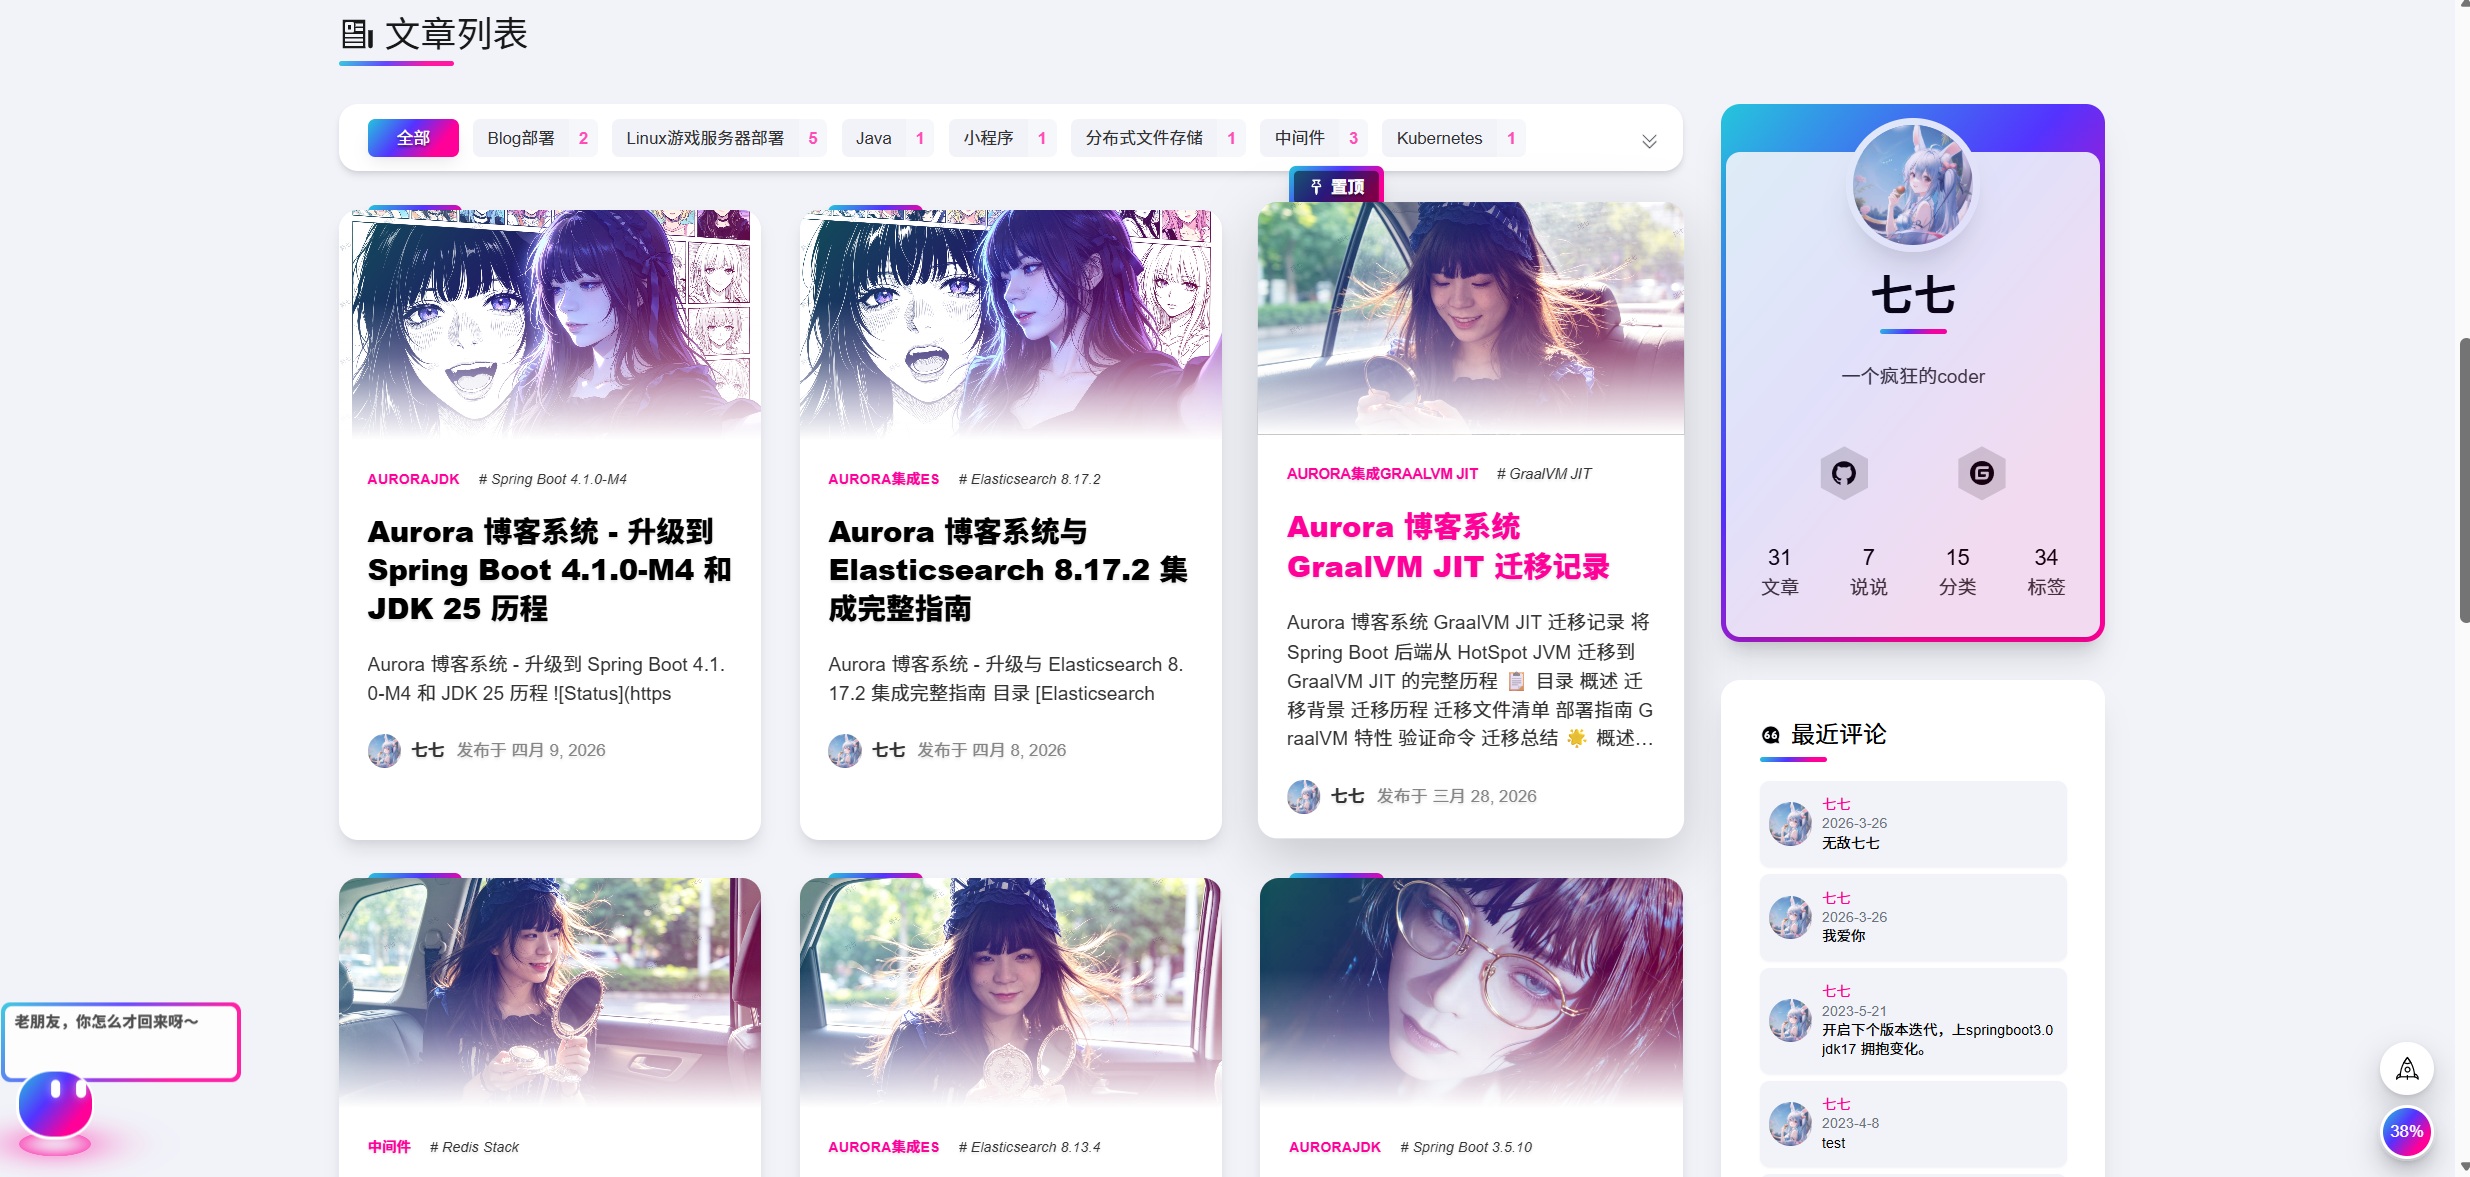
🏠 首页展示 📄 文章详情
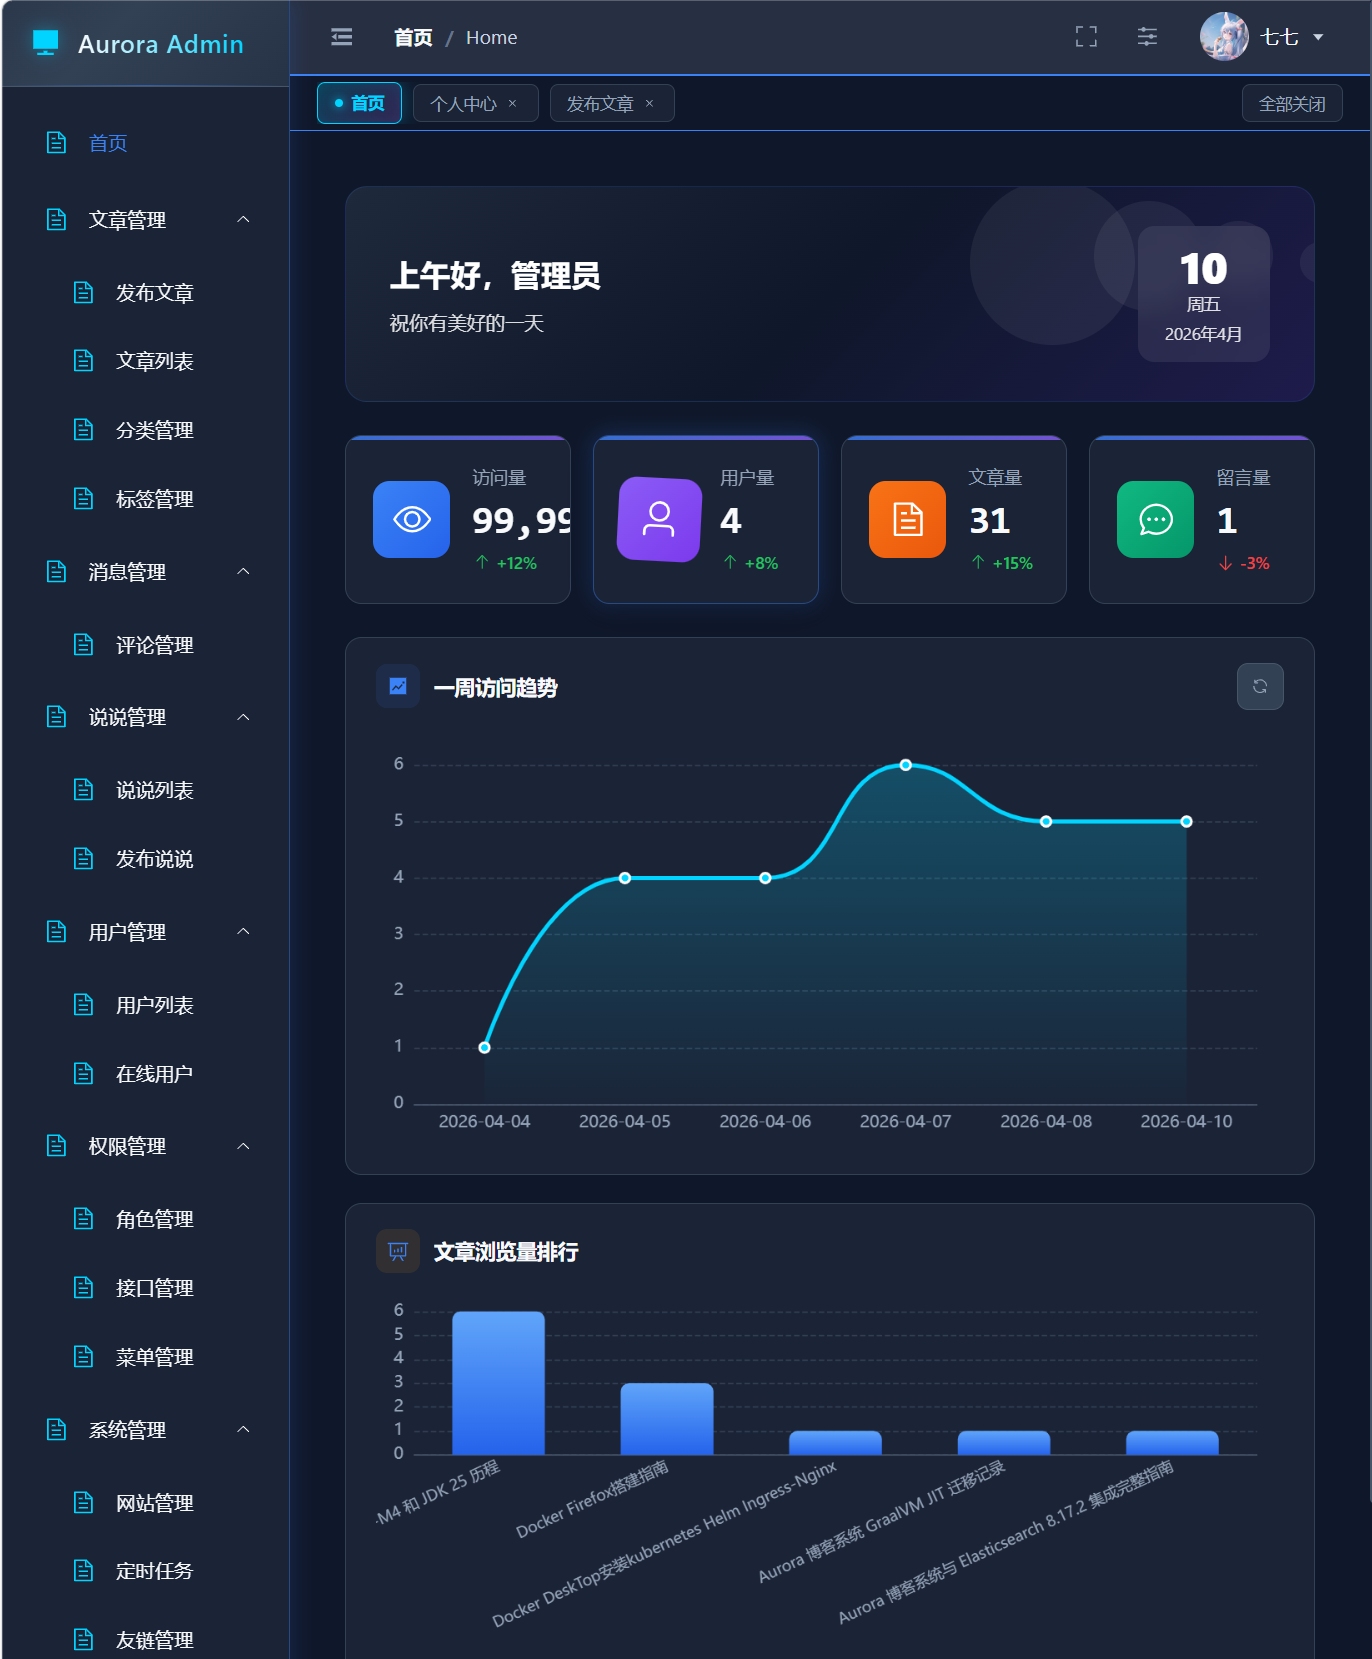
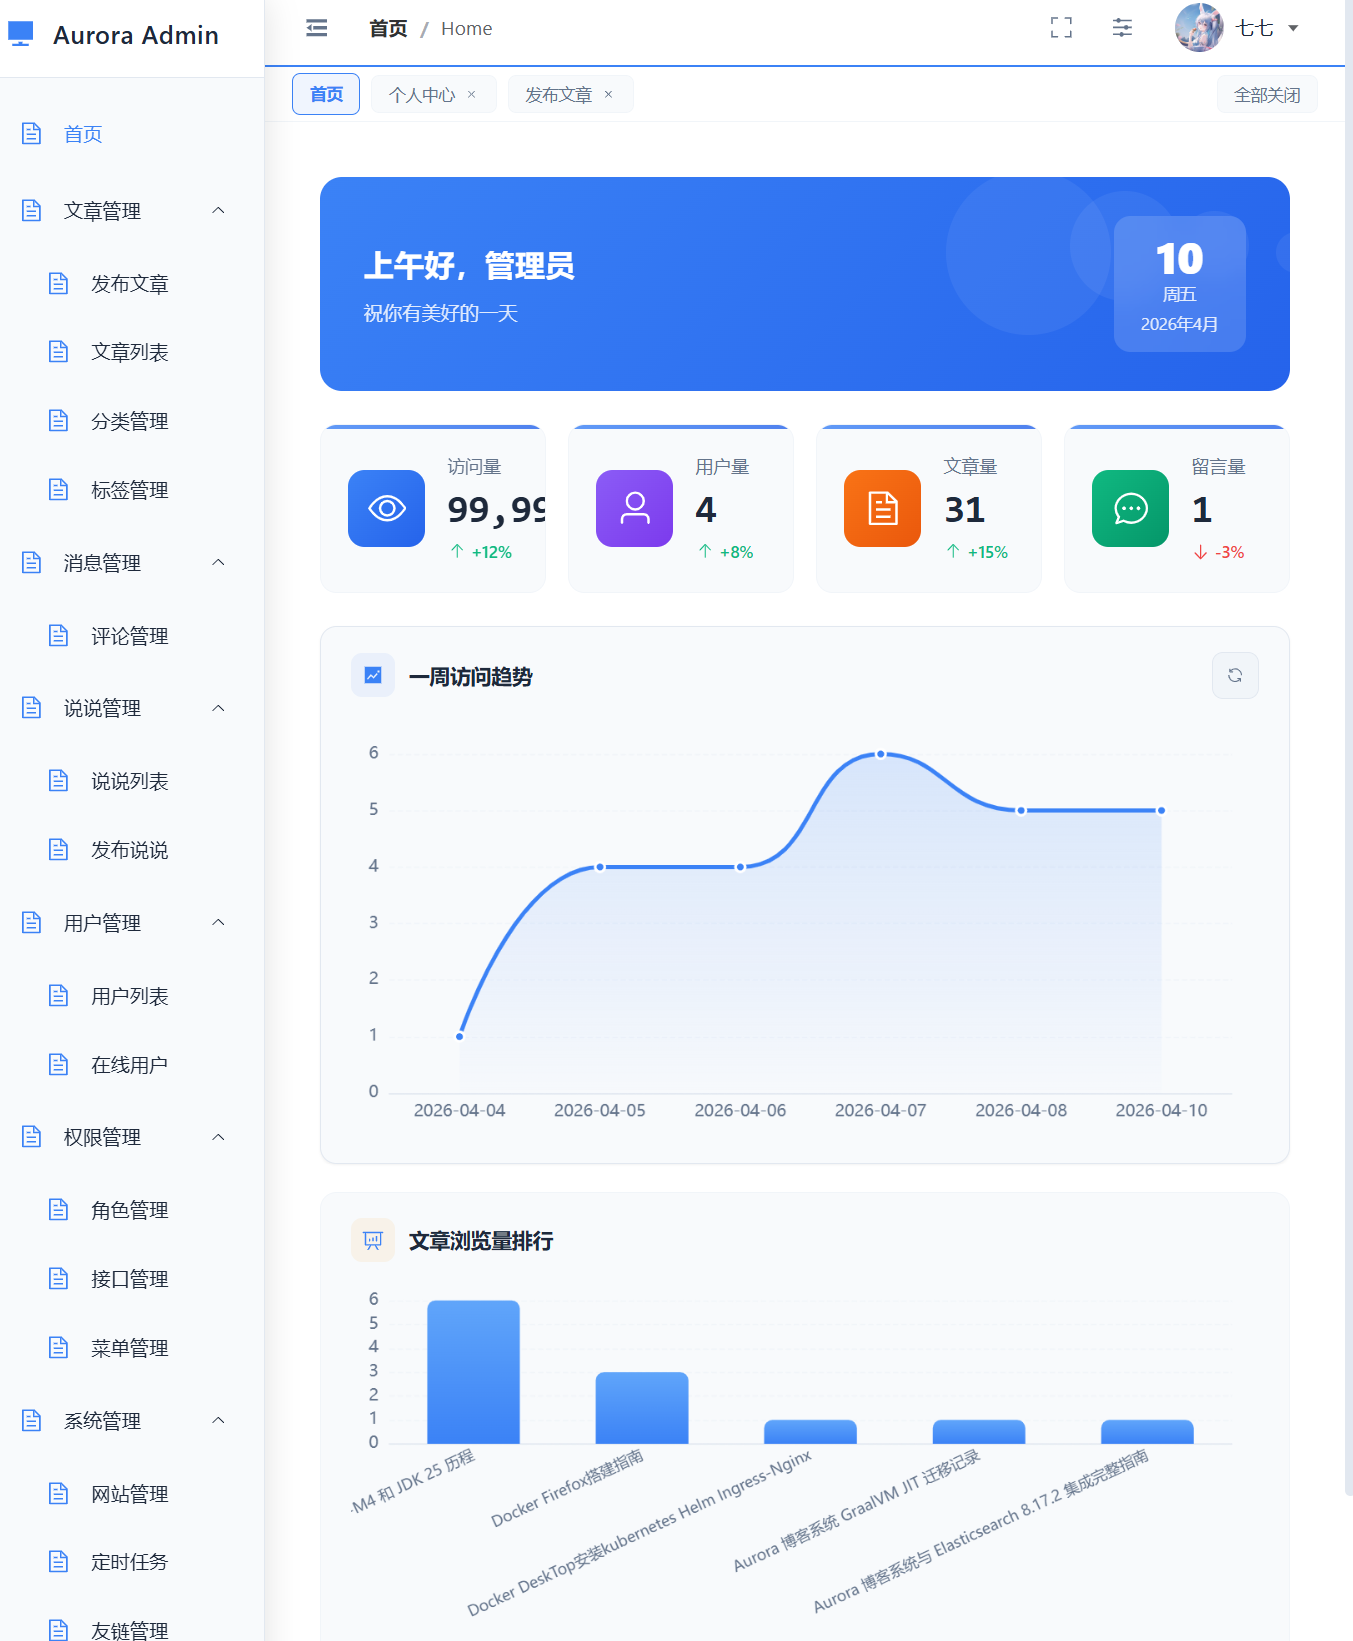
📋 博客列表 🖥️ 管理后台
aurora-master/
├── aurora-springboot/       ☕ Java 后端(主力版本)
├── aurora-go/               🐹 Go 后端(轻量版本,可替换 Spring Boot)
├── aurora-vue/
│   ├── aurora-blog/         🏠 前台(用户端)
│   └── aurora-admin-v3/     ⚙️ 后台(管理端,Vue 3 重写)
├── aurora.sql               📄 数据库初始化脚本
└── README.md
Aurora 提供 Java 和 Go 两种后端实现,共享同一套前端和数据库:
| 对比项 | ☕ Spring Boot | 🐹 Go |
|---|---|---|
| 状态 | ✅ 主力版本,功能完整 | ✅ 已完成核心功能,可替换使用 |
| 内存占用 | ~280 MiB | ~29 MiB (↓89.6%) |
| 启动时间 | ~8s | ~0.3s (↓96%) |
| Docker 镜像 | ~180 MB (JRE) | ~5 MB (↓97.2%) |
| 总内存占用 | ~1,587 MiB | ~1,336 MiB (↓15.8%) |
| AI Agent | — | tRPC-Agent-Go v1.8 (可选) |
| 适用场景 | 功能优先、团队熟悉 Java | 资源受限、追求极致性能 |
💡 两个后端 API 完全兼容,前端无需修改即可切换。
| 📦 分类 | 🛠️ 技术 | 📌 版本 | 📝 说明 |
|---|---|---|---|
| 🏗️ 基础框架 | Spring Boot | 4.1.0-M4 | 最新里程碑版 |
| ☕ 运行环境 | JDK | 25 | 最新版 |
| 🗄️ 持久化框架 | MyBatis-Plus | 3.5.16 | — |
| 🐬 数据库 | MySQL | 9.x | Connector 9.6.0 |
| 🔴 缓存中间件 | Redis Stack | 7.x | — |
| 🐇 消息中间件 | RabbitMQ | 3.x | — |
| 🔍 搜索引擎 | Elasticsearch | 8.19.14 | 原生 Java Client |
| ⏰ 任务调度 | Quartz | 6.x | — |
| 🔒 权限框架 | Spring Security | 6.x | — |
| 📚 API 文档 | SpringDoc OpenAPI | 2.8.0 | OpenAPI 3.x |
| ☁️ 对象存储 | MinIO / Aliyun OSS | 8.6.0 / 3.18.5 | 双存储支持 |
| 🔐 JWT 认证 | JJWT | 0.12.7 | — |
| 📄 JSON 处理 | FastJSON2 | 2.0.61 | — |
| 🔧 工具库 | Hutool | 5.8.44 | — |
| 📦 分类 | 🛠️ 技术 | 📌 版本 | 📝 说明 |
|---|---|---|---|
| 🏗️ Web 框架 | Gin | 1.10 | — |
| ☕ 运行环境 | Go | 1.26 | — |
| 🗄️ ORM | GORM | 1.30 | — |
| 🐬 数据库 | MySQL | 9.x | GORM Driver |
| 🔴 缓存 | go-redis | 9.7 | — |
| 🐇 消息队列 | amqp091-go | 1.10 | — |
| 🔍 搜索引擎 | go-elasticsearch | 8.19.14 | 原生 ES 8.x Client |
| ☁️ 对象存储 | minio-go | 7.0 | — |
| 🔐 JWT | golang-jwt | 5.2 | — |
| 📅 定时任务 | robfig/cron | 3.0 | — |
| ⚙️ 配置管理 | Viper | 1.19 | — |
| 📝 日志 | Zap | 1.27 | 结构化日志 |
| 🤖 AI Agent | tRPC-Agent-Go | 1.8 | 腾讯开源,可选插件 |
| 📦 分类 | 🛠️ 技术 | 📌 版本 |
|---|---|---|
| 🖼️ 基础框架 | Vue 3 | 3.x |
| 🧩 UI 组件库 | Element Plus | 2.2.9 |
| 📊 状态管理 | Pinia | 2.0.14 |
| 🧭 路由组件 | Vue Router | 4.0.3 |
| 🌐 网络请求 | Axios | 0.27.2 |
| 🎨 样式框架 | Tailwind CSS | 2.x |
| 🌍 国际化 | Vue I18n | 9.1.10 |
| ✍️ 富文本编辑器 | Mavon Editor | 3.0.1 |
| 📈 图表库 | ECharts | 5.x |
| 📝 Markdown 解析 | markdown-it | 13.x |
| 🔤 代码高亮 | PrismJS | 1.28.x |
| 🖼️ SVG 图标 | vite-plugin-svg-icons | 2.0 |
| 📦 分类 | 🛠️ 技术 | 📌 版本 |
|---|---|---|
| 🖼️ 基础框架 | Vue 3 | 3.4.21 |
| 🧩 UI 组件库 | Element Plus | 2.5.6 |
| 📊 状态管理 | Pinia | 2.1.7 |
| 🧭 路由组件 | Vue Router | 4.3.0 |
| 🌐 网络请求 | Axios | 1.6.7 |
| ✍️ 富文本编辑器 | MdEditor V3 | 6.4.0 |
| ⚡ 构建工具 | Vite | 5.1.5 |
| 📈 图表库 | ECharts | 5.6.0 |
| 🧪 测试框架 | Vitest | 1.6.0 |
| 🎨 主题系统 | 深色/浅色 + 自定义主题 | — |
| 🔍 全局搜索 | Ctrl+K 快捷搜索 | — |
| 🕐 Cron 生成器 | 可视化 Cron 表达式 | — |
🎨 样式来源:hexo aurora 主题
┌──────────┐    ┌──────────────────┐    ┌──────────────┐    ┌─────────┐
│  Nginx   │──▶│ Spring Boot / Go │──▶│ Elasticsearch │    │  MinIO  │
│ (反向代理) │    │    (后端服务)      │    │   (全文检索)   │    │ (对象存储)│
└──────────┘    └────┬─────────────┘    └──────────────┘    └─────────┘
                     │
              ┌──────┼──────┐
              ▼      ▼      ▼
        ┌──────┐ ┌──────┐ ┌──────┐
        │ MySQL │ │Redis │ │  MQ  │
        │(持久化)│ │(缓存) │ │(消息) │
        └──────┘ └──────┘ └──────┘
Aurora 采用 前后端分离 架构,前端包含两个独立项目:
| 项目 | 用途 | 技术栈 | 端口 |
|---|---|---|---|
aurora-blog |
用户端博客 | Vue 3 + Vite 8 + Element Plus + Tailwind CSS | 5173 |
aurora-admin-v3 |
管理端后台 | Vue 3 + Vite 8 + Element Plus + ECharts | 8080 |
┌─────────────┐      ┌─────────────┐      ┌─────────────┐
│  aurora-blog │────▶│  Nginx      │────▶│  Spring Boot │
│  (用户端)    │      │  (反向代理)  │      │  / Go       │
└─────────────┘      └─────────────┘      └─────────────┘
                         │
┌─────────────┐      ┌─────────────┐      │
│ aurora-admin │────▶│  Nginx      │─────┘
│  (管理端)    │      │  (反向代理)  │
└─────────────┘      └─────────────┘
两个前端项目都使用 Pinia 进行状态管理:
| Store | 用途 | 持久化 |
|---|---|---|
useAppStore |
应用全局状态(主题、侧边栏、语言) | ✅ |
useUserStore |
用户状态(登录信息、权限) | ✅ |
useCommentStore |
评论状态(类型、分页) | ❌ |
持久化配置 (pinia-plugin-persistedstate):
// stores/app.ts
export const useAppStore = defineStore('app', {
  state: () => ({
    sidebarOpen: true,
    theme: 'light',
    locale: 'zh-CN'
  }),
  persist: {
    storage: sessionStorage,  // 或 localStorage
  }
})路由守卫 (src/router/guard/):
authGuard.ts- 登录状态检查permissionGuard.ts- 权限检查(管理端)progressGuard.ts- 页面加载进度条
动态路由 (仅管理端):
// src/router/modules/dynamicRoutes.ts
// 根据用户权限动态生成路由
export const generateDynamicRoutes = (permissions: string[]) => {
  // 根据权限过滤路由
}两个项目都使用统一的 API 封装模式:
// src/utils/request.ts
import axios from 'axios'

const request = axios.create({
  baseURL: import.meta.env.VITE_AURORA_PATH,
  timeout: 10000
})

// 请求拦截器
request.interceptors.request.use(config => {
  const token = sessionStorage.getItem('token')
  if (token) {
    config.headers.Authorization = `Bearer ${token}`
  }
  return config
})

// 响应拦截器
request.interceptors.response.use(
  response => response.data,
  error => {
    // 统一错误处理
    return Promise.reject(error)
  }
)

export default request
API 文件示例:
// src/api/article.ts
import request from '@/utils/request'

export const articleAPI = {
  getList: (params: any) => request.get('/api/articles', { params }),
  getById: (id: string) => request.get(`/api/articles/${id}`),
  create: (data: any) => request.post('/api/admin/articles', data),
  update: (id: string, data: any) => request.put(`/api/admin/articles/${id}`, data),
  delete: (id: string) => request.delete(`/api/admin/articles/${id}`)
}事件总线 (mitt):
// src/utils/emitter.ts
import mitt from 'mitt'

export const emitter = mitt()使用示例:
<!-- 组件 A: 触发事件 -->
<script setup>
import { emitter } from '@/utils/emitter'

const handleClick = () => {
  emitter.emit('article-password-verified')
}
</script>

<!-- 组件 B: 监听事件 -->
<script setup>
import { emitter } from '@/utils/emitter'
import { onMounted, onUnmounted } from 'vue'

const handleVerified = () => {
  // 重新获取文章
}

onMounted(() => {
  emitter.on('article-password-verified', handleVerified)
})

onUnmounted(() => {
  emitter.off('article-password-verified', handleVerified)
})
</script>开发模式:
# aurora-blog
cd aurora-vue/aurora-blog
npm run dev  # http://localhost:5173

# aurora-admin-v3
cd aurora-vue/aurora-admin-v3
npm run dev # http://localhost:8080生产构建:
# 构建
npm run build

# 产物在 dist/ 目录
# 使用 Nginx 部署
Docker 部署:
# Dockerfile 示例
FROM nginx:alpine

COPY dist/ /usr/share/nginx/html

COPY nginx.conf /etc/nginx/nginx.conf

EXPOSE 80

CMD ["nginx", "-g", "daemon off;"]- aurora-blog 详细文档: aurora-vue/aurora-blog/README.md
- aurora-admin-v3 详细文档: aurora-vue/aurora-admin-v3/README.md
| 模块 | 功能 |
|---|---|
| 📄 文章 | Markdown 渲染、代码高亮、目录导航、Mermaid 图表、LaTeX 公式 |
| 🏷️ 标签 | 标签云、标签筛选 |
| 📂 分类 | 文章分类浏览 |
| 🗂️ 归档 | 按时间线归档 |
| 💬 留言板 | 话题留言、表情回复 |
| 📸 相册 | 照片墙、灯箱预览 |
| 🔗 友链 | 友情链接展示、申请 |
| 📢 说说 | 简短动态发布 |
| 🔍 搜索 | Elasticsearch 全文检索 |
| 🌙 主题 | 深色/浅色切换 |
| 🌍 国际化 | 中/英双语 |
| 📱 移动端 | 响应式布局、手势交互优化 |
| 模块 | 功能 |
|---|---|
| 📝 文章管理 | 发布/编辑/删除、Markdown 编辑器、标签/分类 |
| 🏷️ 标签管理 | 增删改查、批量操作 |
| 📂 分类管理 | 增删改查、层级管理 |
| 💬 评论管理 | 审核/删除/搜索 |
| 🔗 友链管理 | 增删改查、上下架 |
| 📸 相册管理 | 创建相册、上传照片、回收站 |
| 📢 说说管理 | 发布/编辑/删除 |
| 👤 用户管理 | 用户列表、角色分配 |
| 🛡️ 角色权限 | RBAC 权限控制、菜单/按钮级权限 |
| 📋 菜单管理 | 动态路由、菜单配置 |
| 📊 资源管理 | 文件上传/管理 |
| ⏰ 定时任务 | Cron 可视化配置、执行日志 |
| 🌐 网站配置 | 基本信息、社交链接、功能开关 |
| 🎨 主题设置 | 深色/浅色/自定义主题、个性化配置 |
| 🔍 全局搜索 | Ctrl+K 全局搜索 |
| 📈 数据面板 | 访问统计、文章数据 |
| 组件 | 版本要求 | 必需 |
|---|---|---|
| JDK | 25+ | ✅ (Java 后端) |
| Go | 1.26+ | ✅ (Go 后端) |
| Node.js | 18+ | ✅ (前端) |
| MySQL | 8.0+ | ✅ |
| Redis | 7.0+ | ✅ |
| RabbitMQ | 3.0+ | ✅ |
| Elasticsearch | 8.x | |
| MinIO | 8.6+ |
💡 快速体验: 使用 Docker Compose 可一键启动所有中间件,无需手动安装!
# 1. 克隆项目
git clone https://github.com/your-repo/aurora-master.git
cd aurora-master

# 2. 启动所有服务 (MySQL + Redis + RabbitMQ + ES + MinIO + Nginx)
cd aurora-springboot
docker compose up -d

# 3. 导入数据库
docker exec -i aurora-mysql mysql -uroot -p123456 aurora < ../aurora.sql

# 4. 访问
# 前台: http://localhost
# 后台: http://localhost:8081# 1. 启动所有服务
cd aurora-go
docker compose -f docker-compose-go.yml up -d
# 2. 导入数据库
docker exec -i aurora-mysql mysql -uroot -p123456 aurora < ../aurora.sql
# 3. 访问
# 前台: http://localhost
# 后台: http://localhost:8081# 登录 MySQL
mysql -u root -p
# 创建数据库
CREATE DATABASE aurora CHARACTER SET utf8mb4 COLLATE utf8mb4_general_ci;
# 导入表结构和初始数据
exit
mysql -u root -p aurora < aurora.sqlMySQL:
# 确保 MySQL 运行在 3306 端口
# 用户名: root, 密码: 123456 (可修改)Redis:
# 确保 Redis 运行在 6379 端口
# 无密码 (可在配置中修改)RabbitMQ:
# 启动 RabbitMQ
docker run -d --name rabbitmq \
  -p 5672:5672 \
  -p 15672:15672 \
  rabbitmq:3.11.9-management

# 默认用户: guest, 密码: guest
Elasticsearch (可选):
# 启动 Elasticsearch
docker run -d --name elasticsearch \
  -p 9200:9200 \
  -e "discovery.type=single-node" \
  -e "xpack.security.enabled=false" \
  elasticsearch:8.19.14

# 验证
curl http://localhost:9200
MinIO (可选):
# 启动 MinIO
docker run -d --name minio \
  -p 9000:9000 \
  -p 9001:9001 \
  -e "MINIO_ROOT_USER=minioadmin" \
  -e "MINIO_ROOT_PASSWORD=minioadmin" \
bitnami/minio:2023.12.7选项 A: Spring Boot 后端
cd aurora-springboot

# 1. 修改配置
# 编辑 src/main/resources/application-prod.yml
# 填入数据库密码、Redis 密码等敏感信息

# 2. 编译打包
mvn clean package -DskipTests

# 3. 运行
java -jar target/aurora-springboot-0.0.1.jar --spring.profiles.active=prod

# 或使用 Maven 插件运行 (开发模式)
mvn spring-boot:run -Dspring-boot.run.profiles=dev
选项 B: Go 后端
cd aurora-go

# 1. 安装依赖
go mod download

# 2. 配置环境变量
cp .env.example .env
# 编辑 .env 填入数据库密码等

# 3. 运行
go run cmd/server/main.go --config configs/config.yaml

# 或使用 Makefile
make run

# 交叉编译 (Windows → Linux)
make build-linux前台 (aurora-blog)
cd aurora-vue/aurora-blog

# 1. 安装依赖
npm install
# 或使用国内镜像加速
npm install --registry=https://registry.npmmirror.com

# 2. 配置后端地址
# 编辑 .env.development
# VITE_API_BASE_URL=http://localhost:8080

# 3. 启动开发服务器
npm run dev
# 访问: http://localhost:5173

# 4. 生产构建
npm run build
# 构建产物在 dist/ 目录
后台 (aurora-admin-v3)
cd aurora-vue/aurora-admin-v3

# 1. 安装依赖
npm install

# 2. 配置后端地址
# 编辑 .env.development
# VITE_API_BASE_URL=http://localhost:8080

# 3. 启动开发服务器
npm run dev
# 访问: http://localhost:8080

# 4. 生产构建
npm run build# /etc/nginx/sites-available/aurora
server {
listen 80;
server_name www.aqi125.cn;
# 前台
location / {
root /var/www/aurora-blog;
index index.html;
try_files $uri $uri/ /index.html;
}
# 后台
location /admin {
alias /var/www/aurora-admin;
index index.html;
try_files $uri $uri/ /admin/index.html;
}
# 后端 API
location /api {
proxy_pass http://localhost:8080;
proxy_set_header Host $host;
proxy_set_header X-Real-IP $remote_addr;
proxy_set_header X-Forwarded-For $proxy_add_x_forwarded_for;
}
}# 1. 创建服务文件
sudo tee /etc/systemd/system/aurora-go.service <<EOF
[Unit]
Description=Aurora Go Backend
After=network.target mysql.service redis.service
[Service]
Type=simple
User=www-data
WorkingDirectory=/opt/aurora/go
ExecStart=/opt/aurora/go/aurora-server --config configs/config.yaml
Restart=always
RestartSec=10s
Environment="TZ=Asia/Shanghai"
[Install]
WantedBy=multi-user.target
EOF
# 2. 启动服务
sudo systemctl daemon-reload
sudo systemctl enable aurora-go
sudo systemctl start aurora-go
# 3. 查看日志
sudo journalctl -u aurora-go -f# 1. 检查后端健康检查
curl http://localhost:8080/health
# 预期响应: {"code":200,"message":"OK"}
# 2. 测试登录
curl -X POST http://localhost:8080/api/auth/login \
-H "Content-Type: application/json" \
-d '{"username":"admin","password":"123456"}'
# 3. 访问前台
open http://localhost:5173
# 4. 访问后台
open http://localhost:8080# 登录获取 JWT Token
curl -X POST http://localhost:8080/api/auth/login \
-H "Content-Type: application/json" \
-d '{
"username": "admin",
"password": "123456"
}'
# 响应示例:
# {
# "code": 200,
# "data": {
# "accessToken": "eyJhbGciOiJIUzI1NiIsInR5cCI6IkpXVCJ9...",
# "user": {
# "id": 1,
# "username": "admin",
# "nickname": "管理员",
# "roleList": ["admin"]
# }
# }
# }# 无需认证即可访问
curl -X GET "http://localhost:8080/api/articles?current=1&size=10" \
-H "Content-Type: application/json"
# 带关键词搜索
curl -X GET "http://localhost:8080/api/articles?keyword=Go语言¤t=1&size=10" \
-H "Content-Type: application/json"# 使用获取的 Token
TOKEN="your_jwt_token_here"
curl -X POST http://localhost:8080/api/admin/articles \
-H "Content-Type: application/json" \
-H "Authorization: Bearer $TOKEN" \
-d '{
"articleTitle": "Go语言入门指南",
"articleContent": "# Go语言简介\n\nGo是一门开源编程语言...",
"articleCover": "https://example.com/cover.jpg",
"categoryId": 1,
"tagName": ["Go", "后端"],
"status": 1,
"isTop": false,
"isFeatured": false,
"type": 1
}'# 上传文章封面或图片
curl -X POST http://localhost:8080/api/admin/files/upload \
-H "Authorization: Bearer $TOKEN" \
-F "file=@/path/to/image.jpg"
# 响应示例:
# {
# "code": 200,
# "data": {
# "url": "https://minio.example.com/aurora/2026/04/image.jpg",
# "filename": "image.jpg",
# "size": 102400
# }
# }# MySQL 搜索模式
curl -X GET "http://localhost:8080/api/articles/search?keyword=Gin&mode=mysql" \
-H "Content-Type: application/json"
# Elasticsearch 搜索模式 (推荐)
curl -X GET "http://localhost:8080/api/articles/search?keyword=Go语言&mode=es" \
-H "Content-Type: application/json"// api-client.ts
class AuroraAPI {
private baseURL: string;
private token: string | null = null;
constructor(baseURL: string = 'http://localhost:8080') {
this.baseURL = baseURL;
}
// 登录
async login(username: string, password: string): Promise<string> {
const response = await fetch(`${this.baseURL}/api/auth/login`, {
method: 'POST',
headers: { 'Content-Type': 'application/json' },
body: JSON.stringify({ username, password }),
});
const data = await response.json();
if (data.code !== 200) {
throw new Error(data.message);
}
this.token = data.data.accessToken;
return this.token;
}
// 获取文章列表
async getArticles(params: {
current?: number;
size?: number;
keyword?: string;
categoryId?: number;
} = {}) {
const query = new URLSearchParams();
if (params.current) query.set('current', params.current.toString());
if (params.size) query.set('size', params.size.toString());
if (params.keyword) query.set('keyword', params.keyword);
if (params.categoryId) query.set('categoryId', params.categoryId.toString());
const response = await fetch(
`${this.baseURL}/api/articles?${query.toString()}`
);
return response.json();
}
// 发布文章 (需要认证)
async createArticle(article: {
articleTitle: string;
articleContent: string;
categoryId: number;
tagName?: string[];
status?: number;
}) {
if (!this.token) throw new Error('请先登录');
const response = await fetch(`${this.baseURL}/api/admin/articles`, {
method: 'POST',
headers: {
'Content-Type': 'application/json',
'Authorization': `Bearer ${this.token}`,
},
body: JSON.stringify(article),
});
return response.json();
}
}
// 使用示例
async function main() {
const api = new AuroraAPI();
// 登录
await api.login('admin', '123456');
// 获取文章列表
const articles = await api.getArticles({ current: 1, size: 10 });
console.log('文章列表:', articles);
// 发布文章
const result = await api.createArticle({
articleTitle: 'TypeScript 入门指南',
articleContent: '# TypeScript 简介\n\nTypeScript 是 JavaScript 的超集...',
categoryId: 1,
tagName: ['TypeScript', '前端'],
status: 1,
});
console.log('发布结果:', result);
}
main();<!-- ArticleList.vue -->
<script setup lang="ts">
import { ref, onMounted } from 'vue'
import { getArticleList } from '@/api/article'
import type { Article } from '@/types/article'
const articles = ref<Article[]>([])
const loading = ref(false)
const fetchArticles = async () => {
loading.value = true
try {
const res = await getArticleList({ current: 1, size: 10 })
if (res.code === 200) {
articles.value = res.data.recordList
}
} catch (error) {
console.error('获取文章列表失败:', error)
} finally {
loading.value = false
}
}
onMounted(() => {
fetchArticles()
})
</script>
<template>
<div class="article-list">
<div v-if="loading" class="loading">加载中...</div>
<div v-else class="articles">
<div v-for="article in articles" :key="article.id" class="article-card">
<img :src="article.articleCover" :alt="article.articleTitle" />
<h2>{{ article.articleTitle }}</h2>
<p>{{ article.articleContent.substring(0, 100) }}...</p>
<div class="meta">
<span>浏览: {{ article.viewCount }}</span>
<span>点赞: {{ article.likeCount }}</span>
</div>
</div>
</div>
</div>
</template>// api/article.ts
import request from '@/utils/request'
import type { ArticleListResponse } from '@/types/article'
export const getArticleList = (params: {
current: number
size: number
keyword?: string
}) => {
return request.get<ArticleListResponse>('/api/articles', { params })
}
export const createArticle = (data: FormData) => {
return request.post('/api/admin/articles', data, {
headers: { 'Content-Type': 'multipart/form-data' }
})
}感谢你对 Aurora 项目的关注!我们欢迎任何形式的贡献。
参与本项目的所有贡献者均须遵守以下准则:
- 尊重他人: 使用友好、包容的语言
- 接受建设性批评: 以专业态度对待反馈
- 关注问题本身: 对事不对人
- 维护社区和谐: 禁止骚扰、歧视、攻击性言论
# 在 GitHub 上 Fork 项目后,克隆你的 Fork
git clone https://github.com/your-username/aurora-master.git
cd aurora-master

# 添加上游仓库
git remote add upstream https://github.com/original-owner/aurora-master.git# 从 main 分支创建新分支
git checkout main
git pull upstream main
git checkout -b feat/add-comment-notification后端 (Java):
cd aurora-springboot
mvn clean compile
# 编写代码并添加测试
mvn test
后端 (Go):
cd aurora-go
go mod download
# 编写代码并添加测试
make test
make lint
前台 (Vue 3):
cd aurora-vue/aurora-blog
npm install
# 编写代码
npm run dev
npm run lint
后台 (Vue 3):
cd aurora-vue/aurora-admin-v3
npm install
# 编写代码
npm run dev
npm run lint# 提交前运行格式化
# Java: 使用 IDE 的格式化功能
# Go: make fmt
# Vue: npm run lint -- --fix
# 提交 (使用 Conventional Commits 格式)
git add .
git commit -m "feat: add comment reply notification feature"
# 推送到你的 Fork
git push origin feat/add-comment-notification- 在 GitHub 上创建 PR
- 填写 PR 模板
- 等待代码审查
- 已搜索现有 Issues,确认没有重复
- 使用的是最新版本
- 提供了完整的复现步骤
**Bug 描述**
简明描述遇到的问题

**复现步骤**
1. 执行 '...'
2. 配置 '...'
3. 看到错误

**预期行为**
描述你期望发生什么

**实际行为**
描述实际发生了什么

**环境信息**
- OS: [e.g., Windows 11, Ubuntu 22.04]
- 后端: [e.g., Spring Boot 4.1.0, Go 1.26]
- 前端: [e.g., Vue 3.4]
- 数据库: [e.g., MySQL 8.0]

**日志输出**
粘贴相关错误日志 (如有)

**截图**
如果适用,添加截图我们欢迎新功能建议!请在使用 Issues 提交时包含:
- 功能描述: 清晰描述你希望添加的功能
- 使用场景: 解释为什么需要这个功能
- 替代方案: 描述你考虑过的其他方案
- 示例: 如果可能,提供伪代码或示例
| 类型 | 前缀 | 示例 |
|---|---|---|
| 新功能 | feat/ |
feat/add-github-oauth |
| Bug 修复 | fix/ |
fix/login-token-expiry |
| 文档 | docs/ |
docs/update-api-reference |
| 性能优化 | perf/ |
perf/optimize-article-query |
| 重构 | refactor/ |
refactor/simplify-handler |
| 测试 | test/ |
test/add-user-service-tests |
PR 标题格式 (遵循 Conventional Commits):
feat: add GitHub OAuth login support
fix: resolve article pagination issue
docs: update API documentation for /upload endpoint
perf: optimize Elasticsearch query performance
PR 描述模板:
## 变更类型
- [ ] Bug 修复
- [ ] 新功能
- [ ] 性能优化
- [ ] 重构
- [ ] 文档更新
- [ ] 测试更新

## 变更描述
详细描述本次变更的内容

## 关联 Issue
Closes #123
Relates to #456

## 测试计划
描述如何测试这些变更

## 检查清单
- [ ] 代码符合项目规范
- [ ] 已添加必要的测试
- [ ] 所有测试通过
- [ ] 已更新相关文档
- [ ] 没有产生新的警告-
遵循阿里巴巴 Java 开发手册
- 使用 IDEA 的 Alibaba Java Coding Guidelines 插件
- 命名规范: 类名
UpperCamelCase, 方法名lowerCamelCase
-
注释规范
/**
 * 根据用户ID获取用户信息
 *
 * @param userId 用户ID
 * @return 用户信息
 * @throws UserNotFoundException 用户不存在时抛出
 */
public User getUserByID(Long userId) throws UserNotFoundException {
    // 实现
}
-
错误处理
// ✅ 正确: 使用自定义异常
try {
    return userRepository.findById(userId)
        .orElseThrow(() -> new UserNotFoundException("用户不存在: " + userId));
} catch (Exception e) {
    log.error("获取用户失败", e);
    throw e;
}

// ❌ 错误: 忽略异常
try {
    return userRepository.findById(userId).get();
} catch (Exception e) {
    // 空catch块
}
-
遵循 Go 官方规范
- 使用
gofmt或goimports格式化代码 - 运行
make fmtbefore提交
- 使用
-
命名规范
// ✅ 正确示例
type UserService interface {}
func GetUserByID(id int64) (*User, error) {}
var userCount int

// ❌ 错误示例
type userService interface {}
func getuserbyid(id int64) (*User, error) {}
var user_count int
-
错误处理
// ✅ 正确: 显式处理错误
user, err := userService.GetUserByID(ctx, userID)
if err != nil {
    return nil, fmt.Errorf("failed to get user: %w", err)
}

// ❌ 错误: 忽略错误
user, _ := userService.GetUserByID(ctx, userID)
-
使用 Composition API
<script setup lang="ts">
import { ref, computed } from 'vue'

// ✅ 使用 ref/reactive 管理状态
const count = ref(0)
const doubled = computed(() => count.value * 2)

// ✅ 使用 async/await
const fetchData = async () => {
  loading.value = true
  try {
    const data = await api.getData()
    // 处理数据
  } finally {
    loading.value = false
  }
}
</script>
-
TypeScript 类型定义
// ✅ 定义清晰的接口
interface Article {
  id: number
  title: string
  content: string
  createTime: string
}

// ✅ 使用类型提示
const articles = ref<Article[]>([])
遵循 Conventional Commits 规范:
| 类型 | 说明 | 示例 |
|---|---|---|
feat |
新功能 | feat: add user registration API |
fix |
Bug 修复 | fix: resolve token expiry issue |
docs |
文档更新 | docs: update API.md with new endpoints |
style |
代码格式 (不影响功能) | style: format code with gofmt |
refactor |
重构 | refactor: simplify error handling in service |
perf |
性能优化 | perf: optimize article list query |
test |
测试相关 | test: add unit tests for UserService |
chore |
构建/工具相关 | chore: upgrade spring boot to 4.1.0 |
<type>(<scope>): <subject>

<body>

<footer>
示例:
feat(auth): add GitHub OAuth login support

- Add GitHub OAuth strategy
- Update User model to store GitHub ID
- Add migration for github_id column

Closes #123
fix(article): resolve pagination issue when page size is 0
When size=0 was passed, the API returned all records instead of
returning a validation error. Now returns 400 with error message.
Fixes #456- 讨论区: GitHub Discussions
- QQ 群: 338371628
- 邮箱: admin@aqi125.cn
感谢所有贡献者的付出! ❤️
📖 详见项目中的 部署文档
- 🔄 Go 版本重构
- 🤖 接入 Agent — tRPC-Agent-Go 完善
- 📦 前后端一体化 Docker Compose 编排
- 🧪 Go 后端测试覆盖率提升
- 📱 PWA 支持
| 📱 社群 | 🔢 号码 |
|---|---|
| 💬 QQ 群 | 338371628 |
感谢 linhaojun857 提供的 Aurora 原版代码。