lightly-modified deauther to support cheap I2C 0,96 Inch display without bugs
flipped display, display not working and frezze

This project is a proof of concept for testing and educational purposes.
Neither the ESP8266, nor its SDK was meant or built for such purposes. Bugs can occur!
Use it only against your own networks and devices!
Please check the legal regulations in your country before using it.
I don't take any responsibility for what you do with this program.
It is not a frequency jammer as claimed falsely by many people. Its attack, its method and how to protect against it is described above. It uses valid Wi-Fi frames described in the IEEE 802.11 standard and doesn't block or disrupt any frequencies.
This project is meant to draw more attention on this issue.
The deauthentication attack shows how vulnerable the 802.11 Wi-Fi standard is and that it has to be fixed.
A solution is already there, why don't we use it?
Please don't refer to this project as "jammer", that totally undermines the real purpose of this project! If you do, it only proves that you didn't understand anything of what this project stands for. Publishing content about this without a proper explaination shows that you only do it for the clicks, fame and/or money and have no respect for intellectual property, the community behind it and the fight for a better WiFi standard!
Drivers and COM Port In order to upload successfully, you must select the correct COM port. You can think of it as the address with that your computer accesses the ESP8266. The best way to find the correct port is to open the Arduino IDE and see what ports are listed there. This looks the same for every OS, including Linux. On Windows, COM1 is usually never the correct port. On Windows you can also have a look at your device manager, there you can also see if a device is not recognized.
If none of the COM ports work correctly or you can't find any COM Port, you might need to install the drivers. The driver you need depends on the UART (USB to Serial) chip that is used on your development board. Those are the drivers of the most used chips:
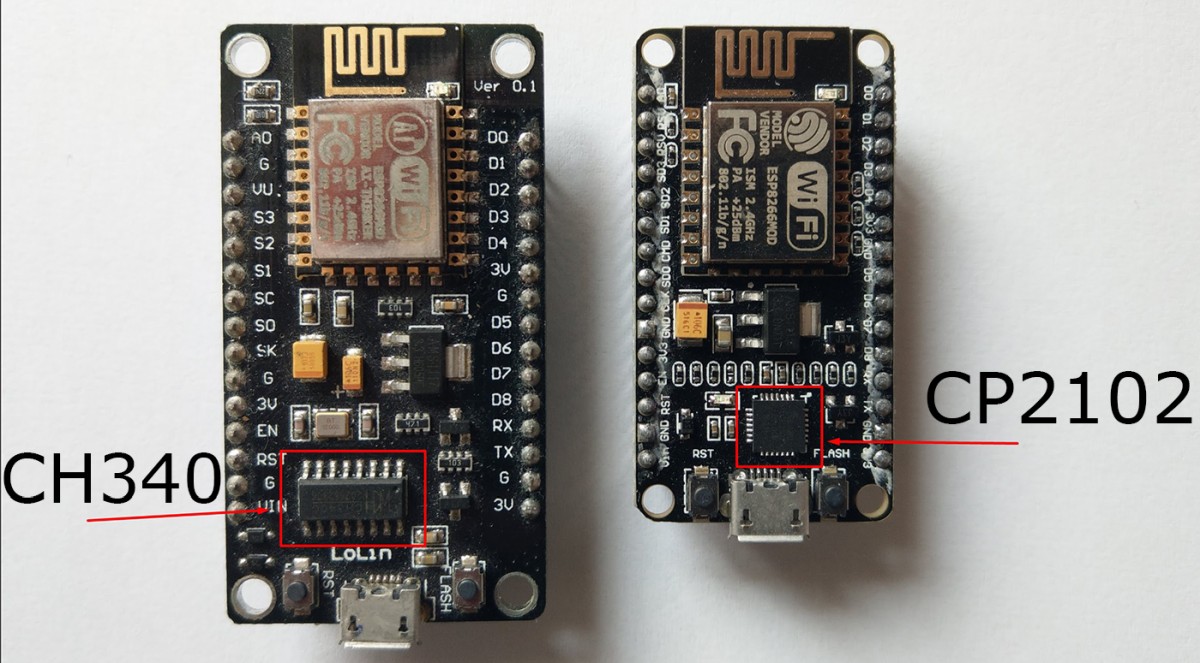
You can find precompiled .bin files on the release page. Be sure to download the latest version. and then flash it to this website
- Download the source code for this project.
- Extract the whole .zip file, navigate to esp8266_deauther and open esp8266_deauther.ino with Arduino.
- Open your Arduino IDE and add Deauther ESP8266 Boards URL in the Additional Board Manager (
File>Preferences>Additional Board Manager URLs), then add/paste this URLhttps://raw.githubusercontent.com/SpacehuhnTech/arduino/main/package_spacehuhn_index.json
or you can refer to the Spacehuhn Deauther ESP8266 Boards installation wiki - Go to
Tools>Board>Boards Manager, searchdeautherand installDeauther ESP8266 Boards - Go To
Tools>Board>Deauther ESP8266 Boards(make sure it'sDeauther ESP8266 Boards) and select your board. -Depending on your board, you might have to select a configuration setting at Tools > Deauther Config -If you need to reset the settings from a prior installation, make sure to select Tools > Erase Flash > All Flash Contents
SSID = meow
PASSWORD = catdeauth
THE DISPLAY ALREADY ENABLED BY DEFAULT. SO YOU CAN USE THE DISPLAY WITHOUT OPEN THE WEBSITE.
| OLED I2C | ESP8266 |
|---|---|
| VCC | 3.3V |
| GND | GND |
| SCL | D1 |
| SDA | D2 |
| BUTTON | ESP8266 |
|---|---|
| UP | D5 |
| DOWN | D6 |
| OK | D7 |