By: Team F10-2 Since: August 2019 Licence: MIT
This document illustrates on the architecture designs and the software decisions implemented for the desktop application DEGREES.NUS. DEGREES.NUS (DN) is a desktop application which enables the prospective applicants of NUS Faculty of Engineering to better plan out their university life. It is an extended task manager, which not only allows for prospective applicants to manage their deadlines and events pertaining to the freshman orientations and document submission, but also provides a coherent and concise platform to compare two engineering degrees of their choice and explore many other details related to the degree. Students can also create lists of engineering degrees of their choice and update it as per their choice. The developer guide will provide you with information such as an overall view of the system hierarchy, logical view of the system’s components, and a process view of the system’s communications that will enable you to help contribute to it too.
This document describes the software architecture and various other software decisions undertaken for the implementation of DN. The intended audience of this document are developers, designers, software testers of DN and for those who wish to modify the source files to fit for their own purposes. You may also have a look at it if you wish to understand how this application works.
While DEGREES.NUS may work using different versions of Java and with other IDEs, the following are recommended because they have been used for testing:
-
Java Development Kit '11'
-
Intellij IDE
Manual Import:
-
Forkthis Repository andCloneyour remote repository locally to your computer -
Open Intellij IDE and set up JDK
11-
Click
Configure>Project Defaults>Project Structure -
Click
New…>JDKand select the path of the installed JDK11 -
Click
OK
-
-
Click
Import Project -
Locate project directory of the cloned repository
-
Click
Next -
Ensure that the
src folderis checked ✅, and ClickNextuntil theFinishbutton appears -
Click the
Finishbutton
Automatic Import using Intellij Check Out:
-
Forkthis Repository -
Open Intellij IDE and set up JDK
11-
Click
Configure>Project Defaults>Project Structure -
Click
New…>JDKand select the path of the installed JDK11 -
Click
OK
-
-
Click
Check out from Version Control>Git -
Enter URL of your remote repository > Click
Clone -
Wait for Intellij to Set Up the project
The undo/redo mechanism is done using a simplified memento pattern, since the command classes have already been implemented. This works as an extension of the command classes and makes use of existing code without any 3rd party libraries or additional dependencies.
Each command that modifies the task or degree lists saves the complete previous state within the command as a memento object. Thus, when we "unexecute" the command, we call this object and get the complete state of the task or degree list before it was modified by this command.
All of these commands are stored in a CommandList, where it has methods to retrieve the previous command whenever undo is input, or to manually retrieve a particular command using undoRedoPointer whenever redo is input.
Once a command has been undone and the user makes new changes to the task or degree list, all commands after the undoRedoPointer will be removed to make way for new commands.
Given below is an example usage scenario and how the undo/redo mechanism behaves at each step.
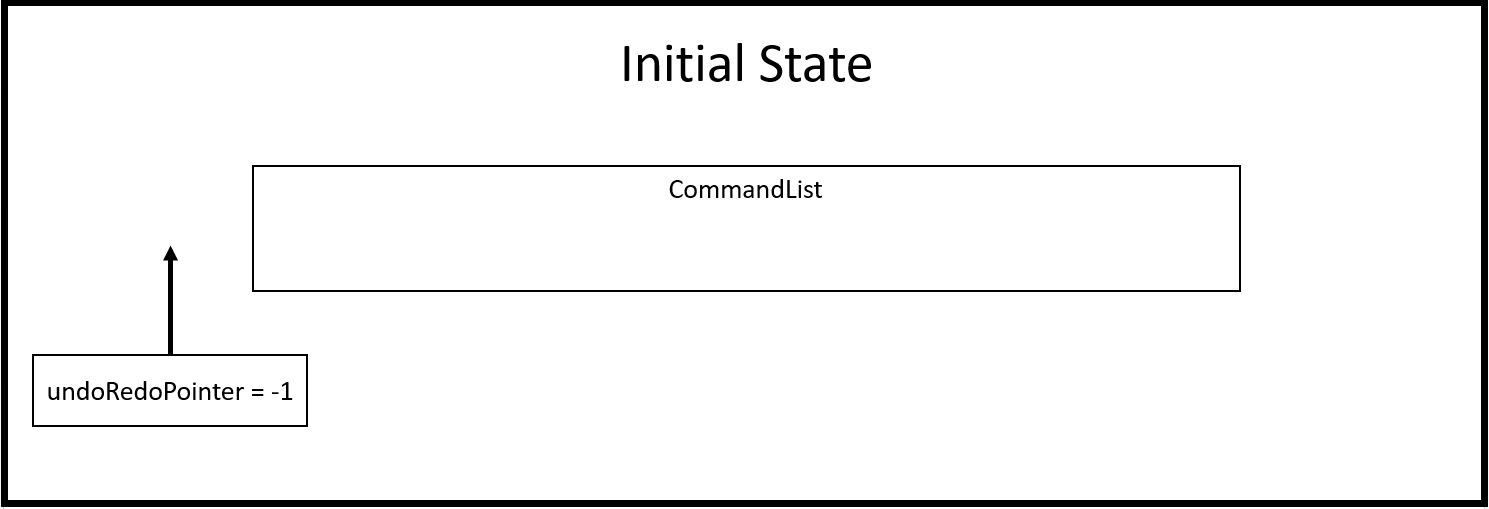
Step 1: The user launches the application, and duke initializes an empty CommandList. The undoRedoPointer points to -1 as there are currently no elements in CommandList.
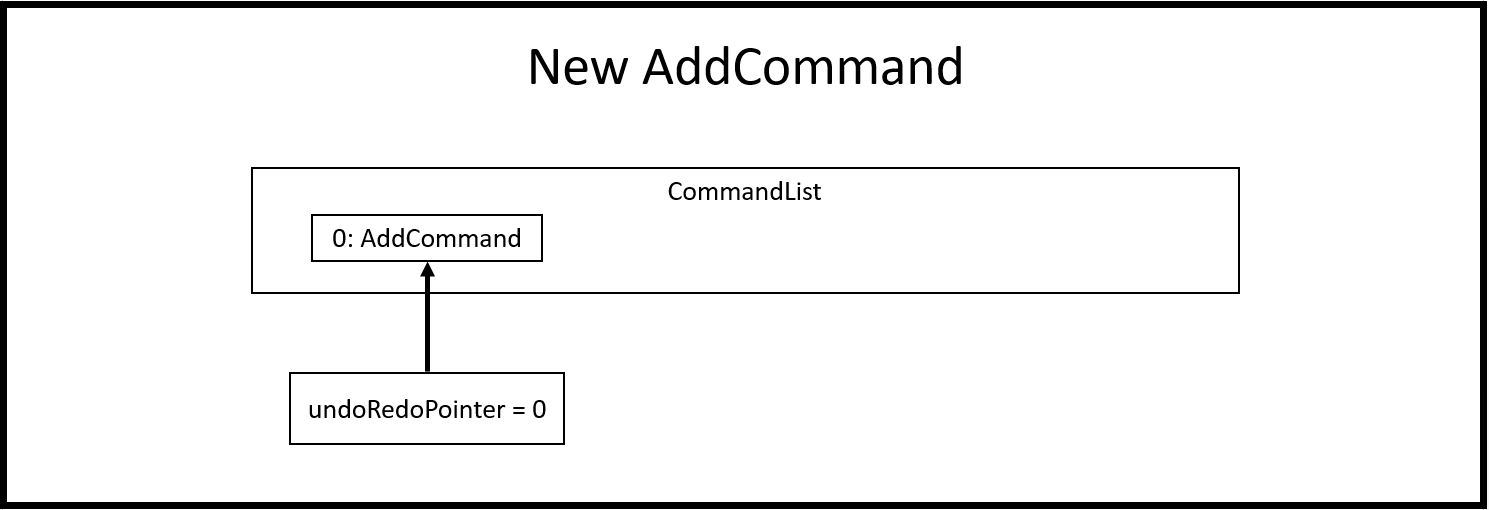
Step 2: The user inputs "todo Sleep". This adds a todo task to the TaskList and constructs an AddCommand object to be executed. Once that AddCommand is executed, it saves the current TaskList into a memento object, and then it adds "todo Sleep" into the TaskList.
Step 3: After command execution, the AddCommand object is added to CommandList. The undoRedoPointer increments by 1 and now points to the newly added AddCommand at index 0.
|
💡
|
CommandList supports modifications to both task and degree lists. Undo simply undoes the modification to one of the lists in order of commands.
|
Step 4: The user inputs "list" to double check the addition of the new task. This executes PrintCommand to display the contents of TaskList, but does not modify it in any way. Thus, it will not be added to CommandList.
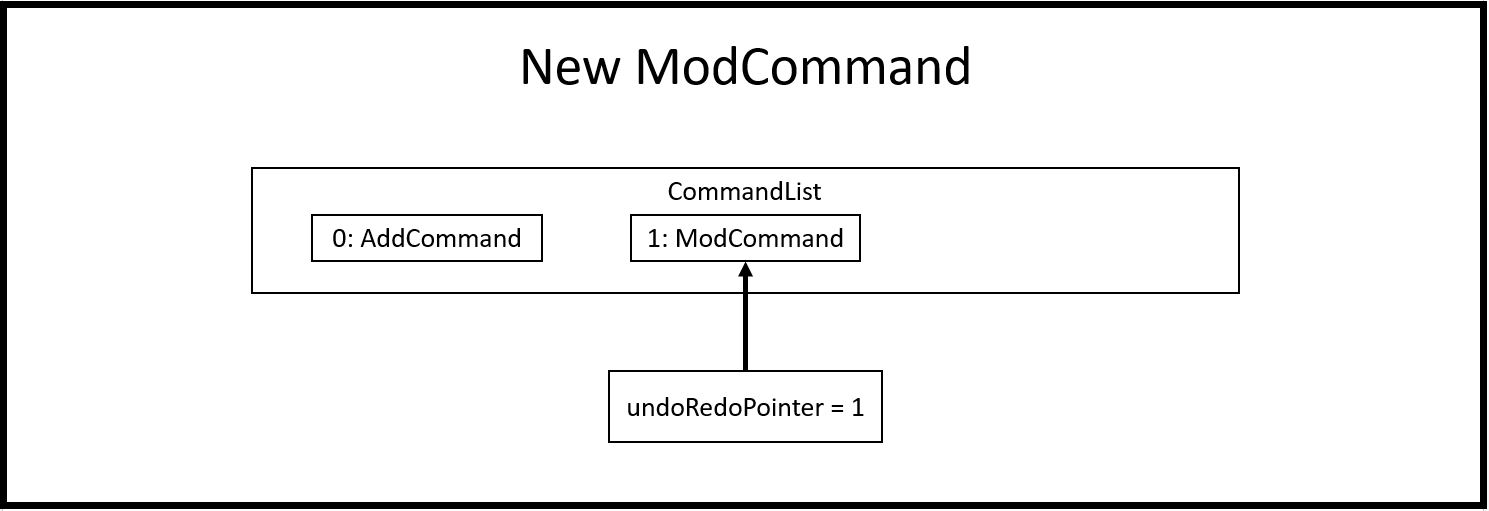
Step 5: The user inputs "done 3" to mark the 3rd task in TaskList as done. This constructs a ModCommand object to change the contents of an element in TaskList. Once ModCommand is executed, it saves the current TaskList into a memento object, and then marks the 3rd task as done.
Step 6: After command execution, the ModCommand object is added to CommandList. The undoRedoPointer increments by 1 and now points to the newly added ModCommand at index 1.
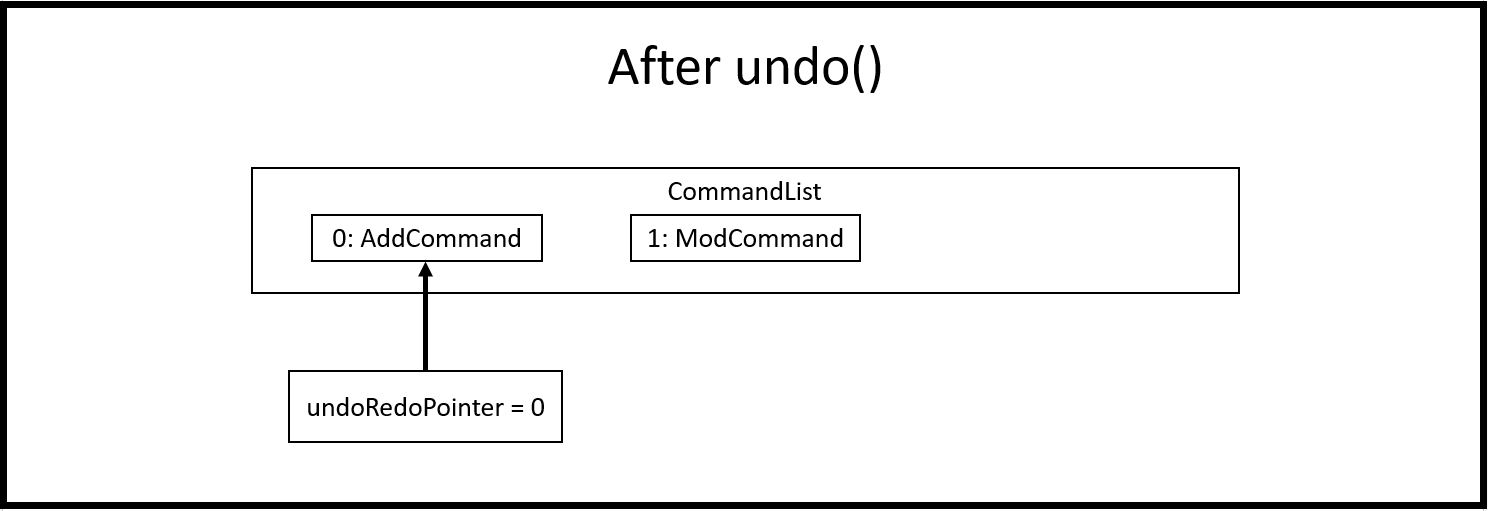
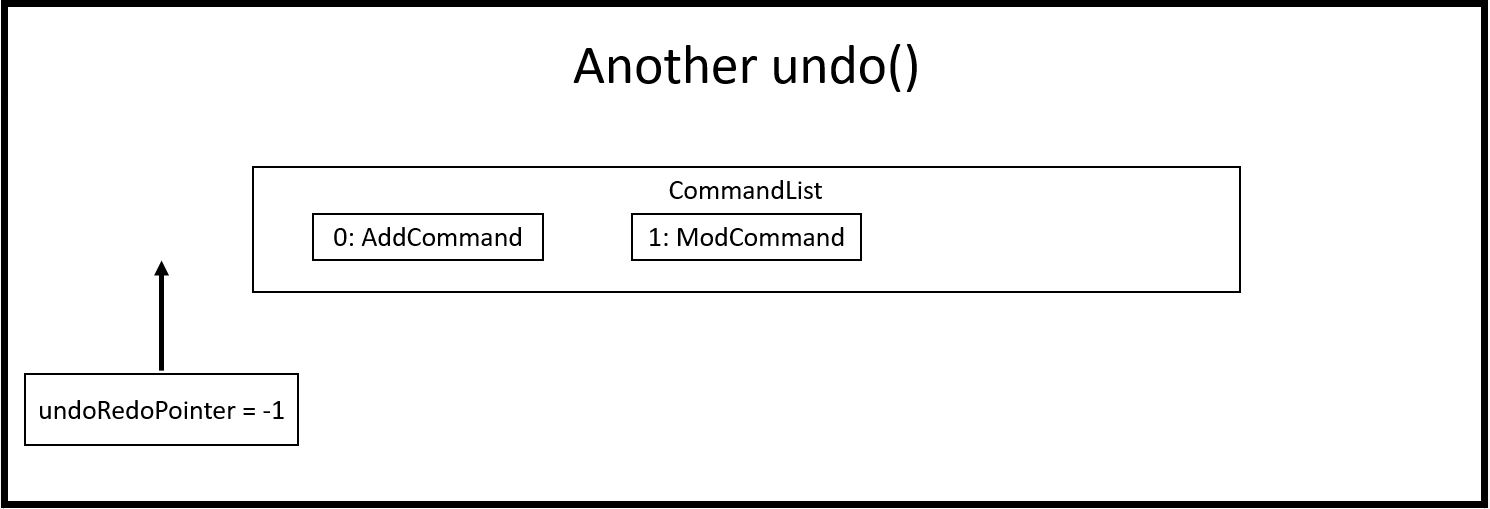
Step 7: The user now inputs "undo" to undo the task marking. This will call the undo method of CommandList, gets the command that undoRedoPointer is pointing to (which is ModCommand in this case) and unexecute it. ModCommand will call its memento object and replace the current TaskList. The undoRedoPointer decrements by 1, and now points to index 0. Note that ModCommand is not removed to facilitate redos.
Step 8: The user inputs another "undo" to undo the task addition. Similar to step 7, it will call the undo method of CommandList again and unexecutes the command that undoRedoPointer is pointing to. AddCommand will call its memento object and replace the current TaskList with the one that does not have the new task. The undoRedoPointer decrements by 1, and now points to index -1.
|
ℹ️
|
Attempting to undo when there is nothing left to undo will return an error message. Similarly, attempting to redo when there is nothing left to redo will also return an error message. |
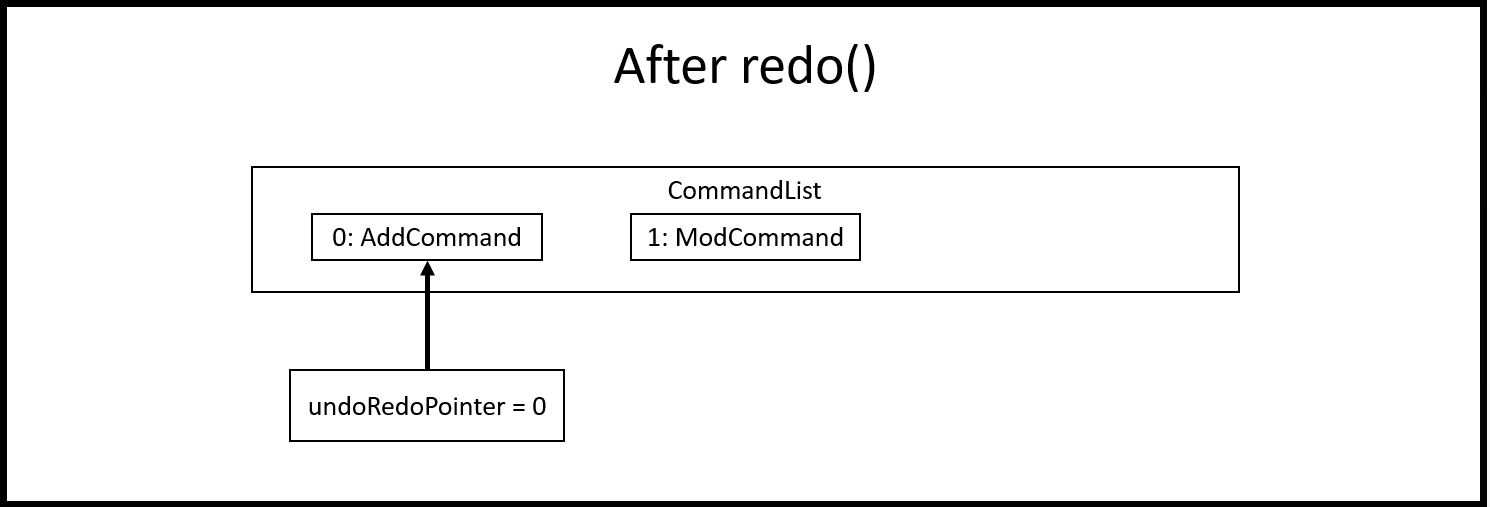
Step 9: The user now inputs "redo" to undo the undo. This will call the redo method of CommandList. It will first increment the undoRedoPointer by 1, and it will then execute the command at the pointed element. This will add "todo Sleep" back to the TaskList.
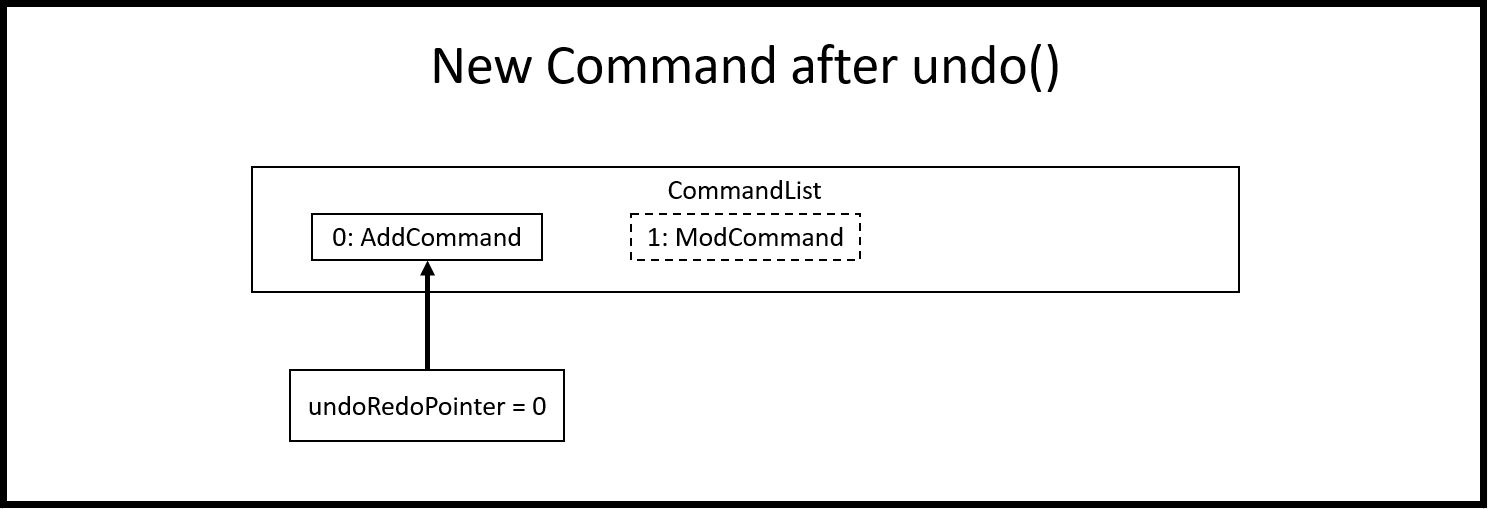
Step 10: The user now inputs "done 1" to mark the 1st task as done. Since its now a different command from "done 3" and not "redo", CommandList will check if there are commands past undoRedoPointer. Currently, ModCommand is the element after the one at undoRedoPointer, thus CommandList will pop all commands from the back of the Stack until undoRedoPointer.
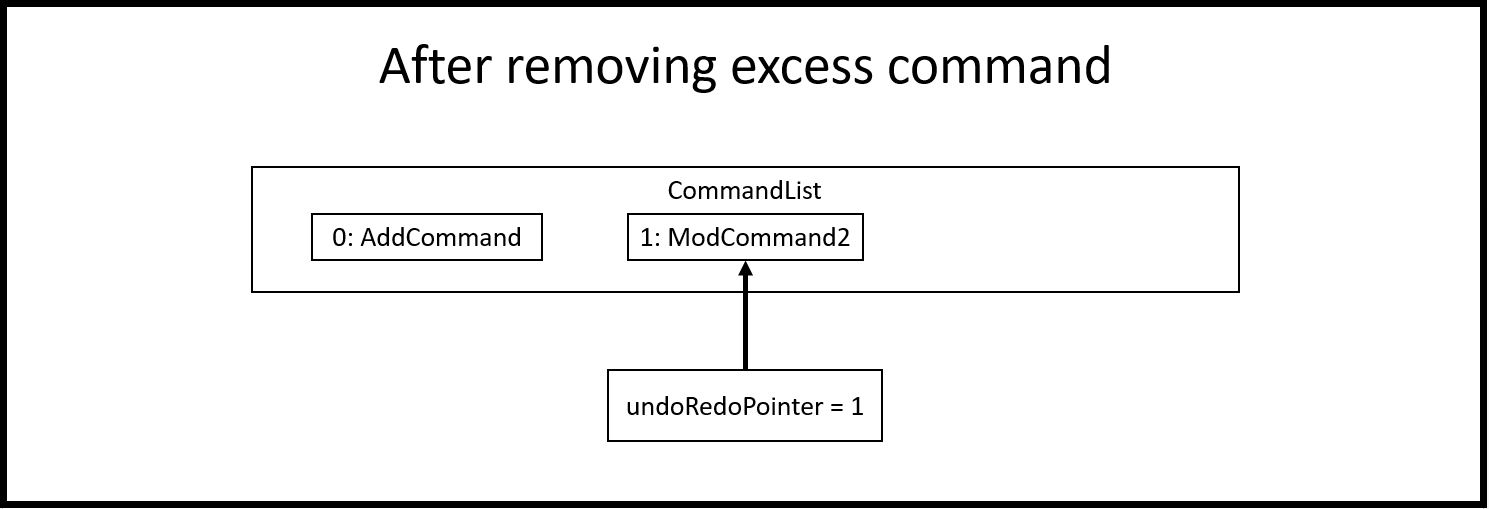
Step 11: Once the excess commands are removed, it will proceed back to normal by executing a new ModCommand and adding it to CommandList, and incrementing undoRedoPointer by 1.
How undo/redo executes:
-
Alternative 1 (Current Choice): Commands saves a complete previous state if it modifies the degrees or task list
-
Pros:
-
Much easier to implement than a partial state save.
-
Easier to implement when new commands are added.
-
Common method in the industry to implement undo/redo.
-
-
Cons:
-
Memory issues once too many commands are executed.
-
-
-
Alternative 2: Saves the degree and task list to a history.
-
Pros:
-
Straightforward method to save previous states that can be called using undo/redo.
-
No work needed when new commands are added.
-
-
Cons:
-
Does not work when a modification changes multiple lists.
-
Memory issues once too many states are saved.
-
-
-
Alternative 3: Perform the opposite command whenever undo is called. (i.e. undoing add will delete the addition instead of recalling the previous state)
-
Pros:
-
Uses less memory than saving the state every time.
-
Proper implementation of the memento pattern.
-
-
Cons:
-
A lot of work needed to "unexecute" every command possible.
-
More commands means more "unexecution" is needed, and the workload scales higher than alternative 1.
-
-
Data Structure to support undo/redo:
-
Alternative 1 (Current Choice):
CommandListclass using a stack and a pointer.-
Pros:
-
Much faster pushing and popping the stack than adding into standard
ListsandArrayLists. -
More control than a simple stack, as it can also support redos and new commands added after undos.
-
-
Cons:
-
Have to manually write the CommandList mostly from scratch instead of using a pre-esxisting data structure or class. (Although it uses a stack to store and retrieve the commands)
-
-
-
Alternative 2:
ArrayListof commands and a pointer.-
Pros:
-
Less work needed to write methods as it uses a pre-existing data structure.
-
Easier for newer developers to understand how the undo/redo function works.
-
-
Cons:
-
Have to do all the work of adding, removing and choosing commands within another class, and can result in messy implementations.
-
Slightly slower than stacks when adding and deleting elements in the
ArrayList.
-
-
The actions involving Degree-Related Tasks are performed mostly using the DegreeTask class. It extends the Task class, eventhough it does not use many methods from the aforementioned class.

This was done in preparation for some proposed additional changes to this feature that will be discussed later in the document.
Currently, the DegreeTask class implements three of the following operations:
-
loadDegreeTasks
-
This method initializes an Arraylist of TaskLists. When it is called, each of these TaskLists will be populated with the specific tasks that are related to each degree programme. For example, all tasks related to
Computer Engineeringare stored in one of the TaskLists. The other two classes will be able to use this Arraylist to perform operations on the user’s TaskList.
-
-
addDegreeTasks
-
This method adds all tasks related to a specified degree programme to the user’s TaskList.
-
-
removeDegreeTasks
-
This method removes all tasks related to a specified degree programme to the user’s TaskList.
-
An example usage scenario details how the mechanism behaves at each step:
Step 1: The user launches the application, and Duke will initialize an instance of the DegreeTasks command. Duke will call the loadDegreeTasks method, and an ArrayList of TaskLists will be instantiated.
Step 2: The user inputs the command add ComE to add Computer Engineering to his choice of degree programmes
Step 3: The degree programme is added to his list of degree programmes by a seperate, unnamed class. Subsequently, addDegreeTasks is called to add all Computer Engineering tasks to his TaskList.
At this point, the user can choose to remove the degree programme from his list of degree programmes if he chooses. If he does, there will be additional steps to the mechanism:
Step 4: The user inputs the command remove 1 to remove the first-indexed degree programme in his list. In this case, it is Computer Engineering
Step 5: The tasks related to this degree programme are removed from his TaskList
In addition to the adding and removing of degree-related tasks, there will be a passive feature of prioritising tasks that have closer dates, or that relate to degree programmes that are higher on the user’s degree list.
This mechanism is facilitated by the TaskRanking class. It extends TaskList and has an internal list of integers that correspond with each task on the user’s tasklist. This list is internally stored as PriorityList.
The priority will be calculated by giving each task points that correspond with higher priority.
Days Away from Date |
Points |
Less Than or Equal to 3 |
7 |
Less Than or Equal to 5 |
5 |
Less Than or Equal to 7 |
3 |
Greater than 7 |
2 |
No Date |
0 |
Degree-Related Tasks also get a boost in points based on how high up on the degree list they are
Ranking of Degree |
Points |
Rank 1 |
10 |
Rank 2 |
8 |
Rank 3 |
6 |
Rank 4 |
3 |
Rank 5 |
2 |
Rank 6 and Above |
1 |
Aspect: Implementing the Degree Tasks
-
Alternative 1: Implementing Degree Tasks as just Events and Deadlines (current choice):
-
Pro: The tasks can be instantiated and treated as Events and Deadlines, and use the methods from those classes
-
Con: Extra code needs to be written to parse the description of each task to tell whether it is a degree-related task or not
-
-
Alternative 2: Implementing Degree Tasks as an extension of the Event and Deadline class:
-
Pro: The tasks are defined as a new subclass of tasks called "Degree-Tasks". It would be a neat way of storing all Degree-Related Tasks
-
Con: The toString() method would produce an extra column in printing, as well as saving, and thus would require changing the Storage class
-
Aspect: Storing the Degree Tasks
-
Alternative 1: Storing them in an ArrayList of TaskLists (current choice):
-
Pro: Easy to call the index that is needed to take one of the TaskLists for interacting with the user’s TaskList
-
Con: Involves a slightly more expensive data structure
-
-
Alternative 2: Storing them in a continuous List of Strings
-
Pro: Efficient way of storing the Tasks
-
Con: Requires continuous parsing at every interaction with the user’s tasklist
-
Aspect: [Proposed] Priority for Tasks
-
Alternative 1: Automated Priority:
-
Pro: Easy to associate the value and sort the pairs
-
Cons: May not allow the user to view other ways of seeing his list
-
-
Alternative 2: Other ways of Sorting:
-
Pro: Gives further functionality to the user to see his list
-
Con: Requires saving different states of the list, or introducing more sorting commands
-
(Diagrams to be added in later)
The degree list is a customizable list for the users to maintain a list to keep track of the degrees they are interested in and they can rank them in order of their preference as well. The degree list functionalities are facilitated by the class DegreeList. It makes use of a private static ArrayList of Strings to keep track of all the degrees entered. It implements the following methods that are needed for the user to add, remove or re-arrange degrees:
DegreeList#add_custom(String input): This function takes in the parameter which is the degree inputted by the user and adds the degree to the ArrayList, following which it is written to the text file to keep a record. It is written to the text file using BufferedWriter.
DegreeList#delete(String input, DegreeListStorage dd): This function takes in two parameters, the first being a string which contains index of the degree the user wishes to remove from the degree list and the second being the class DegreeListStorage (to be changed and linked to main Storage). This function not only deletes the degree the user wishes to remove from the ArrayList, but the function AddRemoved also updates the text file and adds the word ‘REMOVED’ next to the degree removed and is not considered in further analysis.
DegreeList#swap(String input, DegreeListStorage dd): This function takes in an input string, which is then split using the support of the Parser Class and the indices of the degrees to be swapped are obtains and are then swapped using the Collections.swap() function. A method from the DegreeListStorage is then called in order to update the text file with the current index of the degree after the swap.
In the future releases, upon adding a degree, the user will see the related information of the degree such as the cohort sizes of the past 3-4 years, and the employment rate post graduation and the average salary. This information will be deployed in a tabular format or using visual aids, such as bar graphs
Aspect: Storing the Degree List
-
Alternative 1: Overwriting the file once the user enters
bye(current choice):-
Pro: This takes up lesser processing time as the prograam need not continuously update the file, and simply overwrites the file based on the final status of the Degree List.
-
Con: If the user forgets to enter the exit command, the degrees might not be saved, leading to confusion.
-
-
Alternative 2: Concurrently writing to the file based on user-input:
-
Pro: The storage is always up-to-date with the changes that have taken places
-
Con: A lot of extra code is required to simultaneously write to the text file, and can also lead to potential bugs when the degrees are swapped around as their order changes.
-
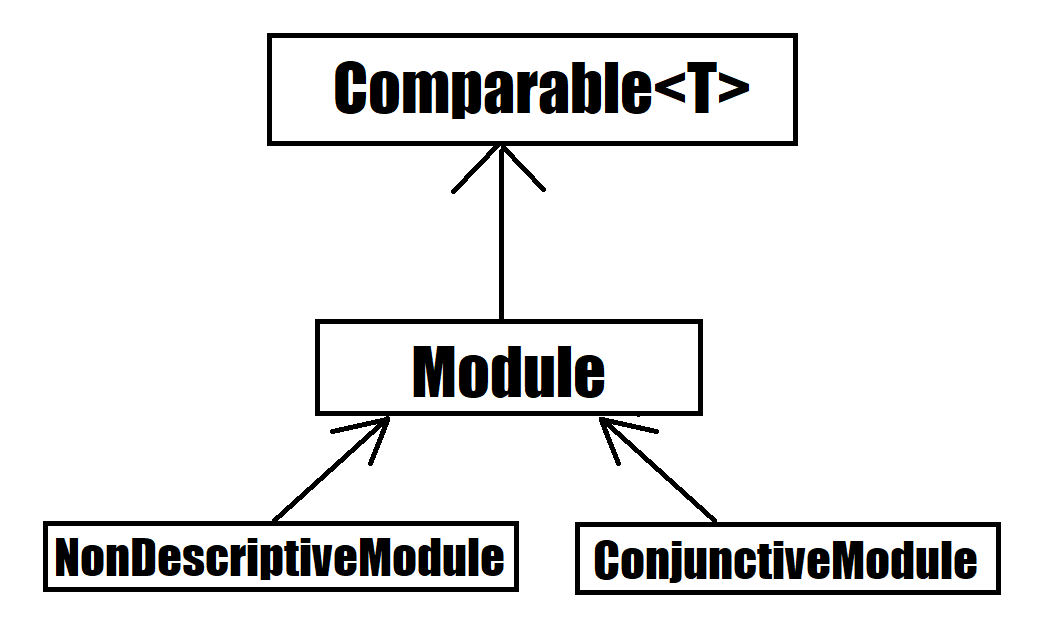
The module class stores default type of module information, represented by 2 Strings and an Integer. This module string should be of the accepted module code type (2-3 Letters followed by 4 digits and a suffix letter, or 2-3 letters followed by one digit and 3 'x’s). The module class is extended to 2 other types, the Conjuntive module and NonDescriptive Module. Module and it’s children are stored in the class ModuleList.
Module#print(void): This function outputs the user friendly view for people to know which module is it. It fetches the module code and name, and adds them together with a space separating them, it then adds spaces until it is of the maximum allowable length - 4, the module’s credits are then appended. The result is printed.
Module#getPrint(int setWidth): This function takes in an integer indicating the desired width of printing (in terms of characters). It outputs the Module Code and Name left aligned, and the Module MC right aligned. If the string is too long, it will be truncated and a "…" will indicate the truncation. A string is returned, according to the desired setWidth amount of characters.
Module#tabModuleCode(void): This function returns the Code for printing through the JavaFX interface. The subclasses of Module are expected to follow the same format, or override this function accordingly.
Module#tabModuleName(void): This function returns the Name for printing through the JavaFX interface. The subclasses of Module are expected to follow the same format, or override this function accordingly.
Module#toString(void): This function returns a string, the module’s code is returned.
Module#equals(Object obj): This function returns an boolean, representing if the object compared to it is equivalent to it. It checks if the toString result of the module matches the other module.
Module#compareTo(Module other): This function returns an int, indicating whether the other module is greater lesser or equivalent to it. It compares the results of the getCode function of both modules, ordering them in lexicographical order.
Given below is an example scenario where module will be constructed.
Step 1: The user launches the application, and duke initializes the list of degrees, the degrees contain ModuleList, which will contain Modules.
Step 2: If a degree’s csv file is parsed successfully, it will fetch the module data in the form of a string consisting of code and name, separated by a space, as well as an integer indicating the module credits allocated to that module. The check for valid module code will be done in the degree calling it.
Step 3: The Module is created and can be used as part of a ModuleList.
Furthermore, attached is an image depicted the hierachy between Module and its subclasses:
How module is implemented: * Alternative 1 (Current Choice): Separated code and name and credits. Pros: * Able to access information of each component separately. * Easier to make comparison based methods based on one of these 3 components. Cons: * Extra handling required to return a printable result
-
Alternative 2: Save the module code name and integer as a space separated string.
-
Pros:
-
Module is saved as is, and returned as is.
-
Module is extremely sensitive to differences between itself and other modules.
-
-
Cons:
-
Extra work required to separate it into various components.
-
Too sensitive, codes which match whereas the names do not will be flagged as different modules.
-
-
The conjunctive module class is an extension of module. It stores modules which are co-listed as requirements, represented by a Map of Strings to Strings and an Integer. The Map will have the a Code as a key, with a name as its value. This module’s strings should be of the accepted module code type (2-3 Letters followed by 4 digits and a suffix letter, or 2-3 letters followed by one digit and 3 'x’s). Each module’s code and name should be separated by an " OR ". It can be stored in the class ModuleList as an extension of Module.
Given below is an example scenario where module will be constructed.
Step 1: The user launches the application, and duke initializes the list of degrees, the degrees contain ModuleList, which will contain Modules.
Step 2: If a degree’s csv file is parsed successfully, it will fetch the module data in the form of a string consisting of multiple code and name, separated by a " OR ", as well as an integer indicating the module credits allocated to that module. The check for valid conjunctive module string will be done in the degree calling it.
Step 3: The Module is created and can be used as part of a ModuleList.
ConjunctiveModule#print(void): This function outputs the user friendly view for people to know which module is it. It fetches the module code and name, and adds them together with a space separating them. It does this for every module in the Map, and adds an " OR " between each module. It then adds spaces until it is of the maximum allowable length - 4, the module’s credits are then appended. The result is printed. The result is returned as a string.
ConjunctiveModule#getCode(void): This function iterates through every code in the Map and returns the codes separated by a "|".
Data structure used to hold ConjunctiveModule: * Alternative 1 (Current Choice): Treemap data structure. Pros: * Consistent and sorted iteration through codes and modules * No extra work required from user after placing the pairs in the list Cons: * Slightly more heavy memory usage.
-
Alternative 2: ArrayList.
-
Pros:
-
Simple data structure for beginners to understand.
-
Not memory intensive.
-
-
Cons:
-
Extra work required to sort.
-
Needs to use a non default data type, Pair, to store the code and name separately.
-
-
-
Alternative 3: HashMap.
-
Pros:
-
O(1) amortized access and storage.
-
-
Cons:
-
Memory intensive (To maintain low load factor, needs twice the amount of space devoted to the keys).
-
Randomized iteration is the nature of HashMap, requires further sorting of results after getting them.
-
-
The non-descriptive module class is an extension of module. It stores modules which do not follow the standard format. They can be placeholders for modules which are not named or belong to a certain group. It can be stored in the class ModuleList as an extension of Module.
Given below is an example scenario where module will be constructed.
Step 1: The user launches the application, and duke initializes the list of degrees, the degrees contain ModuleList, which will contain Modules.
Step 2: If a degree’s csv file is parsed successfully, it will fetch the module data in the form of a string consisting of multiple code and name, separated by a " OR ", as well as an integer indicating the module credits allocated to that module. The check for valid module string will be done in the degree calling it. If determined it is not a valid module string it will be created as a NonDescriptive Module.
Step 3: The Module is created and can be used as part of a ModuleList.
NonDesciptiveModule#toString(void): This function returns the module code and the credits allocated to it separated by a space.
How NonDescriptive is implemented: * Alternative 1 (Current Choice): Name field is empty. Pros: * Taps upon existing Module methods for printing and comparison * Able to implement class specific methods in the future.
-
Alternative 2: Non-empty name, uses the same string as code field.
-
Pros:
-
Leverages module class functions which require the name field to be used
-
-
Cons:
-
Have to write a custom printing method for the class
-
Does not capture the essence that Non-Descriptive is different from module because it had only one string /code.
-
-
The module list stores modules. It also has helper functions to determine the difference between itself and another instance of the modulelist
Module#add(Module wry): This function adds a module to the ModuleList class. It also adds the new module’s credits to the current sum of module credits.
Module#getModules(void): This function returns the set of modules which the ModuleList contains.
Module#compare( ModuleList other): This function compares itself to another instance of ModuleList. It returns the set of modules which are the same, as well as a pair of the set of modules which are not the same from each ModuleList.
Module#setDifference(Set<Module> subset): This function returns the set of modules which are not contained within the Set of modules passed in.
Module#getSum(void): This function returns the sum of the modules in ModuleList.
Module#updateSum(Integer mc): This function increments the current sum by the integer passed in.
Given below is an example scenario where module will be constructed.
Step 1: The user launches the application, and duke initializes the list of degrees, the degrees contain ModuleList, which will contain Modules.
Step 2: If a degree’s csv file is parsed successfully, it will fetch the module data.
Step 3: The Module is created and can be used as part of a ModuleList.
Step 4: The modules are placed in the appropriate ModuleList in the degree class
How ModuleList is implemented:
Data Structures used for ModuleList: * Alternative 1 (Current Choice): TreeSet of modules. Pros: * It is self sorting. * Able to use set method, retainAll(). Cons: * Takes a longer time in searching for modules in the set
-
Alternative 2: HashSet of modules.
-
Pros:
-
Fast access to any module in the set.
-
Able to use set method, retainAll().
-
-
Cons:
-
Random iteration through set.
-
Set is not in order.
-
-
Degree is a class which contains ModuleList class and other auxiliary information related to the degree. When being constructed, it accepts a list of Strings and validates that it is a .csv file type with the correct number of columns. Additionally it implements the following operations:
Degree#addAlias(String input): This function takes in the parameter which is the alias the degree should be referred to, this input is stored into a List of Strings within Degree.
Degree#addToList(Integer list, String module, String mcs): This function takes in three parameters, the first being an Integer which indicates which Module List the Module should be added to. The second and third parameters are Strings which are expected to contain the Module and th Module Credits respectively. This function is called when a new Degree is created with the csv file being input into it as a List of Strings. This function calls createNewModule and adds the (valid) Module result into the appropiate List suggested by the Integer parameter list.
Degree#createNewModule(String in, String mcs): This function takes in the string in and the string mcs. The String mcs is validated by validInt to ensure it is a validInt, following which the in string is checked for a " OR ". If an " OR " is found, it indicates the module is a conjunctive module and each module string is then checked for validity by this method. If all the strings checked are valid, a conjunctive module is returned. Otherwise, having validated that the String is a proper module, a default module is returned. Otherwise, a NonDescriptive Module is returned.
Degree#validateModule(String[] input): This function takes in the list of strings input. Each String in the list is checked by the validateModule(String input) function to ensure that it is of the proper format. If any String did not pass this check, an exception is thrown.
Degree#validateModule(String input): This function takes in the string input. It then splits the Strings into 2 portions, the first String up to the first white space, will be considered as the Module’s code. The remainder of the String is the module’s name. The Module Code will be checked against the Regular Expression in the Parser class to ensure that it is of the correct format. The name is checked to ensure it is not empty. If both of these conditions are passed it returns a true result. Otherwise an exception will be thrown.
Degree#setUem(String in): This function takes in the string input. If the string is blank, it assumes that no UEM value is to be set. If the uem value in Degree has already been set, it will throw an exception as there should not be multiple UEM values. It will otherwise ensure that the String is a valid Integer, then set the value resulting from validInt.
Degree#validInt(String in): This function takes in the string input. If the string is is parsed successfully as an Integer, it checks to ensure that it is non negative. If integer is not parsed sucessfully or it is negative, exceptions are thrown. It then returns the valid result.
Degree#validList(List<String> input): This function takes in a list of strings. First, the input is checked to make sure it is not null or empty, or only consists of one string. Then each string is then checked for the following criteria. Then the second string is checked to make sure it has 12 comma separated values.
Degree#compare(Degree other): This function prints result of comparison with another degree. It will print out the Proper Names of each degree, followed by the list headers. For each list header, it will print similar degrees followed by different degrees.
Degree#print(void): This function prints the degree list. It first prints out the hardcoded information, then it prints out the list headers followed by the lists.
Given below is an example usage scenario and how the degree mechanism behaves at each step.
Step 1: The user launches the application, and Duke will initalize the storage. Duke will then instantiate a new copy of DegreeManager, by handing it a copy of the Storage and its contents.
Step 2: DegreeManager will load the list of degrees it should initialize from storage. Then it will attempt to load the relevant save data from each file. If any Degree is unsucessful in loading, an empty instance of DegreeManager will be initialized instead.
Step 3: The degrees are created using the data from the csv files. It will then be linked via its key (the name of the Degree) to the Degree.
Step 4: If no errors occured, the map of degrees will be initialized, if not the maps and sets will be cleared and there will be a request to contact the System Adminstrator for assistance.
Step 5: Duke will continue refer to Degrees stored in DegreeManager in order to determine where to get the degree information from.
How Degree executes:
-
Alternative 1 (Current Choice): Degrees checks its own inputs and determines if they are valid.
-
Pros:
-
No dependency on other classes for validation.
-
Easier to implement when new commands are added.
-
Common method for complex classes which utilize other classes.
-
-
Cons:
-
Extension of the class is necessary if the degree format changes or there are multiple formats.
-
-
-
Alternative 2: Let the Parser class handle all validation and return the sanitized input if available.
-
Pros:
-
Maintenance and edits only need to be done in the Parser class.
-
No work needed when new commands are added.
-
-
Cons:
-
Bloats the Parser class further.
-
Parser class is not directly related to the Degree class yet it determines the validity of Degree.
-
-
Data Structure to support degree’s listing of modules:
-
Alternative 1 (Current Choice):
ModuleListclass which maintains lists of Modules for Degree. And other auxiliary primitive data types-
Pros:
-
Abstracts away the need to maintain the Lists of Modules and the information associated with it within the Degree class.
-
More control than primitive data types, supports differential operations.
-
-
Cons:
-
Have to create and maintain a new class.
-
-
-
Alternative 2: Primitive data containers used to contain modules, in addition to other auxiliary primitive data types.
-
Pros:
-
Easier for newer developers who are only aware of basic java primitive data containers.
-
-
Cons:
-
Unable to support extra operations outside of the template functions given to data containers.
-
Decreases cohesion of Degree class (Also doing the task of containing modules).
-
-
DegreeManager a class which contains the ModuleList class and Map of Strings to Degrees. When being constructed, it looks for a list of degrees in Storage class and then proceeds to attempt to load every degree.
Degree#print(String input): This functions takes in the input string and checks if it matches any alias of any degree. If a match was found, it will call that degree’s print function in order to print the degree’s details.
DegreeManager#isKey(String alias): This function takes in a string and verifies it against all aliases. It will return true for the first alias it matches to, false if there were no matches at all.
DegreeManager#findAnyKey(String degreeName): This function takes in a string and returns the valid degree key if any. An empty string is returned if a degree cannot be matched to the input. The key is used to access the correct Degree in the map of Strings to Degrees.
DegreeManager#twoKeyGenerator(String[] split): This function takes in an array of Strings. The array is then partitioned into two segments, each containing at least one String, white space is padded between each element. The corresponding partitions are run through a check for validity. If both partitions are successfully matched to a degree, degreeOneKey and degreeTwoKey (two String variables in DegreeManager) will hold the respective information collected. If both degree keys are unique, the result of the comparison between the two degrees will be printed.
DegreeManager#compare(String input): This function takes in an input string. The input string is then split into an Array of Strings (separated by whitespace). The resultant array is then passed to twoKeyGenerator. If two unique keys were generated and then stored in DegreeManager, DegreeManager will use degreeOneKey and degreeTwoKey in order to invoke a comparison of the first degree to the second.
Given below is the UML Diagram relating how DegreeManager is linked to the main() logic as well as how it utilizes Degree and Storage when being initialized
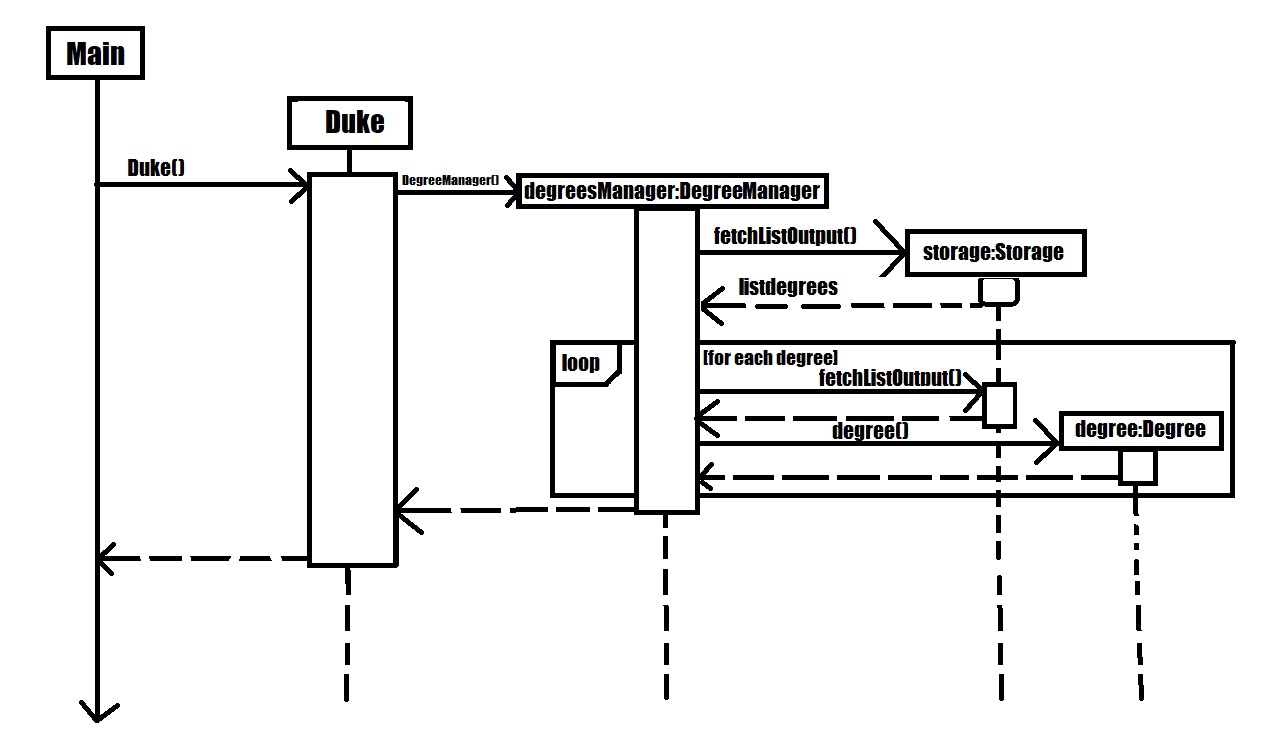
As detailed in the diagram above, when the main logic is initialized, an instance of Duke is created. Duke will subsequently create a Storage class. Duke will then create DegreeManager which will use Duke’s instance of Storage. DegreeManager will fetch the information regarding the list of degrees from Storage. Subsequently, for each degree in the list, it will create a Degree class to be stored within itself.
How DegreeManager handles the checking of valid degree names:
-
Alternative 1 (Current Choice): Iteration through every possible alias and checking if it matches
-
Pros:
-
Trivial to implement
-
It is readable.
-
Suitable for small and fixed number of aliases such as the current version of this program.
-
-
Cons:
-
It is not the best or most efficient way.
-
-
-
Alternative 2: Creation of Disjoint Set to find aliases.
-
Pros:
-
Extremely efficient Data Structure, O(4) time in searching for an entry.
-
Can be used to instantly determine if two keys belong to the same set as well.
-
Becomes faster over time through usage of Path Compression techniques.
-
-
Cons:
-
Non-primitive storage container, requires self implementation which may be flawed.
-
Complicated to use when handling non-integer members.
-
Extra Containers and functions needed to support the Disjoint Set.
-
-
A class GraduateEmployment is used in order to display employment percentage rates and basic mean salary of recent graduates in the form of a dual axis bar chart. This class is an implementation of the Statistics interface.
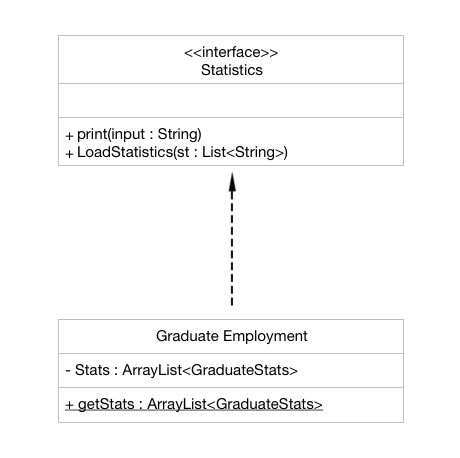
The Statistics interface comprises of two methods that are overridden in the GraduateEmployment class. These two methods are:
Statistics#loadStatistics(List<String>): This method takes in the parameter of a list of strings (List<String>) that have been fetched from the Storage class. They are then categorised as per the different degrees and year, following which it is added into an ArrayList of type GraduateStats (Fig xyz) and stored.
Statistics#print(String input): This method takes in the parameter of a string which is the degree inputted by the user. The end result is the display of a bar chart on a separate window, visually depicting the statistics. In the case of GraduateEmployment, an instance of the class Employment_BarChart is created and a dual axis bar chart is displayed with information for the employment percentage rates and basic mean salary.
The GraduateEmployment class also has the following function:
GraduateEmployment#getStats(): This method returns an ArrayList of type Graduate Stats, namely Stats, when called and is used to store the information needed.
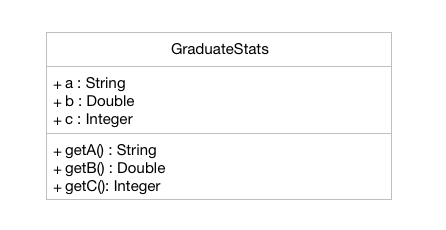
The Graduate Stats class as mentioned above allows to store the a string pertaining to the degree, a double value which is the employment percentage rate and an integer which corresponds to the basic mean salary. An array list of type GraduateStats is hence created to store all the necessary information.
Following is a sequence diagram to depict the process of the statistics being loaded and stored in the ArrayList:
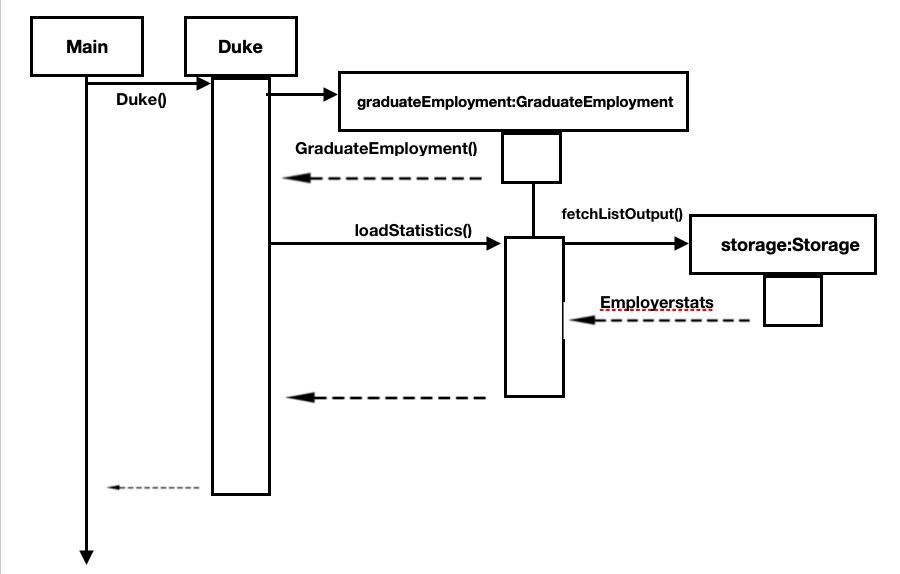
Different ways were considered to display the employment statistics:
-
Alternative 1 (Current Choice): Display a dual axis bar chart
-
Pros:
-
Concise and clear display of data
-
Visually pleasing
-
Easy for the user to understand the data
-
-
Cons:
-
Needs two datasets to be rendered and then added to a single chart panel
-
Complicated implementation as a work-around needs to be used and a series of null values need to be added to prevent overlap the axes
-
-
-
Alternative 2: Display in the form of a table
-
Pros:
-
Easy implementation only requiring to manually draw a table
-
Data read is directly displayed on the CLI
-
-
Cons:
-
Too simplistic of a display
-
Doesn’t help users to visually compare the employment rates and mean salary for the past 3 years
-
-
-
Alternative 3: Display two separate graphs for two separate commands
-
Pros:
-
Cleaner code as it clearly distinguishes between the commands for employment rates and salary
-
Distinction between data sets also for fewer bugs
-
-
Cons:
-
Troublesome for the user
-
Side-by-side analysis will not be available to have a better idea
-
-
| User Stories | Priority |
|---|---|
As a student entering NUS, I can view all the details of the course and their modules in one place rather than going through multiple websites so that I can avoid confusion |
High |
As a student applying to NUS, I wish to be able to save a list of possible personal degrees so that I can have a neat way of accessing my list of possible degrees that I have brainstormed to apply for |
High |
As a student applying to NUS, I wish to compare the details of two majors on a single platform so that I can clearly see what details of the major are important and relevant to me. |
High |
As an impulsive user, I can delete/rank degrees from my personal selection list so that I can correct old decisions that I made the last time in order to have my most updated list at all times. |
High |
As a student presented with too many options, I would want to have a narrowed-down view of the major requirements to make a clearer decision. |
High |
As a student applying to NUS, I should be able to have a list wherein I can add general/unrestricted modules I am interested in and also have the option to delete them whenever needed so that I can have the most updated list at all times. |
High |
As a prospective student choosing between NUS and other universities’ engineering courses, I will prefer to easily look up all the modules and their details required for the engineering degree, and having one for NUS makes us more attractive than other unis |
High |
As a student applying to NUS, I would want to keep track of all the deadlines to submit documents or housing, and of the various freshman events so that I don’t miss out any. |
High |
As a new student, I want to know the module details of the courses as soon as possible, without resorting to manually searching through all modules so that I can know easily learn more about upcoming modules. |
High |
As a student applying to NUS, I want to know all the modules required and their details for the next few years so that I can make a more informed decision. |
High |
As a user who prefers side by side comparisons, I would want to be able to compare between any two majors simultaneously, without the need to switch tabs so as to not get confused. |
High |
As a novice user, I can type a “help” command and receive all the possible commands that Duke 2.0 provides so that I can use the software to its fullest potential |
Medium |
As a student applying to NUS and having specific interests, I want to see if the core modules have any overlap with my interests so that I am better able to decide which engineering disciplines suits me the most |
Medium |
As a student applying to NUS and wishing to explore, it should able to propose to me a 2nd Major and point out how many overlaps are there with another degree, so that I am able to decide which second major would be the most beneficial for me. |
Medium |
As a student applying to NUS and who is organised, I would want to view the module requirements for the two degrees in a tabular format which can also provide a percentage similarity between the two. |
Medium |
As a student, I would want to be able to view the complexity of each module in the major and an overall calculation for the complexity of the entire degree so as to see other students’ perceptions regarding the major |
Medium |
As a careless typer, I can type mistakes into the command without Duke 2.0 crashing so that I do not have to re-run the program at every mistake. |
Medium |
As a user, I can save my personal module selection list onto the hard drive so that I can go back to it when I turn on the program the next time. |
Medium |
As a student applying to NUS, I wish to see a recommended schedule so that I can better plan around |
Medium |
As a student applying to NUS, it can show me past statistics of the module so that I can make a better decision when choosing my modules based on my competency level |
Medium |
As a student applying to NUS, I would like to know the module workload for the upcoming semester so that I can better plan for electives. |
Medium |
As a thorough decision-maker, I want to be able to visit the NUS website associated with the module so that I can view the official webpage of the degree for extremely specific details. |
Medium |
As a person ambitious about a certain engineering discipline, I would want to know about everything NUS offers such as modules, research projects, internships etc. for it so as to make a more informed decision. |
Medium |
As an advanced user, there should be an option to toggle the Module Name display so that I can view it in a format suitable for me. |
Medium |
As a person who likes to keep it short, I would want the user commands to be as simple as possible to search up for anything so that I don’t have to memorize and remember many long commands |
Medium |
As an advanced user, I want to make/delete user defined commands which execute a certain command for me |
Medium |
As an ambitious student, I can see which majors have a rigorous course curriculum so that I can apply for degree that is personally challenging. |
Medium |
As an enthusiastic student applying to NUS, it can link me to resources (Eg textbooks, external websites) for the module so that I can have a headstart in my studies. |
Low |
As a practical person, I can view what majors are the most in demand by employers in the job market so that I make my choices on my job prospects. |
Low |
As a student applying to NUS, I would want to be able to view the past cohort sizes so that I know what sort of competition awaits me in my university career. |
Low |
As a lazy typer, duke will auto suggest things according to my most frequently used words so that DukeJr. becomes easier to use as time goes on |
Low |
System |
Actor |
Use Case |
Steps |
Duke 2.0 (D2) |
Prospective Applicant to NUS Faculty of Engineering |
View the whole list of possible commands for D2 |
User requires help with command syntax |
Duke 2.0 (D2) |
Prospective Applicant to NUS Faculty of Engineering |
Check core modules for Bachelor of Engineering (Electrical Engineering) |
User identifies a degree that he/she wishes to research |
Duke 2.0 (D2) |
Prospective Applicant to NUS Faculty of Engineering |
Compare core modules for EE and CEG |
User identifies two degrees she wishes to compare |
Duke 2.0 (D2) |
Prospective Applicant to NUS Faculty of Engineering |
Add CEG into degree list and view degree list |
User identifies the degree he/she wishes to add to his/her list of possible degrees |
Duke 2.0 (D2) |
Prospective Applicant to NUS Faculty of Engineering |
Swap CEG with EE in degree list |
User identifies two degrees that he/she wishes to switch in the degree list |
-
D2 is a fast application.
-
D2 can be used on any platform (any PC), and is hence light-weight.
-
The information provided is accurate as of the latest semester.
-
The application has simple functions, with more options provided for advanced users.
-
The application is fairly easy and understandable to navigate through.
-
Multi-step commands are available for beginners, as compared to one step for advanced users.
-
The application provided tabular formatting of information for better analysis.
-
It is inviting to the eye with a well-designed graphical user interface.