-
Ordered Lists
-
represents an ordered list of items
-
typically rendered as a numbered list.
-
created by <ol>
-
every item inside it created by <li>
<ol> here is an order list<li>first item</li><li>Second item</li><li>Third item</li></ol>
Result:
-
- here is an order list
- first item
- Second item
- Third item
- Unordered Lists
-
represents an unordered list of items
-
typically rendered as
-
created by <ul>
-
every item inside it created by <li>
<ul> here is an unordered list<li>first item</li><li>Second item</li><li>Third item</li></ul>
Result:
-
- here is an unordered list
- first item
- Second item
- Third item
- Definition Lists
-
element represents a description list
-
created by <dl>
-
the list items created by:
-
<dt> contain the term being defined
-
<dd> contain the definition.
   <dl>
 <dt>Definition</dt>
 <dd>Lorem ipsum dolor sit amet, consectetur adipiscing elit. Nunc a pharetra mauris. Curabitur imperdiet dignissim risus eu sodales.</dd>
     </dl>
-
The Result:
- Definition
- Lorem ipsum dolor sit amet, consectetur adipiscing elit. Nunc a pharetra mauris. Curabitur imperdiet dignissim risus eu sodales.
putting a list inside a list
  <ul>
 <li>item</li>
 <li>item
 <ol>
 <li>item1</li>
 <li>item2</li>
</ol>
</li>
<li>Tarts</li>
</ul>
The Result:
- item
- item
- item1
- item2
- item
LISTS
- There are three types of HTML lists: ordered, unordered, and definition.
- Ordered lists use numbers.
- Unordered lists use bullets.
- Definition lists are used to define terminology.
- Lists can be nested inside one another
All HTML elements can be considered as boxes because html treats every element as if it has a box around it.
 <div style="width=20px;height:60px;background-color: tomato">
 <pstyle="width=10px;height:30px;background-color: #333">Lorem ipsum dolor sit amet, consectetur adipiscing elit. Nunc a pharetra mauris. Curabitur </p>
 </div>
The Result:
Lorem ipsum dolor sit amet, consectetur adipiscing elit. Nunc a pharetra mauris. Curabitur
-
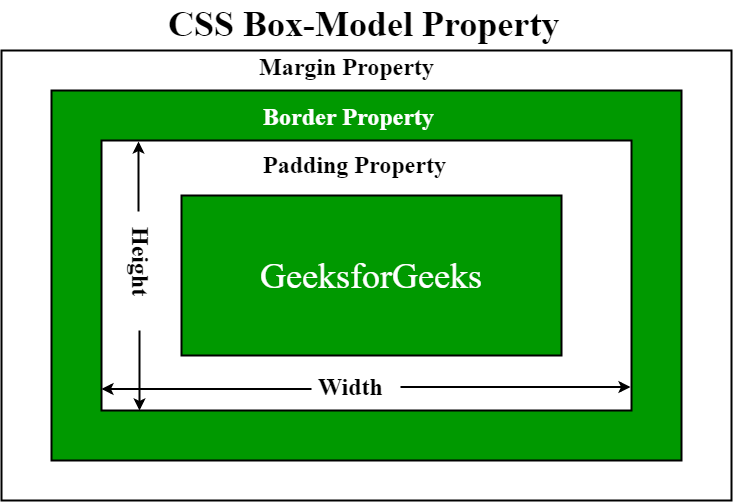
max-width property defines the maximum width of an element
-
min-width property defines the minimum width of an element.
 <img style="min-width: 350px;
 max-width: 550px;" src="https://miro.medium.com/max/733/1*pBPPK_ZIS2KTRCvGVs2Q1g.png" alt="box">
The Result:
-
min-height property defines the minimum height of an element.
-
max-height property defines the maximum height of an element.
 <div  style="min-height:60px;
        max-height: 70px; border:tomato solid 3px;">
 <p>Lorem ipsum dolor sit amet, consectetur adipiscing elit. Nunc apharetra mauris. Curabitur imperdiet dignissim risus eu sodales. Maecenas posuere hendrerit auctor. Duis at vehicula purus, eu imperdiet mauris. Sed ullamcorper semper rutrum. Curabitur tempus viverra ligula ut porttitor. Sed bibendum eros dui, vitae faucibus sapien porttitor sit amet. Vivamus turpis telluum erat. Cras vehicula accumsan mauris, sed dapibus metus efficitur a.Morbi eu risus a nulla mattis tristique eget eu ipsum.</p>
 </div>
Lorem ipsum dolor sit amet, consectetur adipiscing elit. Nunc a pharetra mauris. Curabitur imperdiet dignissim risus eu sodales. Maecenas posuere hendrerit auctor. Duis at vehicula purus, eu imperdiet mauris. Sed ullamcorper semper rutrum. Curabitur tempus viverra ligula ut porttitor. Sed bibendum eros dui, vitae faucibus sapien porttitor sit amet. Vivamu lectus quis, dictum erat. Cras vehicula accumsan mauris, sed dapibus metus efficitur a. Morbi eu risus a nulla mattis tristique eget eu ipsum.
somwthinf
The overflow property tells the browser what to do if the content contained within a box is larger than the box itself
The overflow property tells the browser what to do if the content contained within a box is larger than the box itself
- hidden: hides any extra content > overflow: hidden;
- scroll adds a scrollbar to the box >overflow: scroll;
***hidden: ***
<p style="height:80px; width:60%; overflow: hidden ;border:tomato solid 2px;">Lorem ipsum dolor sit amet, consectetur adipiscing elit. Nunc a pharetra mauris. Curabitur imperdiet dignissim risus eu sodales. Maecenas posuere hendrerit auctor. Duis at vehicula purus, eu imperdiet mauris. Sed ullamcorper semper rutrum. Curabitur tempus viverra ligula ut porttitor. Sed bibendum eros dui, vitae faucibus sapien porttitor sit amet. Vivamu lectus quis, dictum erat. Cras vehicula accumsan mauris, sed dapibus metus efficitur a. Morbi eu risus a nulla mattis tristique eget eu ipsum.</p>
The Result:
Lorem ipsum dolor sit amet, consectetur adipiscing elit. Nunc a pharetra mauris. Curabitur imperdiet dignissim risus eu sodales. Maecenas posuere hendrerit auctor. Duis at vehicula purus, eu imperdiet mauris. Sed ullamcorper semper rutrum. Curabitur tempus viverra ligula ut porttitor. Sed bibendum eros dui, vitae faucibus sapien porttitor sit amet. Vivamu lectus quis, dictum erat. Cras vehicula accumsan mauris, sed dapibus metus efficitur a. Morbi eu risus a nulla mattis tristique eget eu ipsum.
scroll:
<p style="height:80px; width:60%; overflow: scroll;border:tomato solid 2px; ">Lorem ipsum dolor sit amet, consectetur adipiscing elit. Nunc a pharetra mauris. Curabitur imperdiet dignissim risus eu sodales. Maecenas posuere hendrerit auctor. Duis at vehicula purus, eu imperdiet mauris. Sed ullamcorper semper rutrum. Curabitur tempus viverra ligula ut porttitor. Sed bibendum eros dui, vitae faucibus sapien porttitor sit amet. Vivamu lectus quis, dictum erat. Cras vehicula accumsan mauris, sed dapibus metus efficitur a. Morbi eu risus a nulla mattis tristique eget eu ipsum.</p>
The Result:
Lorem ipsum dolor sit amet, consectetur adipiscing elit. Nunc a pharetra mauris. Curabitur imperdiet dignissim risus eu sodales. Maecenas posuere hendrerit auctor. Duis at vehicula purus, eu imperdiet mauris. Sed ullamcorper semper rutrum. Curabitur tempus viverra ligula ut porttitor. Sed bibendum eros dui, vitae faucibus sapien porttitor sit amet. Vivamu lectus quis, dictum erat. Cras vehicula accumsan mauris, sed dapibus metus efficitur a. Morbi eu risus a nulla mattis tristique eget eu ipsum.
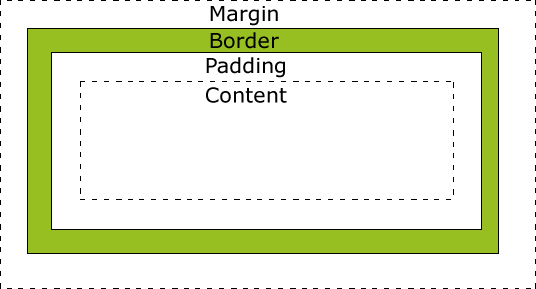
- The border: separates the edge of one box from another.
- Margin: create a gap between the borders of two adjacent boxes.
- Padding: increase the readability of its contents.
<p style=" border:tomato solid ;border-width:1px 4px 12px 4px;">Sed bibendum eros dui, vitae faucibus sapien porttitor sit amet. Vivamu lectus quis, dictum erat. Cras vehicula accumsan mauris, sed dapibus metus efficitur a. Morbi eu risus a nulla mattis tristique eget eu ipsum.</p>
The Result:
Sed bibendum eros dui, vitae faucibus sapien porttitor sit amet. Vivamu lectus quis, dictum erat. Cras vehicula accumsan mauris, sed dapibus metus efficitur a. Morbi eu risus a nulla mattis tristique eget eu ipsum.
You can control the style of a border using the border-style

<p style=" border:tomato ;border-width:1px 4px 12px 4px;border-left-style: solid;border-right-style: dotted;border-top-style: dashed;border-bottom-style: double;">Sed bibendum eros dui, vitae faucibus sapien porttitor sit amet. Vivamu lectus quis, dictum erat. Cras vehicula accumsan mauris, sed dapibus metus efficitur a. Morbi eurisus a nulla mattis tristique eget eu ipsum.</p>
The Result:
Sed bibendum eros dui, vitae faucibus sapien porttitor sit amet. Vivamu lectus quis, dictum erat. Cras vehicula accumsan mauris, sed dapibus metus efficitur a. Morbi eurisus a nulla mattis tristique eget eu ipsum.
<p style=" border:solid;border-width: 4px;border-top-color:black;
border-right-color:white;
border-bottom-color:green;
border-left-color:red;">Sed bibendum eros dui, vitae faucibus sapien porttitor sit amet. Vivamu lectus quis, dictum erat. Cras vehicula accumsan mauris, sed dapibus metus efficitur a. Morbi eurisus a nulla mattis tristique eget eu ipsum.</p>
The Result:
Sed bibendum eros dui, vitae faucibus sapien porttitor sit amet. Vivamu lectus quis, dictum erat. Cras vehicula accumsan mauris, sed dapibus metus efficitur a. Morbi eurisus a nulla mattis tristique eget eu ipsum.
<p style=" border:red solid 4px;">Sed bibendum eros dui, vitae faucibus sapien porttitor sit amet. Vivamu lectus quis, dictum erat. Cras vehicula accumsan mauris, sed dapibus metus efficitur a. Morbi eurisus a nulla mattis tristique eget eu ipsum.</p>
The Result:
Sed bibendum eros dui, vitae faucibus sapien porttitor sit amet. Vivamu lectus quis, dictum erat. Cras vehicula accumsan mauris, sed dapibus metus efficitur a. Morbi eurisus a nulla mattis tristique eget eu ipsum.
by making the left and right margin auto
Here is a box in the center
using Display keyword
-
inline :
 <ul>
     <li style="display:inline">this is </li>
     <li style="display:inline">an inline </li>
      <li style="display:inline">list </li>
</ul>
The Result:
- this is
- an inline
- list
-
block :
<big style="display:block" >this </big><big style="display:block">paragraph </big><big style="display:block"> is block</big>
The Result:
this paragraph is block
-
none:
    <div style="border:tomato solid 2px;">
    <p style="display:none">this paragraph will not
     show </p>
    </div>
The Result:
this paragraph will not show
using visibility:
  <div style="border:tomato solid 2px">
  <p style="visibility: hidden;">this paragraph is here with the width and height but will not
             show </p>
            </div>
The Result:
this paragraph is here with the width and height but will not show
This property requires three pieces of information:
- The URL of the image
- Where to slice the image
- What to do with the straight edges
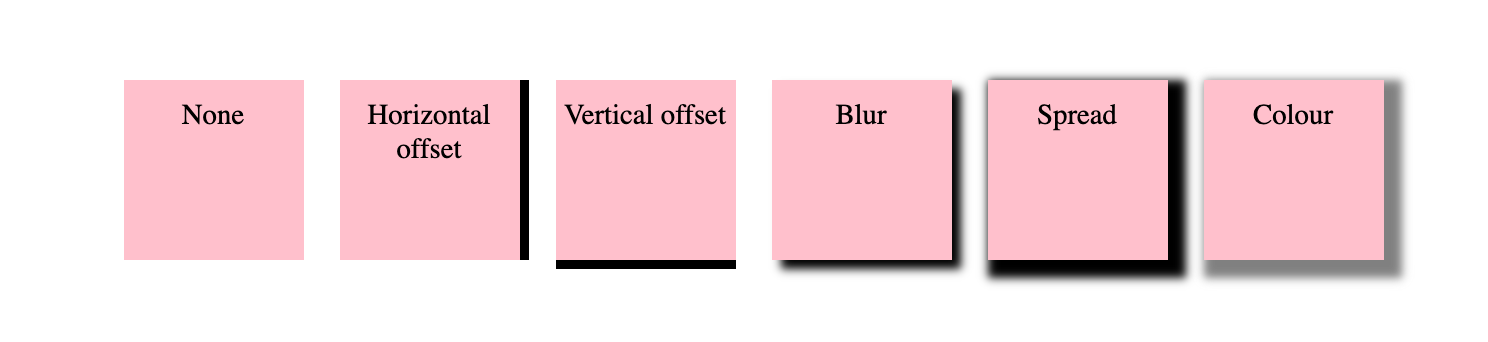
box-shadow: attaches one or more shadows to an element.
    <p style=" border: 1px solid;
    padding: 10px;
    box-shadow: 5px 10px #333;">Sed bibendum eros dui, vitae faucibus sapien  porttitor sit amet. Vivamu lectus quis, dictum erat.Cras vehicula accumsan mauris, sed dapibus metus efficitur a.</p>
Sed bibendum eros dui, vitae faucibus sapien porttitor sit amet. Vivamu lectus quis, dictum erat. Cras vehicula accumsan mauris, sed dapibus metus efficitur a.
using border-radius:
<button style="background-color:lightgreen;border-radius:7px;"> my border are rounded</button>
The Result:
my border are rounded
 <button style="background-color:lightgreen;border-top-left-radius:
 80px 50px;border-bottom-right-radius:40px 30px "> my border are rounded with Elliptical Shapes </button>
my border are rounded with Elliptical Shapes
BOXES
- CSS treats each HTML element as if it has its own box.
- You can use CSS to control the dimensions of a box.
- You can also control the borders, margin and padding for each box with CSS.
- It is possible to hide elements using the display and visibility properties.
- Block-level boxes can be made into inline boxes, and inline boxes made into block-level boxes.
- Legibility can be improved by controlling the width of boxes containing text and the leading.
- CSS3 has introduced the ability to create image borders and rounded borders.
An array is a special type of variable. It doesn't just store one value; it stores a list of values. you can use it on a list or a set of values that are related to each other.
var Array-Name = [value1,value2...valueN]
The array literal is preferred over the array constructor when creating arrays.var Array-Name = new Array(value1 , value2,valueN);
Values in an array are accessed as if they are in a numbered list. It is important to know that the numbering of this list starts at zero (not one).
Switch statements function somewhat similarly to the if statement. It gives a more descriptive way to compare a value with multiple variants.A switch statement starts with a variable called the switch value. Each case indicates a possible value for this variable and the code that should run if the variable matches that value.

JavaScript use weakly type which means if you use a data type JavaScript did not expect, it tries to make sense of the operation rather than report an error. Furthermore a strongly typed language requires an explicit conversion (by using the cast operator) between related types, when there is possibility of data loss, while a weakly typed one would carry out the conversion regardless.
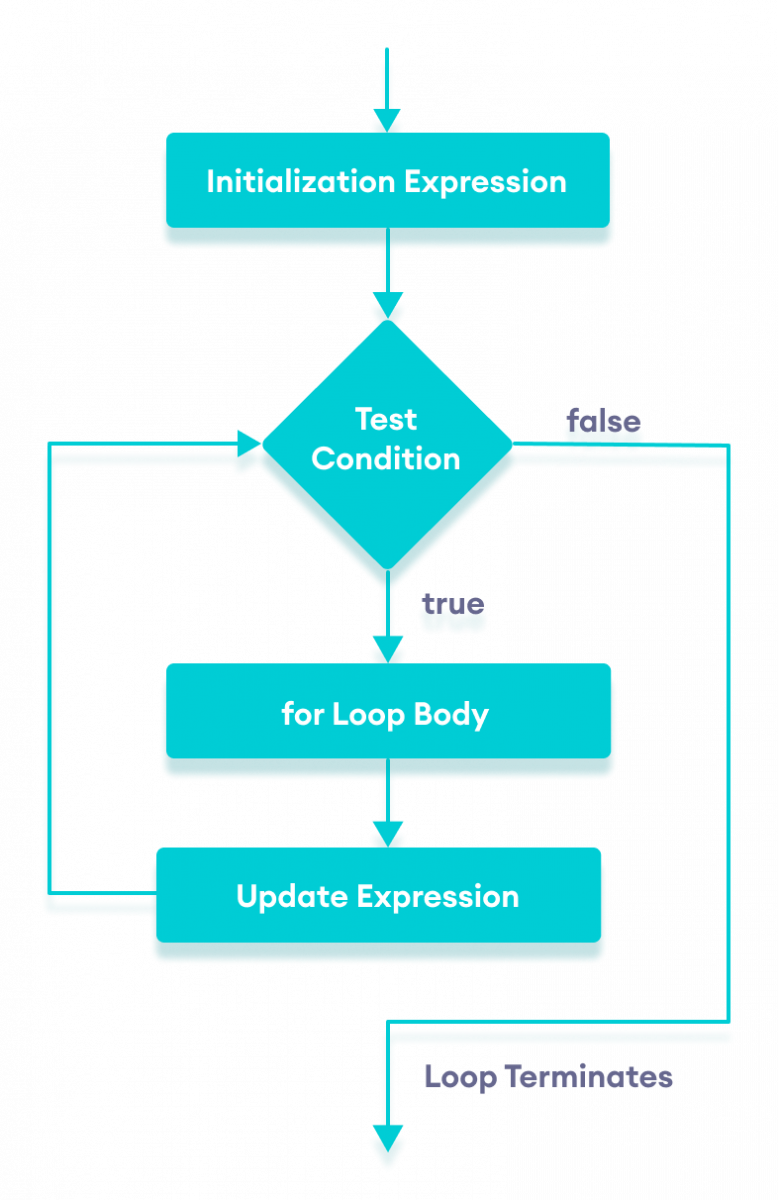
loop is a programming structure that repeats a sequence of instructions until a specific condition is met. Loops check a condition. If it returns true, a code block will run. Then the condition will be checked again and if it still returns true, the code block will run again. It repeats until the condition returns false.
in below a flowchart of loop:
There are three common types of loops:
-
For Loop: If you need to run code a specific number of times, use a . is the most common loop.) In a for loop, the condition is usually a counter which is used to tell how many times the loop should run.
-
While Loop: If you do not know how many times the code should run, you can use a while loop. Here the condition can be something other than a counter, and the code will continue to loop for as long as the condition is true.
-
do...while: loop is very similar to the while loop, but has one key difference: it will always run the statements inside the curly braces at least once, even if the condition evaluates to false.
