If you have a dunamic IP from your ISP then setting up automatic DNS update might be smart to save yourself the time and hassle of doing it manually for every domain connected to the same ip.
install ddclient Github
sudo apt install ddclient
Then procede with the config for me I had to chose my DNS provider as Cloudflare, write the email assosiated with my account, the global API key (can be found at your profile) and then give it all of the domains (complete form eg. sub.main.com) separated by comma. After you have cleared the settup all should be good and turned on.
Test if it is working
sudo ddclient -daemon=0 -debug -verbose -noquiet
if not try adding at the top of your configfile found at /etc/ddclient.conf
zone=yourmaindomain.com
Portainer is an open-source management platform designed to simplify the deployment and management of containerized applications and infrastructure. It provides an intuitive web-based interface that allows users to easily interact with and manage Docker containers, Kubernetes clusters, and other container orchestration tools. Portainer enables both beginners and experienced developers to streamline the containerization process and monitor their applications with ease.

After installing docker and docker-compose create a volume
sudo docker volume create portainer_data
and then create the container.
sudo docker run -d -p 8000:8000 -p 9000:9000 --name=portainer --restart=always --network=general -v /var/run/docker.sock:/var/run/docker.sock -v portainer_data:/data portainer/portainer-ce:latest
Chosing to utilize the legacy http port 9000 for conviniance reasons, as the https connection will not matter as any exposure to the web will be done with Cloudflare Tunnel.
To access the Portainer gui go to http://serverIP:9000. There you will be asked to make an admin account. And thats it, you are good to go!
Nginx Proxy Manager is a web-based application designed to simplify the process of managing reverse proxy configurations using the Nginx web server. It provides a user-friendly interface for users to create, modify, and manage proxy rules that enable routing incoming web traffic to various backend services, such as web applications or APIs. Nginx Proxy Manager streamlines the typically complex configuration tasks associated with setting up reverse proxies, making it accessible to users with varying levels of technical expertise. Through its intuitive dashboard, users can easily create custom domain configurations, set up SSL certificates, manage routing rules, and monitor traffic flow, all without directly dealing with intricate Nginx configuration files. This tool is particularly useful for individuals or organizations aiming to efficiently and securely expose multiple web services using a single public IP address.

Utilizing the proposed docker-compose file with some minor additions provided by the official documentation through the Portainer Stacks deployment feature:
version: '3.8'
services:
  app:
    image: 'jc21/nginx-proxy-manager:latest'
    restart: always
    network_mode: host
    container_name: npmapp
    ports:
      - '80:80'
      - '81:81'
      - '443:443'
    volumes:
      - ./data:/data
      - ./letsencrypt:/etc/letsencrypt
Then in Portainer:


Then click the "Deploy the stack" at the bottom of the page and you are done.
You should now be able to access the managment page at yourServerIP:81/ where you need to log in with the default username and password:
Email:    admin@example.com
Password: changeme

You will then be asked to change the default user and create a new password. Now the settup process is complete.
Dashy: The Ultimate Homepage for Your Homelab is a versatile and customizable web-based dashboard designed to centralize and display various information and tools in one convenient location. It's specifically tailored for home laboratory setups, allowing users to aggregate and visualize data such as system statistics, network status, weather forecasts, calendar events, and more. Dashy empowers users to personalize their homepage with widgets and modules of their choice, creating a unique and efficient hub for managing and monitoring their homelab environment. Whether you're a tech enthusiast, hobbyist, or professional, Dashy offers a sleek and user-friendly solution to enhance your homelab experience. For more info see dashy.to.
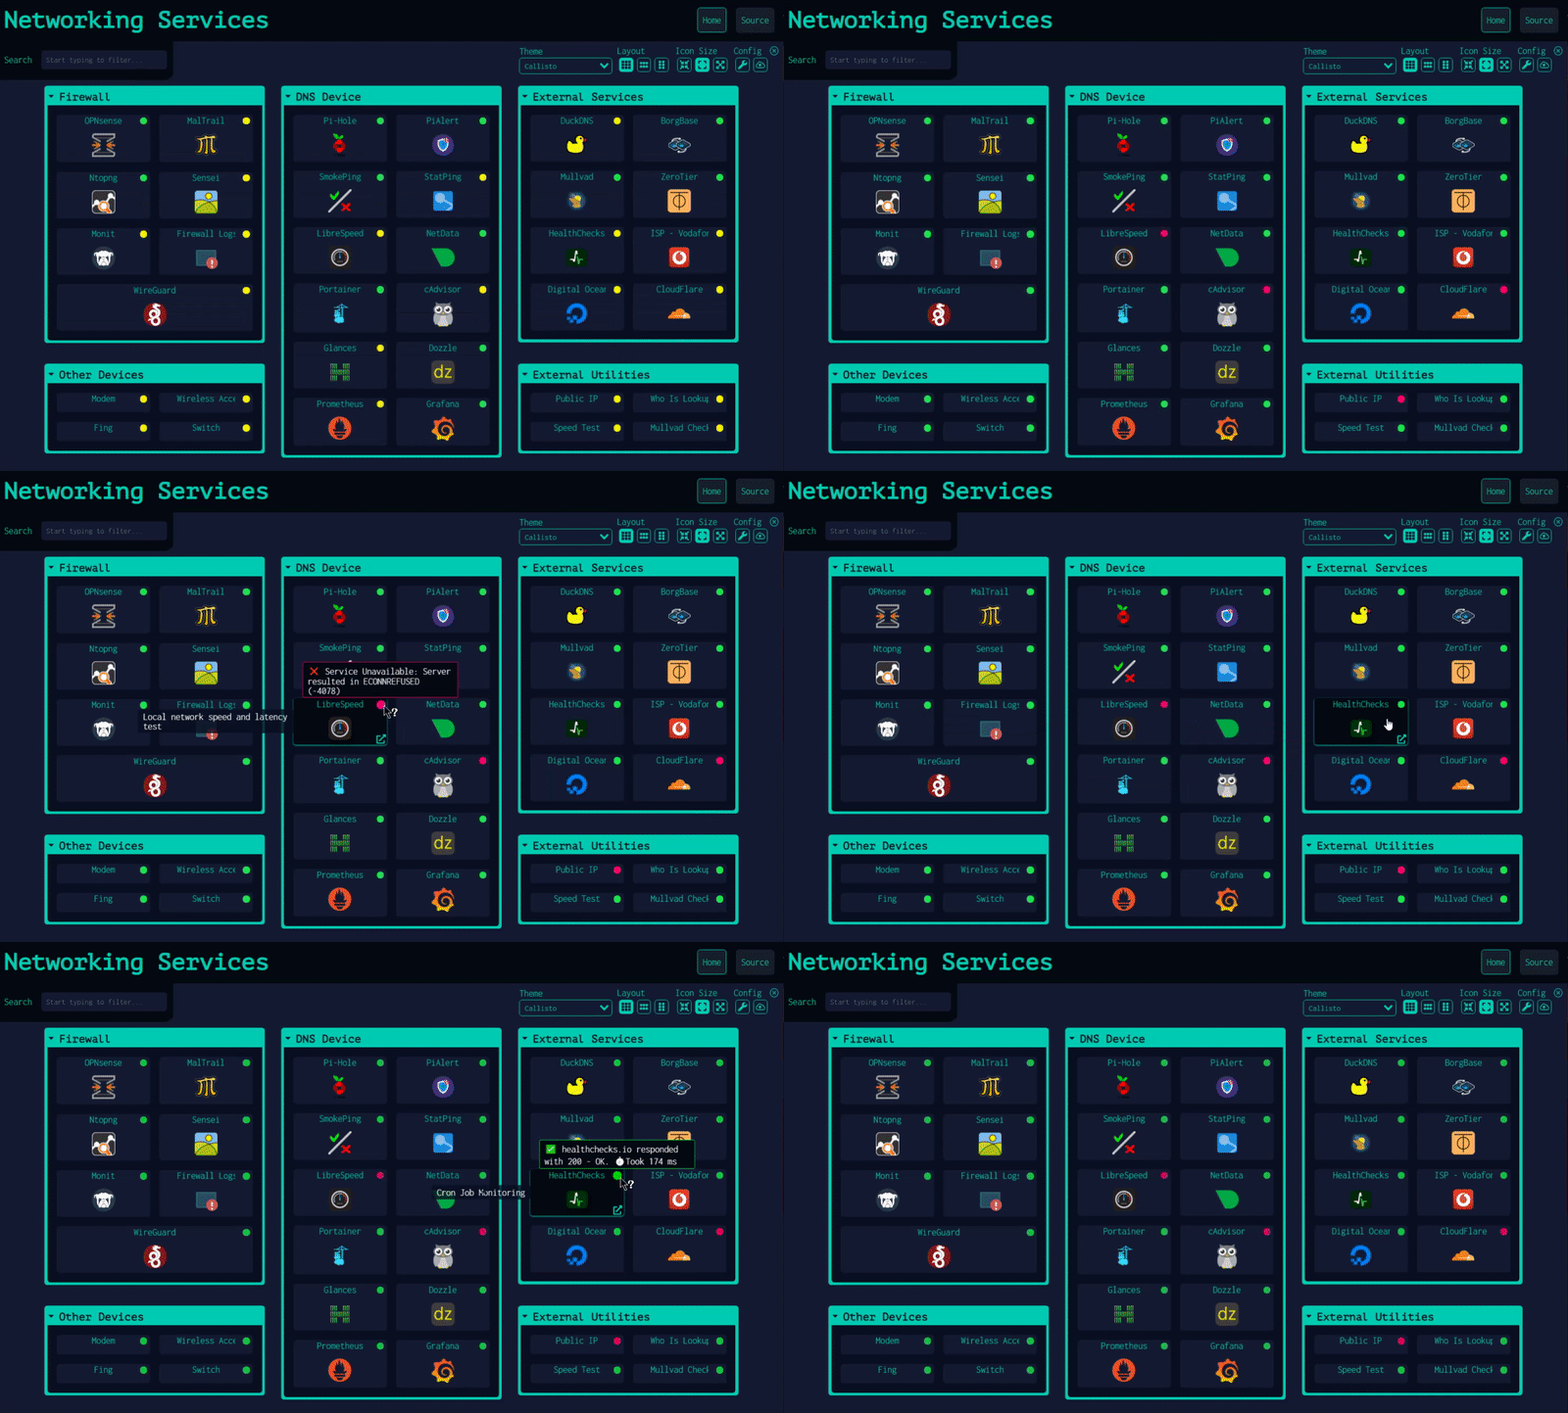
Deploy it through Portainer just like in the Nginx Proxy Manager install. Make sure to have a .yml file at the set location before deploying.
---
version: "3.8"
services:
  dashy:
    image: lissy93/dashy
    container_name: dashy
    # Pass in your config file below, by specifying the path on your host machine
    volumes:
      - /media/Dashy/conf.yml:/app/public/conf.yml
      - /media/Dashy/item-icons:/app/public/item-icons/
    ports:
      - 4000:80
    # Set any environmental variables
    environment:
      - NODE_ENV=production
    restart: always
To configure dashy you can use the interactive demo tool (or to get a .ylm file to start with). Or configure your instance directly in your dashy instance (web editor).
Final result:

Install docker
curl -fsSL https://get.docker.com -o get-docker.sh
sh get-docker.sh
Install docker-compose
sudo apt-get update
sudo apt-get install docker-compose-plugin
With many voulnerabilities running loose at all times its good to patch them as soon as possible.
Source: here
First verify that the software is intalled, if not install it first.
which unattended-upgrades
Then activate the feature:
sudo dpkg-reconfigure -plow unattended-upgrades
Take a look through the config file located at:
sudo nano /etc/apt/apt.conf.d/50unattended-upgrades
and make sure “${distro_id}:${distro_codename}-security”; is present and not commented out. By default the config is preatty good but if you want to go more in dept such as enabling auto reboot or delete unused dependencies.
Cloudflare Tunnel, formerly known as "Argo Tunnel," is a service provided by Cloudflare that securely connects your infrastructure to the Cloudflare network. It allows you to route traffic from your servers, data centers, or private networks through Cloudflare's global network of data centers. This offers several benefits, including enhanced security, performance optimization, and simplified network management.
After seting up your Cloudflare account and domain you can go your home page and chose "Zero Trust" from the side menu. Next under the "Access" dropdown chose "Tunnels" and chose you plan (free).

Then you should be ready to add a new tunnel. Proceede to name your tunnel and choose your prefered method of installation, I chose the docker install.

Then though the docker CLI we innitiate our connector on the same network as the services you want to expose (replacing the placeholder with your token).
sudo docker run -d --restart=always --name=tunnel --network=general cloudflare/cloudflared:latest tunnel --no-autoupdate run --token [superSecretToken]
If all was sucessfull you should see

In the tunnel configuration page chose the "Public hostanames" tab there you need to click on "Add a public hostname" button. Then fill in your details in this example I am going to expose my portainer instance, using docker network name recognition I can simply type in the container name in the url field. Lastly click "Save" and you should be all good.

Grafana is a data visualization tool, in this case we are interested in using it for system resource monitoring. Together with the metrics gathering/collecting tool Prometheus and certain exporters makes for a great combo.

make sure to place the promethius config file in the spesified directory before running the container or else you will need to restart it.
# prometheus.yml
global:
  scrape_interval:     15s # By default, scrape targets every 15 seconds.

  # Attach these labels to any time series or alerts when communicating with
  # external systems (federation, remote storage, Alertmanager).
  # external_labels:
  #  monitor: 'codelab-monitor'

# A scrape configuration containing exactly one endpoint to scrape:
# Here it's Prometheus itself.
scrape_configs:
  # The job name is added as a label `job=<job_name>` to any timeseries scraped from this config.
  - job_name: 'prometheus'
    # Override the global default and scrape targets from this job every 5 seconds.
    scrape_interval: 5s
    static_configs:
      - targets: ['localhost:9090']

  # Example job for node_exporter
  - job_name: 'node_exporter'
    static_configs:
      - targets: ['node_exporter:9100']

  # Example job for cadvisor
  - job_name: 'cadvisor'
    static_configs:
      - targets: ['cadvisor:8080']
Then in portainer deploy the following stack:
---
version: '3'

volumes:
  grafana-data:
    driver: local
  prometheus-data:
    driver: local

services:
  prometheus:
    image: prom/prometheus:latest
    container_name: prometheus
    ports:
      - 9090:9090
    volumes:
      - /media/prometheus/config:/etc/prometheus
      - prometheus-data:/prometheus
    command:
      - '--config.file=/etc/prometheus/prometheus.yml'
    restart: always

  grafana:
    image: grafana/grafana-oss:latest
    container_name: grafana
    ports:
      - 3001:3000
    volumes:
      - grafana-data:/var/lib/grafana
    restart: always

  node_exporter:
    image: quay.io/prometheus/node-exporter:latest
    container_name: node_exporter
    command:
      - '--path.rootfs=/host'
    pid: host
    restart: always
    volumes:
      - /:/host:ro,rslave

  cadvisor:
    image: gcr.io/cadvisor/cadvisor:latest
    container_name: cadvisor

    volumes:
      - /:/rootfs:ro
      - /var/run:/var/run:ro
      - /sys:/sys:ro
      - /var/lib/docker/:/var/lib/docker:ro
      - /dev/disk/:/dev/disk:ro
    devices:
      - /dev/kmsg
    privileged: true
    restart: always
After loging in to grafana interface at yourServerIP:3001/ with username and password "admin", custimize your user details with new password and name and all.
Now to add some panels to display data I used some premade ones by the community, to import them to the "Dashboards" tab in the hamburger menu, then click the "New" button, then chose "Import", last enter in the ID of the panel you want to import and click "Load" at the bottom. I will be using the Cadvisor exporter with ID 14282 and Node Exporter Full with ID 1860. Now you just need to expose your grafana instance with your trusty reverse proxy and you are good to go!

ntfy (pronounced notify) is a simple HTTP-based pub-sub notification service. It allows you to send notifications to your phone or desktop via scripts from any computer, and/or using a REST API. It's infinitely flexible, and 100% free software. See https://ntfy.sh/ for more info.
Deploy with stack feature in Portainer with the following compose:
version: "2.3"

services:
  ntfy:
    image: binwiederhier/ntfy
    container_name: ntfy
    command:
      - serve
    environment:
      - TZ=CEST    # optional: set desired timezone
    volumes:
      - /media/ntfy/cache:/var/cache/ntfy
      - /media/ntfy/settings:/etc/ntfy
    ports:
      - 8082:80
    restart: always
Create a server.yml in your settings directory with the following content and restart the container (for more options see server.yml:
# Default stuff
base-url: "http://ntfy.eduardp.com"
cache-file: "/var/cache/ntfy/cache.db"
attachment-cache-dir: "/var/cache/ntfy/attachments"

# Tell ntfy to use "X-Forwarded-For" to identify visitors
behind-proxy: true

# AUTHANTICATION
auth-file: "/etc/ntfy/user.db"
auth-default-access: "deny-all"
You may to create user.db file manually as it will cause a crash if its missing and the server tries to start.
Then to add a new user access the container via the sh terminal and create a new user like so
ntfy user add --role=admin [yourUsername]
Now just expose your ntfy server to the web and its ready to use!
Nextcloud is an open-source, self-hosted cloud collaboration platform that enables individuals and organizations to store, share, and manage files, documents, calendars, contacts, and more. It offers features similar to popular cloud services, such as file synchronization, data access from various devices, secure sharing with others, and collaborative tools like document editing and real-time collaboration. Nextcloud prioritizes data privacy and security, allowing users to maintain control over their data by hosting the platform on their own servers or choosing trusted providers. This provides a flexible and customizable solution for those seeking an alternative to commercial cloud storage services while maintaining control over their digital assets.

I will be primarilly using this for cloud storage for me and my family, but some of the other features are also nice to have.
I will be installing the Nextcloud All-in-One docker image utilizing Portainer which i have set up previously. Following the official documentation I am going to be using a premade docker compose script they have made for Portainer with some minor difrances like removing commented out extras. Pasting this docker-compose script just like in the Nginx Proxy Manager install. Deploying it with Cloudflare Tunnel comes with some major downsides according to the docs, so I will deploy it with Nginx Proxy Manager instead.
volumes:
  nextcloud_aio_mastercontainer:
    name: nextcloud_aio_mastercontainer # This line is not allowed to be changed as otherwise the built-in backup solution will not work
networks:
  general:
    external: true
services:
  nextcloud-aio-mastercontainer:
    image: nextcloud/all-in-one:latest
    networks:
      - general
    restart: always
    container_name: nextcloud-aio-mastercontainer # This line is not allowed to be changed as otherwise AIO will not work correctly
    volumes:
      - nextcloud_aio_mastercontainer:/mnt/docker-aio-config # This line is not allowed to be changed as otherwise the built-in backup solution will not work
      - /var/run/docker.sock:/var/run/docker.sock:ro # May be changed on macOS, Windows or docker rootless. See the applicable documentation. If adjusting, don't forget to also set 'WATCHTOWER_DOCKER_SOCKET_PATH'!
    ports:
      - 8080:8080
    environment: # Is needed when using any of the options below
      - APACHE_PORT=11000 # Is needed when running behind a web server or reverse proxy (like Apache, Nginx, Cloudflare Tunnel and else). See https://github.com/nextcloud/all-in-one/blob/main/reverse-proxy.md
      - APACHE_IP_BINDING=127.0.0.1 # Should be set when running behind a web server or reverse proxy (like Apache, Nginx, Cloudflare Tunnel and else) that is running on the same host. See https://github.com/nextcloud/all-in-one/blob/main/reverse-proxy.md
      - NEXTCLOUD_DATADIR=/media/nextcloud # Allows to set the host directory for Nextcloud's datadir. ⚠️⚠️⚠️ Warning: do not set or adjust this value after the initial Nextcloud installation is done! See https://github.com/nextcloud/all-in-one#how-to-change-the-default-location-of-nextclouds-datadir
      - NEXTCLOUD_MOUNT=/media/ # Allows the Nextcloud container to access the chosen directory on the host. See https://github.com/nextcloud/all-in-one#how-to-allow-the-nextcloud-container-to-access-directories-on-the-host
Now before proceding with the setup you need to add the host to the reverse proxy as the settup will need acces to the internet to do a domain check. In the managment page for Nginx Proxy Manager at yourServerIP:81/ add a new proxy host:


client_body_buffer_size 512k;
proxy_read_timeout 86400s;
client_max_body_size 0;
And now asuming your proxy is set up correctly and the proper ports on your router are open everything should be ready to continue setup.
Take note of your Nextcloud AIO master password this will be used to access the root settings if you forgot your password or accidentally closed the page without noting (page only shows up first time visiting) alternativelly do this:
sudo cat /var/lib/docker/volumes/nextcloud_aio_mastercontainer/_data/data/configuration.json | grep password
Then proceede with the settup. Enter your domain after adding a new A-record to your domain for your nextcloud instance, as the AIO settup requires it.

Then select the apps/extentions you wish to use (i unchecked Nextcloud Talk) and select yor timezone. Last click on the "Download and start containers" button and after a little while you can open your nextcloud interface. Log in with the initial username and password given in the AIO interface. DONE!

Jellyfin is an open-source media system that allows users to organize, manage, and stream their personal media collection across various devices. It serves as a comprehensive solution for cataloging and playing back movies, TV shows, music, and photos. Jellyfin supports a wide range of media formats and offers features such as user authentication, transcoding, subtitle support, and remote access. Users can set up their own media server using Jellyfin, enabling them to access their content from anywhere with an internet connection. Unlike many commercial media platforms, Jellyfin is free to use and can be customized and extended by the community, making it a popular choice for those seeking a self-hosted media streaming solution.

This install uses the image from linuxserver see this for further documentation. This is the slightly modified docker-compose file I used (deployed though Portainer just like in the Nginx Proxy Manager install.
---
version: "2.1"
services:
  jellyfin:
    image: lscr.io/linuxserver/jellyfin:latest
    container_name: jellyfin
    environment:
      - TZ=Europe/Oslo
    volumes:
      - /media/jellyfin:/config
      - /media/nextcloud/bordduk69/files/Music:/data/music #path to my music mapped to /data/music in container
    ports:
      - 8096:8096 # http
      - 8920:8920 # https
    restart: always
After deployment is done go to yourServerIP:8096/ and procede with setup. You will need to create a user, select your media and will get the opportunity to change other settings.
Now you should add a new host to your reverse proxy to expose this to the web (if you wish). Using Ngnix Proxy Manager:


Lastly remember to add the subdomain in your domain manager.
For propper displaying of your media follow the guidelines
Pi-hole is a network-level ad blocker that filters out unwanted ads and tracking by intercepting DNS requests, improving online privacy and network performance.
Deploy via Portainer as always.
version: "3"

# More info at https://github.com/pi-hole/docker-pi-hole/ and https://docs.pi-hole.net/
services:
  pihole:
    container_name: pihole
    image: pihole/pihole:latest
    ports:
      - "5353:53"
      - "8081:80"
    environment:
      TZ: 'Europe/Oslo'
      # WEBPASSWORD: 'set a secure password here or it will be random'
    # Volumes store your data between container upgrades
    volumes:
      - '/media/pihole:/etc/pihole'
      - '/media/pihole/dnsmasq.d:/etc/dnsmasq.d'
    restart: always
Currently if anything happens to my server at home (like a power outage or internet problems) i have no possible way of knowing without reaping the consequences, as everything runs on the same machine. If i want to notify myself of any problems i would have to counteract that limitation.
By setting up another "smaller" server offsite like in the cloud (which has exelent uptimes) i could host all i need to keep tabs on my main server at low cost. With the github education pack you get 200$ in free credits for a year on digitalocean, or 100$ on azure. Where digitalocian looked by far more affordable in my research, so i will give that a try.
For my needs i will be going with the 12$ a month config which has 1 CPU core, 2GB of RAM and 50GB of SSD storage, with the free credits i can run this config for a full year at no cost. Chosig a hosting location near you is recomended therefore i went with their servers in Frankfurt. Added my ssh key for accessing the vm and gave it a name.
After creating the vm you can access it with ssh root@serverip.
What i will be deploying:
- Cloudflare Tunnel for exposing to the internet
- ntfy for notifications
- Uptime Kuma for monitoring of uptime
First time settup:
apt update
apt upgrade -y
ufw enable
ufw allow 22
reboot now
Then install docker:
curl -fsSL https://get.docker.com -o get-docker.sh
sh get-docker.sh
apt-get update
apt-get install docker-compose-plugin
Run the containers with docker compose up -d from same dir as the following docker-compose.yml:
version: "2"

services:
  ntfy:
    image: binwiederhier/ntfy
    container_name: ntfy
    command:
      - serve
    environment:
      - TZ=CEST    # optional: set desired timezone
    volumes:
      - /var/cache/ntfy:/var/cache/ntfy
      - /etc/ntfy:/etc/ntfy
    restart: always

  uptime-kuma:
    image: louislam/uptime-kuma:1
    container_name: uptime-kuma
    volumes:
      - /etc/uptime-kuma:/app/data
    restart: always

  tunnel:
    container_name: cloudflared-tunnel
    image: cloudflare/cloudflared:latest
    restart: always
    command: tunnel run
    environment:
      - TUNNEL_TOKEN=yourToken
With all containers running follow their respective additional settups. Then expose services through the cloudflare interface.